User Guide
![]()
- Introduction
- About
- Quick Start
- Layout
- Features
- Adding and Removing Entries
- Manipulation of data
- Presentation and Organisation of data
- Advanced
Introduction
Are you a tuition center manager who finds it tedious to deal with a large amount of data? myStudent is the perfect software to help improve your work experience!
myStudent is an easy-to-use, portable and aesthetically-pleasing desktop application for managing students of a tuition center, optimized for use via a Command Line Interface
(CLI) while still having the benefits of a Graphical User Interface (GUI).
With an intuitive User Interface(UI) design and easy-to-understand commands, myStudent is the perfect software for you. Wasting time searching on Google how a command work and racking your brain to create complicated formulas in your Excel sheet is now a thing of the past. You can become more productive today!
About
This user guide provides a detailed documentation of how to install and use myStudent. It provides explanations of how to use and what it does for all the features available in myStudent. If you don’t have any technical knowledge, don’t worry as it is not needed to be able to use this guide.
![]() Notes about some keywords in this user guide:
Notes about some keywords in this user guide:
-
Entry: an entry is a student, a tutor or a class.
-
Displayed list: it refers to the current list that is displayed. There are three possible list: the student list, the tutor list and the class list. Only one them will be displayed at one time, and this list is referred to as the displayed list.
-
Format appears in each command section. It refers to the format of the inputs that you need to type into the command box to execute the commands. (E.g.,
Format: delete <index>means that you need to type indeletefollowed by anindexto execute the command.) -
Prefixes are characters (case-sensitive) followed by a slash and are usually prepended to a field.
(E.g.,n/orp/.) -
Fields are information to be supplied by you for the application to execute.
(E.g.,nameorphone)
![]() Notes about the command format in this user guide:
Notes about the command format in this user guide:
-
< >- indicates that the enclosing field is mandatory.
(E.g.,add n/<name>, where<name>is a mandatory field “name” and a valid input could beadd n/John Doe.) -
[ ]- indicates that the enclosing elements (prefixes and/or fields) are optional.
(E.g.,n/<name> [#/<tag>], where valid inputs could beadd n/John Doeorn/John Doe #/male.) -
You can input fields of prefixes in any order.
(E.g.,nok <index> n/<name> p/<phone>, where valid inputs could benok 2 n/John Doe p/91234567ornok 2 n/John Doe p/91234567. However,nok n/John Doe p/91234567 2, where the<index>is at the end of the input, is not valid.) -
Extra inputs that you enter for commands that do not take in any fields will be ignored.
(E.g., theclearcommand does not have any other fields, thus typingclear asdfghjklinto the command box will have the same result as if you had enteredclearinstead.)
Below is a quick guide on how to get started.
Quick Start
-
Ensure you have Java 11 or above installed in your Computer.
-
Download the latest
myStudent.jarfrom here. -
Copy the file to the folder you want to use as the home folder for the application.
 Home Folder
The home folder refers to the particular folder that will be containing themyStudent.jarfile and its relevant files. Since myStudent will need to load and save files, it is recommended that you to putmyStudent.jarin a new folder to ensure a smooth experience when using it. -
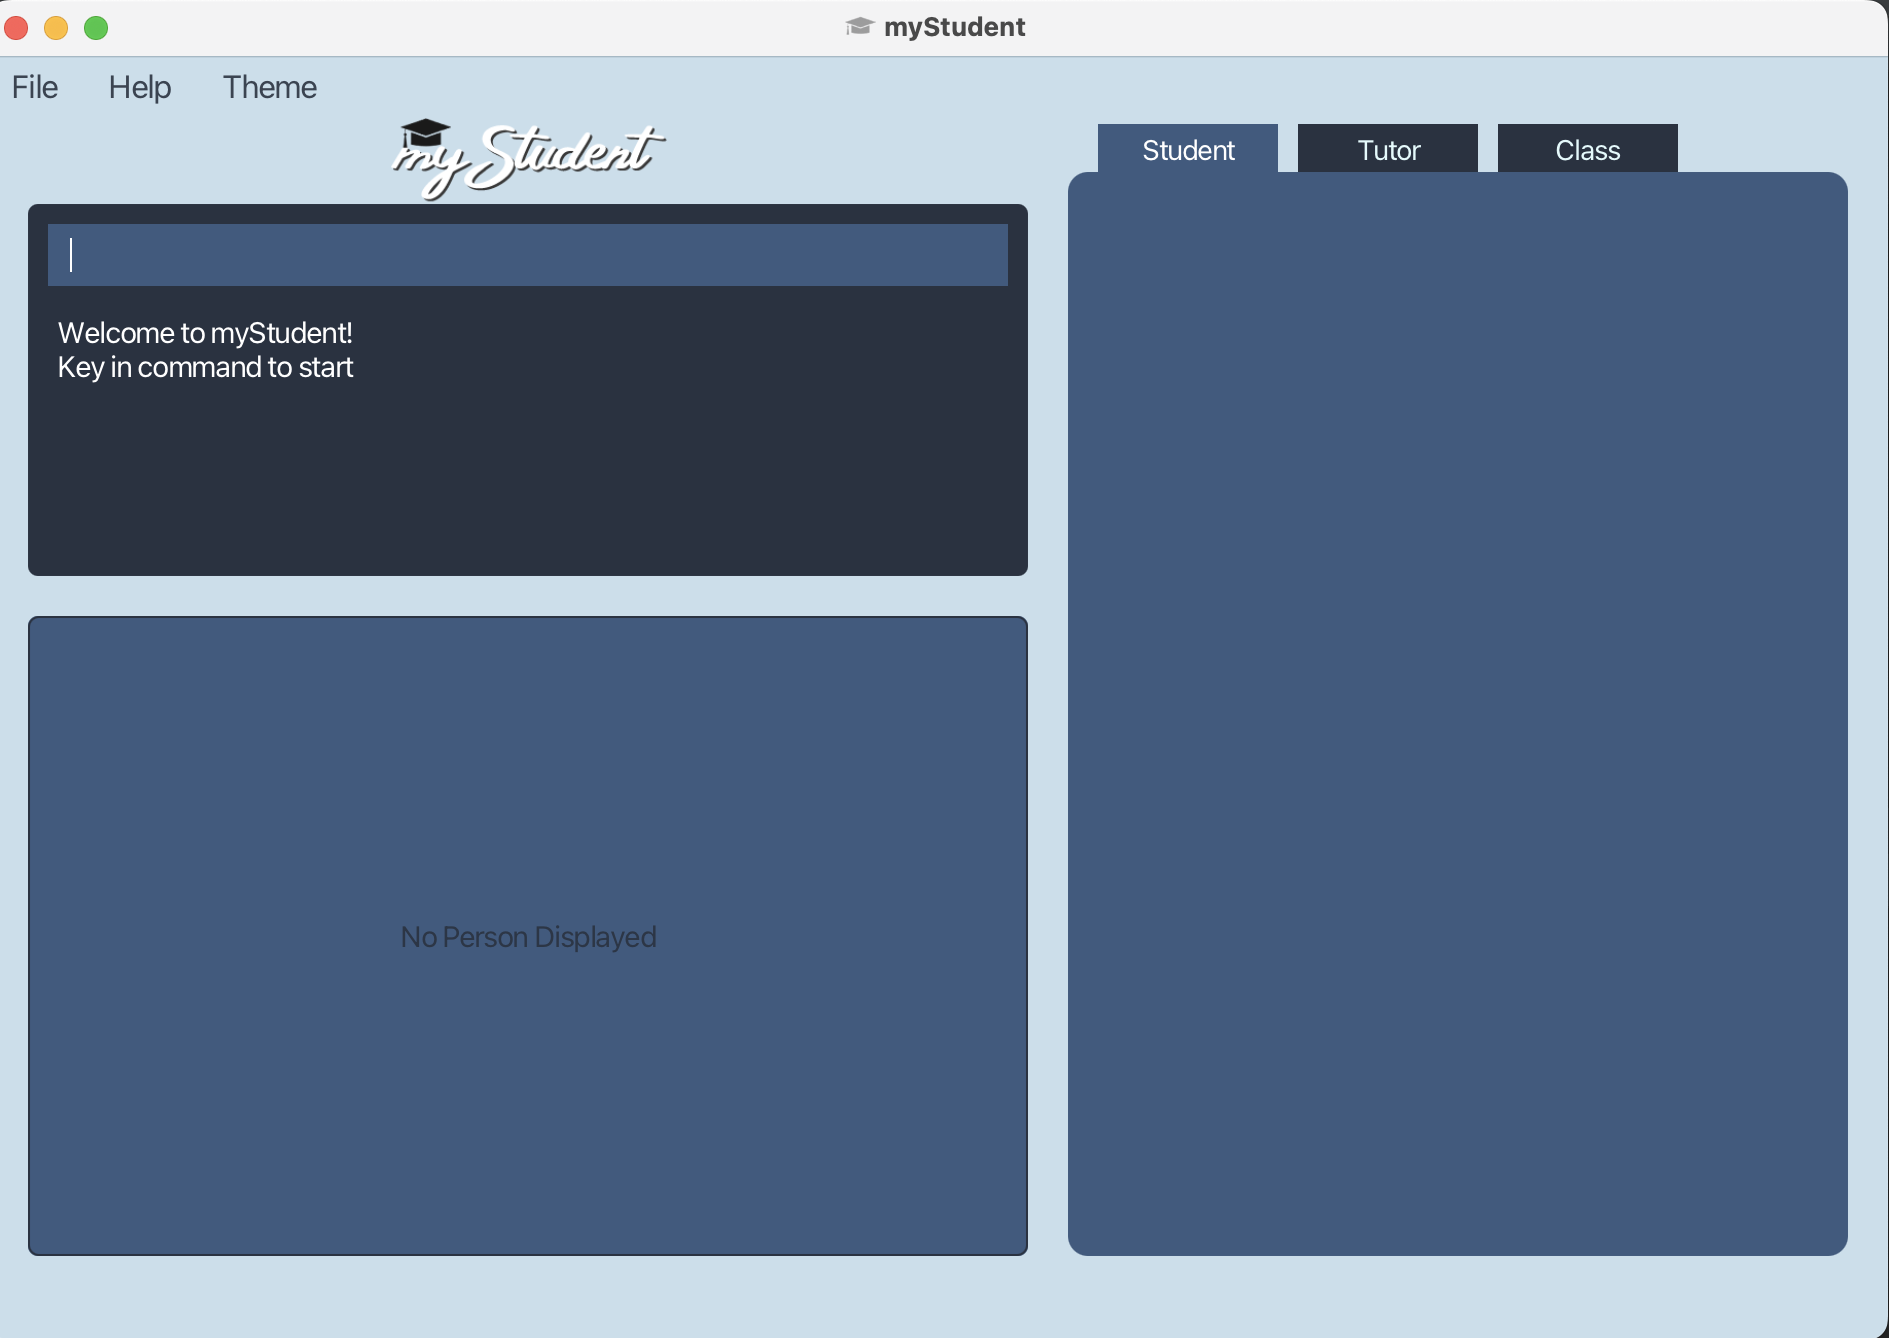
Double-click the file to start the app. The GUI similar to the one below should appear in a few seconds.
![]() Configuring the app
Configuring the app
You can change the default configurations of the app in the preference.json file, which is located in the home folder.
A preference.json file will be created when you first run the application, if it doesn’t exist initially. You can then edit the file to customize myStudent to your needs.
What you can change:
-
The size of the window such as its height and width (in pixels).
-
At which part of the screen the app will be displayed.
-
The default theme.
-
Where your data will be loaded from and stored into.
| Settings | Default Value |
|---|---|
| Window Width | 670px |
| Window Height | 950px |
| Window Coordinates | null |
| Theme | Light Theme |
| Student Address Book Location | data\\studentaddressbook.json |
| Tutor Address Book Location | data\\tutoraddressbook.json |
| Tuition Class Address Book Location | data\\tuitionclassaddressbook.json |
![]() Alert
Alert
All your data will be saved as .json files in their respective location as specified above.
The default location of the files will be in a folder named data in your home folder.
Do NOT modify these files directly as it may cause irreparable damage to your data, cause the application to not work as intended, or both.
If you need to modify the details of your entries, please do so within the myStudent application. Your data will be saved automatically.
Some applicable commands that helps to modify your data are: assign, unassign and edit.
Layout
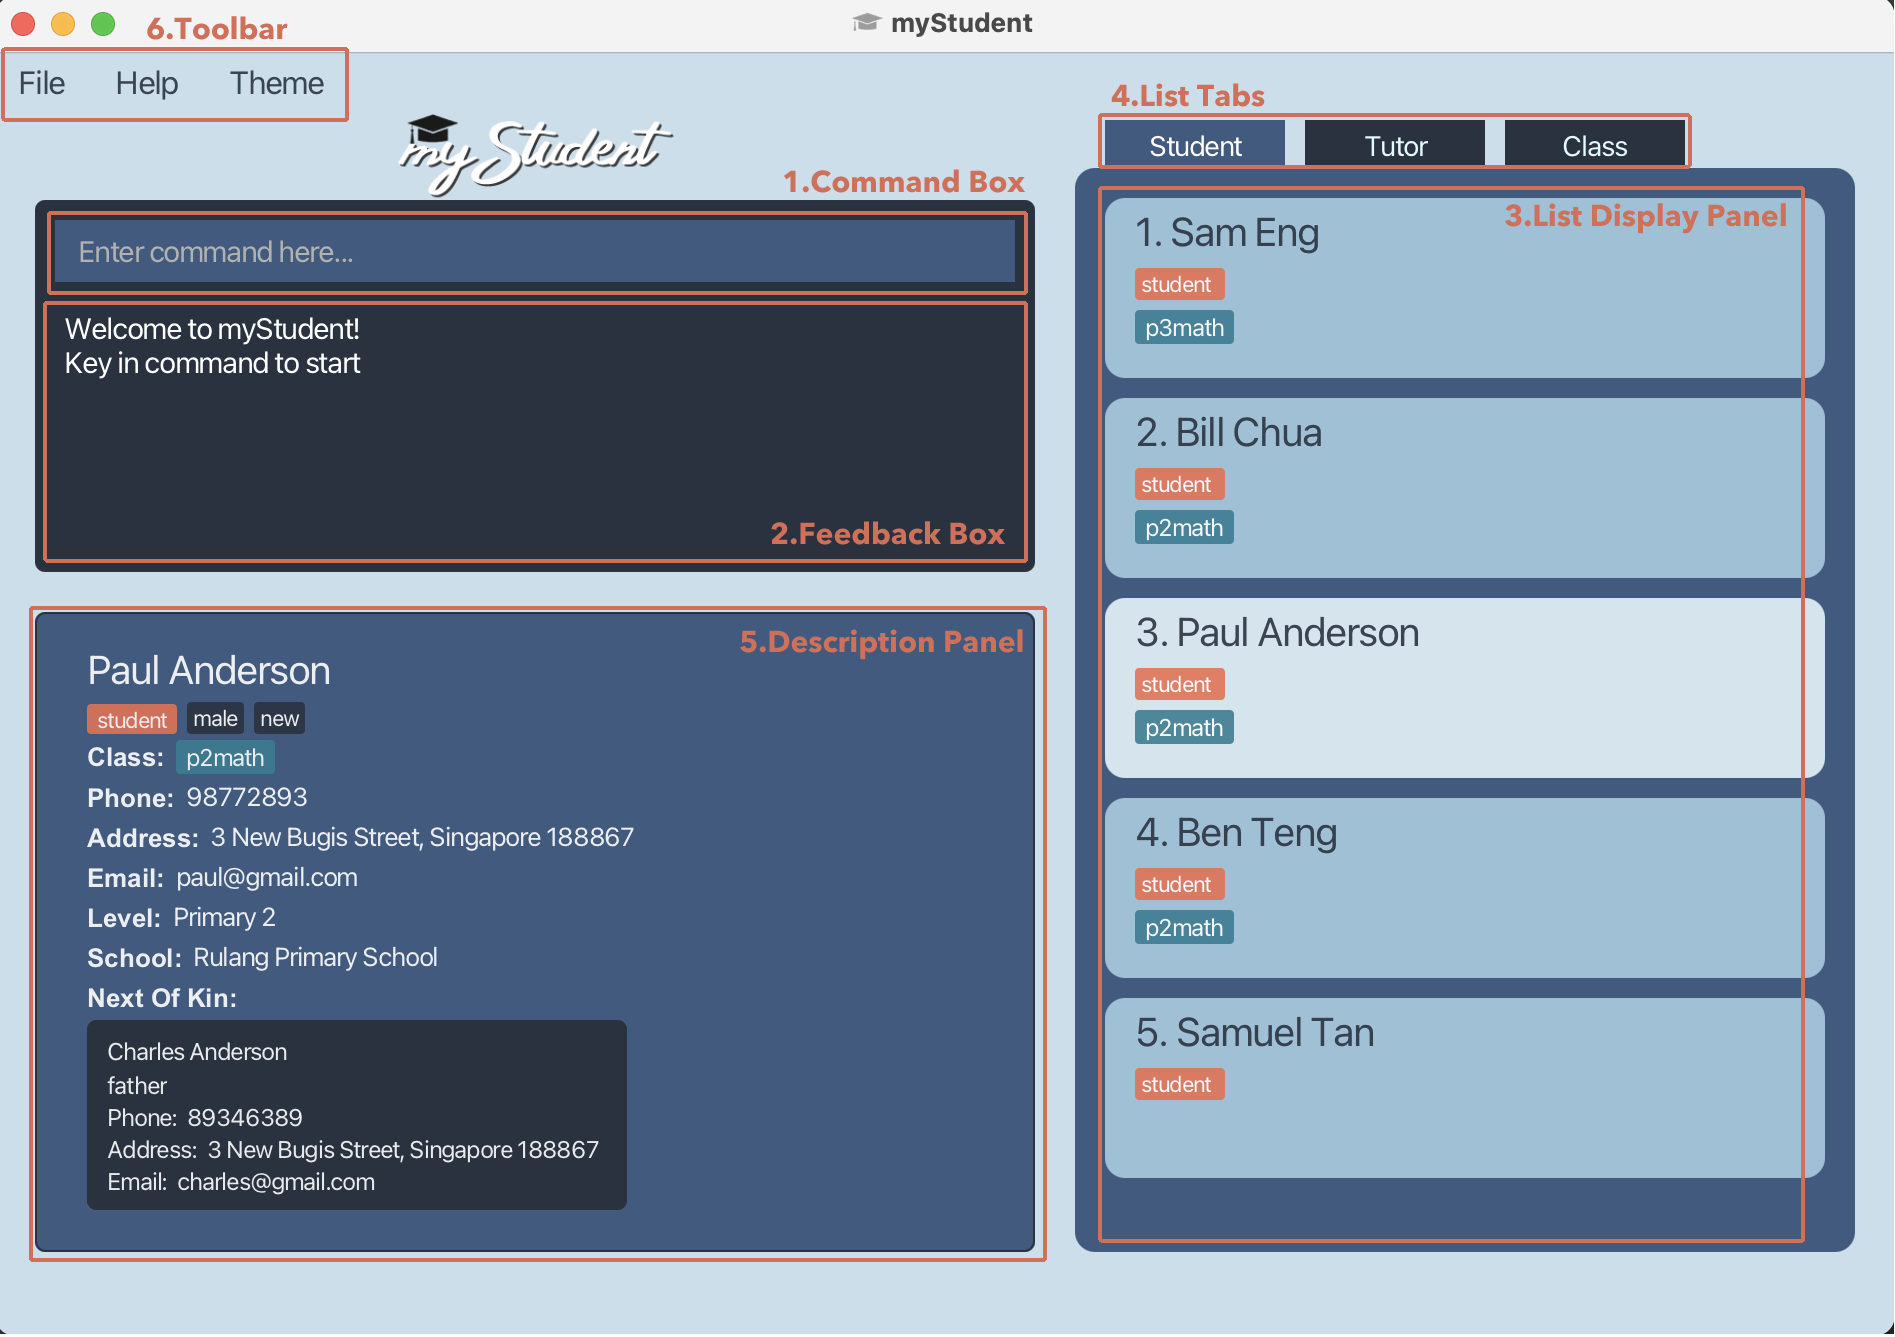
1. Command Box
This is where you key in commands. After typing the commands, simply press enter on your keyboard to execute them.
2. Feedback Box
This is the area under the command box. It is where the feedback information is displayed after you execute a command. For example, if you had entered an invalid command, the feedback “Unknown command” would be shown in the box.

3. List Display Panel
This is where the displayed list of entries is shown. Only one of the three entries, student, tutor, or class will be shown at one time.
In the student list and tutor list, clicking on the individual student or tutor cards to show their description in the description panel.
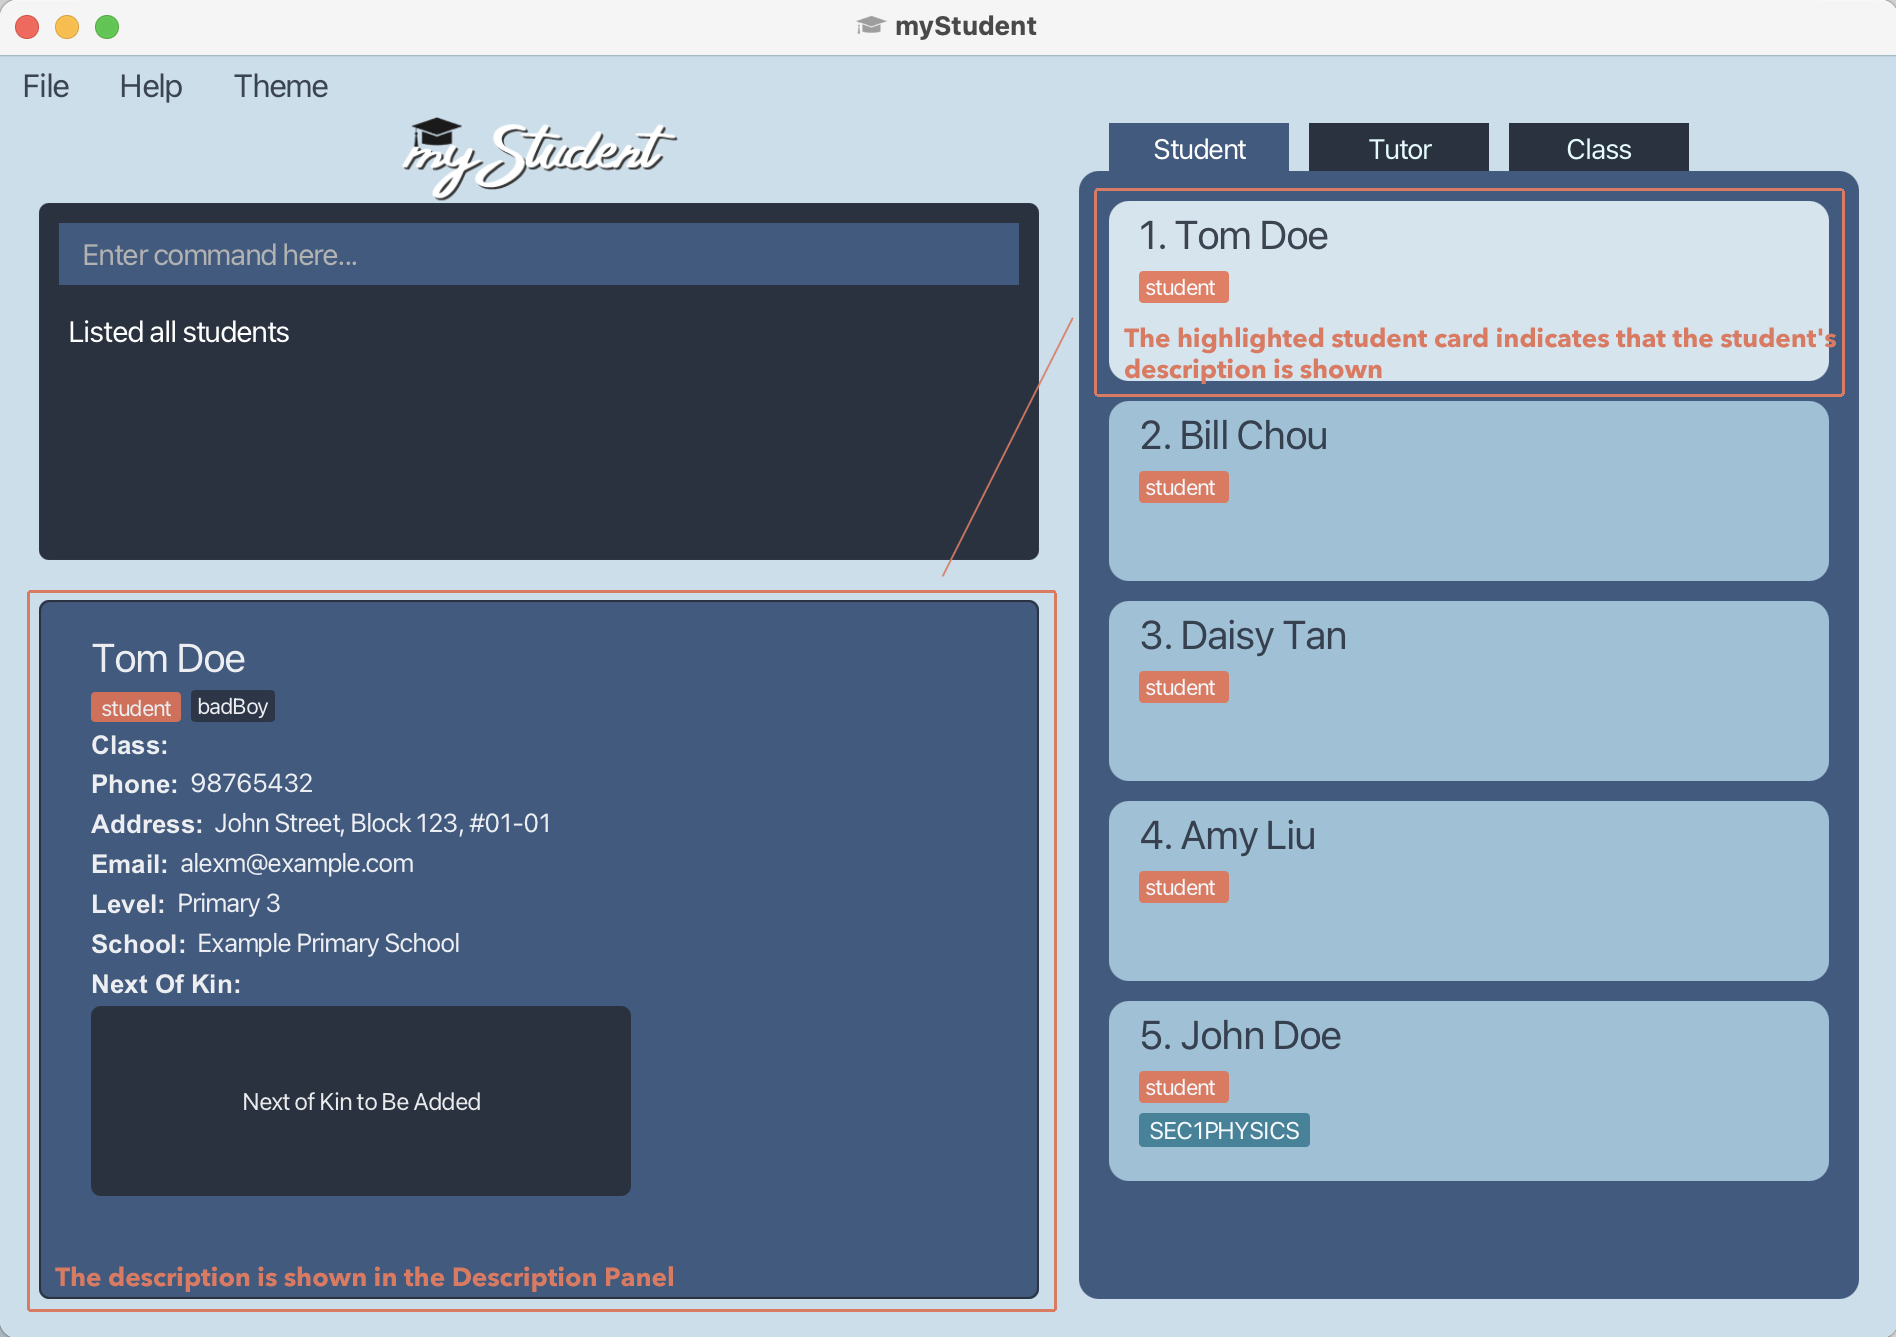
Note that the card for the person being displayed will be highlighted as well.
4. List Tabs
There are three tabs: Student, Tutor and Class.
The highlighted tab indicates which list is currently being displayed.
5. Description Panel
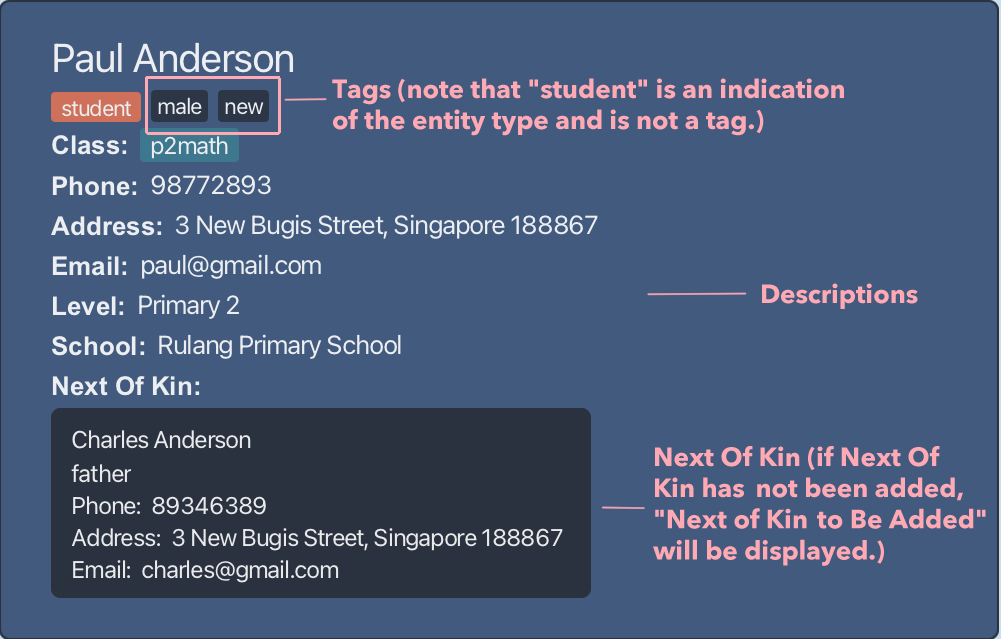
This is an example of a student entry being displayed in the description panel. When there is no person being displayed, the line “No Person Displayed” would be shown.
6. Toolbar

File
The File menu contains Export and Exit.
-
Exportallows you to export your data into a.csvfile.
For more information regardingExport, you can click here. -
Exitallows you to exit the software.
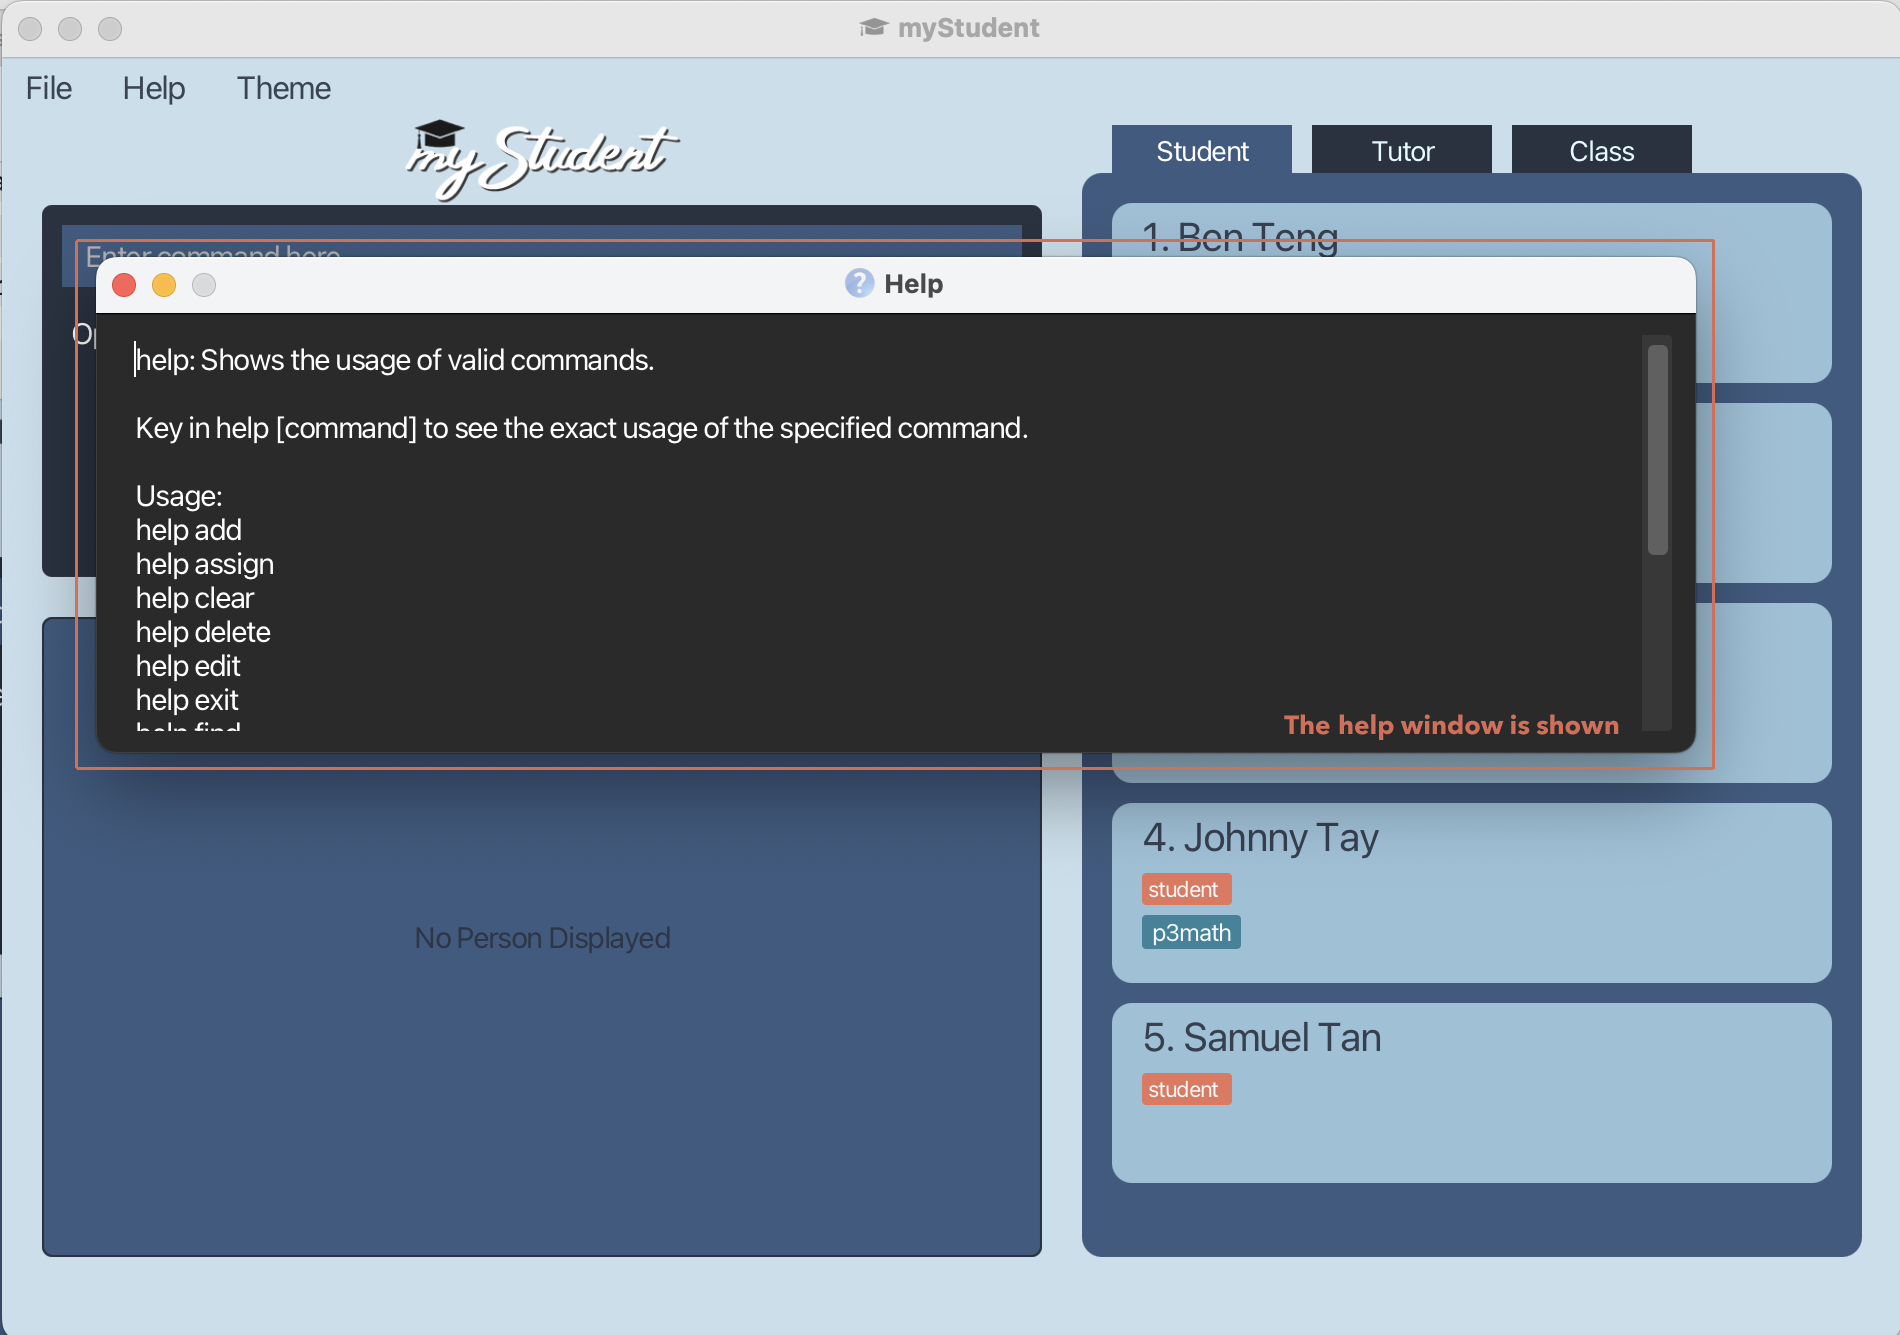
Help
Help allows you to view the help information regarding our software.
Theme
Theme allows you to change the color scheme of the software, such as what commands you can use.
There are four themes provided: Light Theme, Dark Theme, Green Theme and Pink Theme.
Features
Viewing help: help
Shows help information that will be useful to you.
Formats:
To view general command information, enter help
To view specific command information, enter help [<command>]
-
To view all the commands, type
helpand press Enter. -
To view information regarding a specific command, type
helpfollowed by said command and press Enter.
Examples:
-
help add -
help edit -
help
Exiting the software: exit
Plays a neat animation before exiting myStudent.
Format: exit
Adding and Removing Entries
Adding a person: add
Adds a person to the myStudent database.
Formats:
To add a student,
add student n/<name> p/<phone> e/<email> a/<address> s/<school> l/<level> [#/<tag>]…
To add a tutor,
add tutor n/<name> p/<phone> e/<email> a/<address> q/<qualification> i/<institution> [#/<tag>]…
-
All fields of a person being added must be present, except for the optional
<tag>field. -
If a specific field is repeated, the last occurrence in the input is taken. The
<tag>field is an exception as multiple tags are allowed. -
Generally,
-
<name>field should only contain alphanumeric characters and spaces, and should not be left blank. -
<phone>field should only contain numbers, and it should be between 7 and 15 digits long. -
<email>field should be of the format of a correct email address such as “johndoe@gmail.com”. -
<address>field can take any values but should not be left blank. -
<tag>fields should only contain alphanumeric characters. No spaces are allowed.
-
-
For students,
-
<school>field should only contain alphanumeric characters and spaces, and should not be left blank. -
<level>field should be one of the valid academic levels. The valid academic levels are:- Primary 1 to 6
- Secondary 1 to 4
(Abbreviations are also allowed, e.g., “P1” or “Sec 3”.)
-
-
For tutors,
-
<qualification>field should only contain alphanumeric characters, commas and spaces, and should not be left blank. -
<institution>field should only contain alphanumeric characters and spaces, and should not be left blank.
-
Examples:
-
add tutor n/Betsy Crowe p/1234567 e/betsycrowe@example.com a/Newgate st, block 123, #01-01 q/MSc, Master of Science i/National University of Singapore #/mostLiked -
add student n/John Doe p/98765432 e/johndoe@example.com a/John street, block 123, #01-01 s/Example Primary School l/Primary 3 #/badBoy
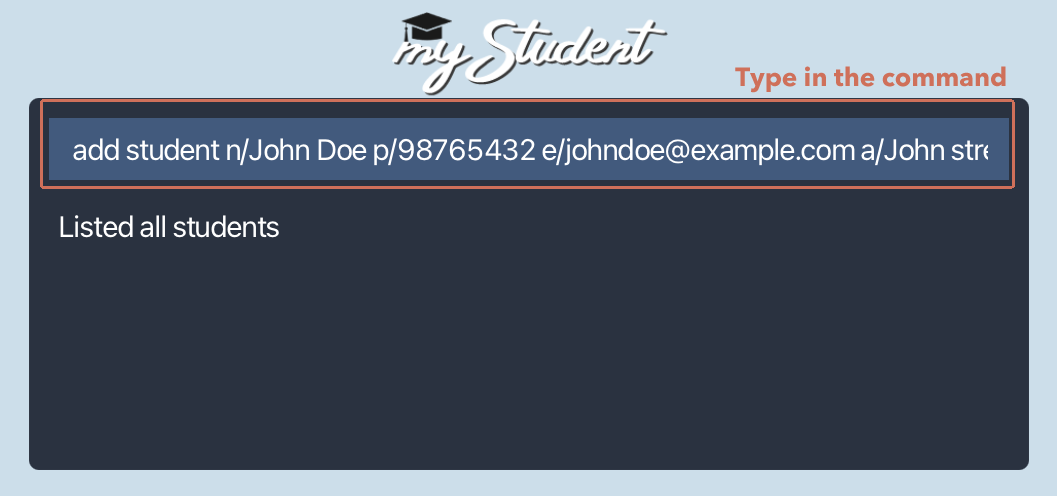
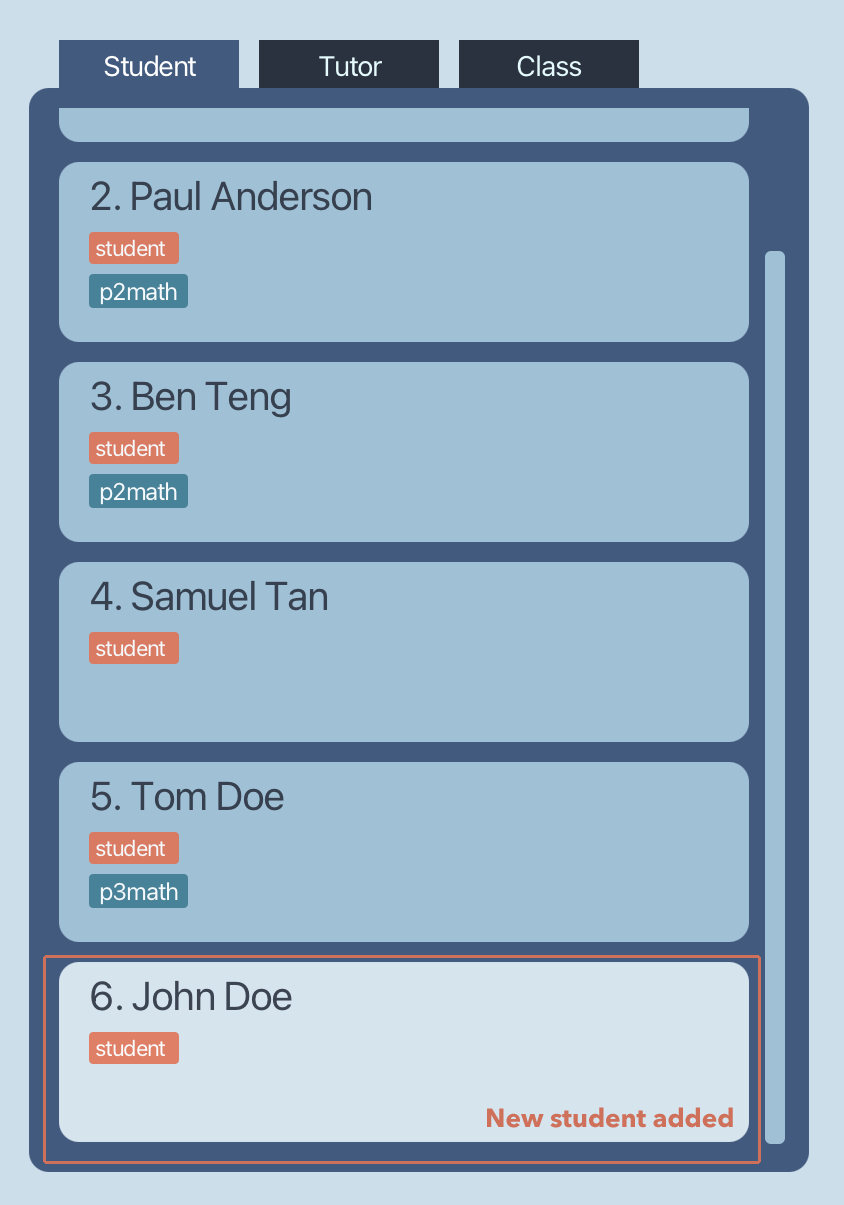 The new student has been added into the database.
Adding a class: add
Adds a class to the myStudent database.
Format: add class n/<name> s/<subject> l/<level> d/<day> t/<time> [#/<tag>]…
-
All fields must be present, except for the optional
<tag>field. -
If a specific field is repeated, the last occurrence of the field is taken. The
<tag>field is an exception, where multiple tags are allowed. -
Generally,
-
<name>field should only contain alphanumeric characters and spaces, and should not be left blank. Also, there should not be an existing class with the same name. -
<subject>field should only contain alphabetical characters, and should be one of the valid subjects. The valid subjects are:- English
- Mathematics
- Physics
- Chemistry
- Biology
- Elementary Mathematics
- Additional Mathematics
(Abbreviations are also allowed, e.g., “Eng” or “Amath”.)
-
<level>field should be one of the valid academic levels. The valid academic levels are:- Primary 1 to 6
- Secondary 1 to 4
(Abbreviations are also allowed, e.g., “P1” or “Sec 3”.)
-
<day>field should be a valid day of the week. (Abbreviations are also allowed, e.g., “Mon” or “Thurs”.) -
<time>field should be separated by a dash, a space or “to”, and adhere to the following constraints:- Timings must be in either 12-hour or 24-hour formats. When using the 12-hour format, AM/PM must be specified while minutes can be omitted. For both, the colon and initial zero may be omitted.
- Start and end timings specified must respect chronology. The end time cannot occur before the start time.
Note that all timings are considered to be on the same day (including midnight, i.e., 12am or 00:00, if specified as the end time, symbolises the end of the same day).
Some valid examples are:
- 12pm - 3pm
- 1:00pm 2:00pm
- 2200 to 2400
- 23:00 - 00:00
-
<tag>fields should only contain alphanumeric characters. No spaces are allowed.
-
Examples:
-
add class n/S1ENGT10 s/Math l/Secondary 1 d/Thursday t/10am to 12pm -
add class n/P2MATHF12 s/Math l/Primary 2 d/Friday t/12:00 - 14:00
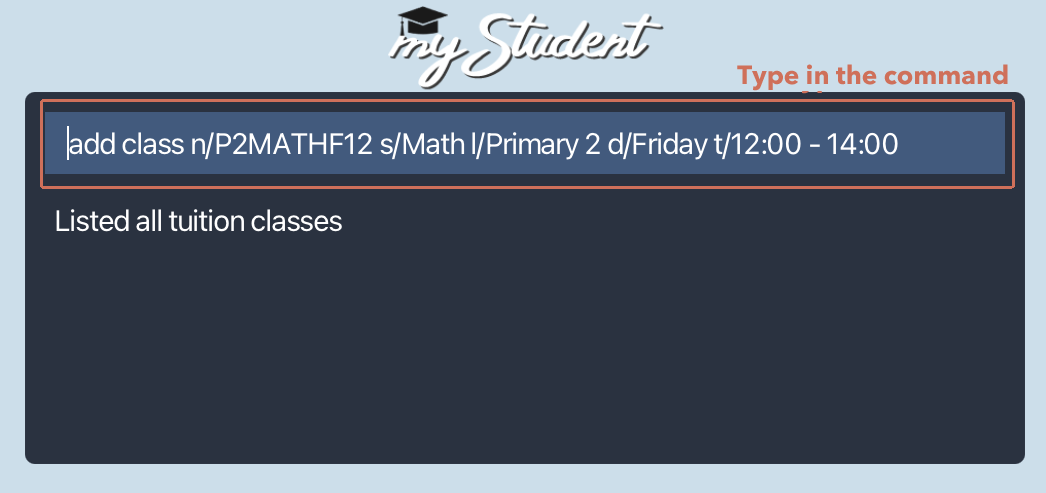
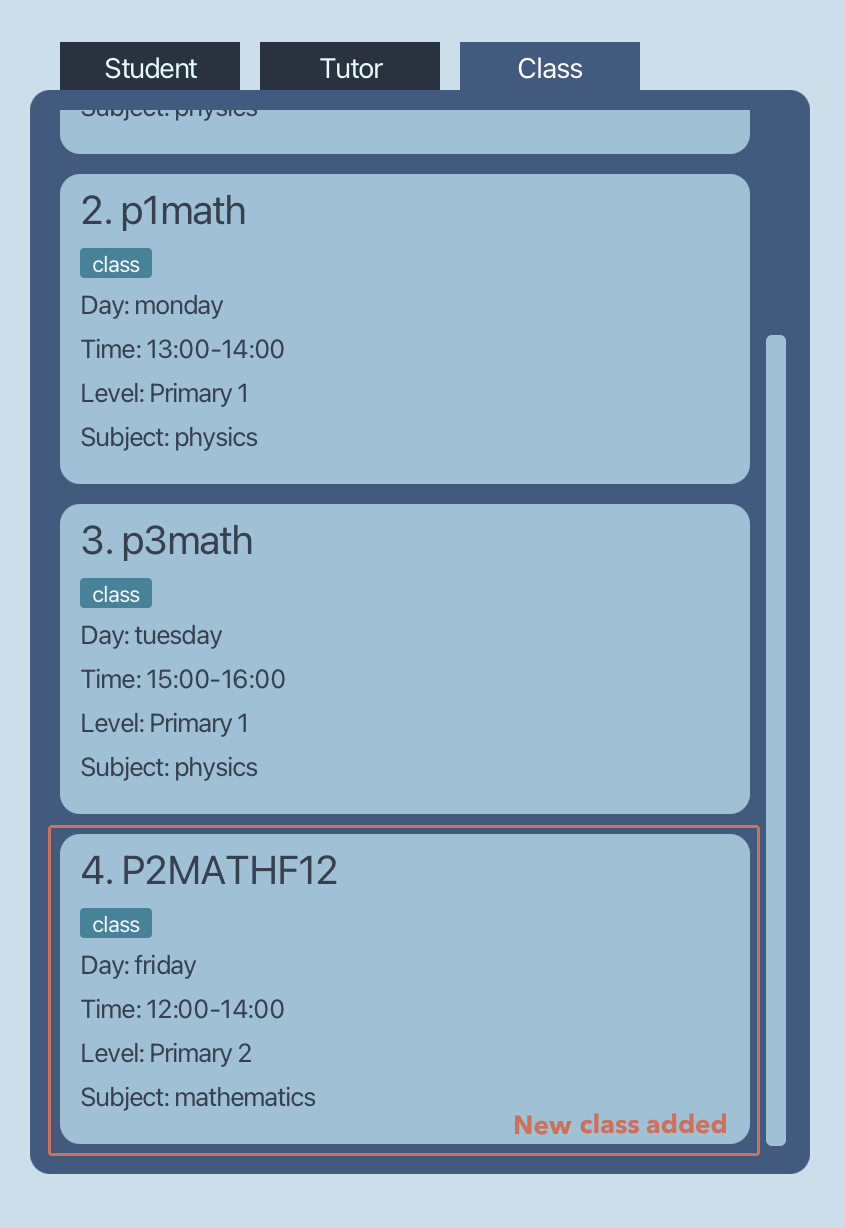 This adds the class into the database.
Deleting an entry: delete
Deletes an entry from the myStudent database.
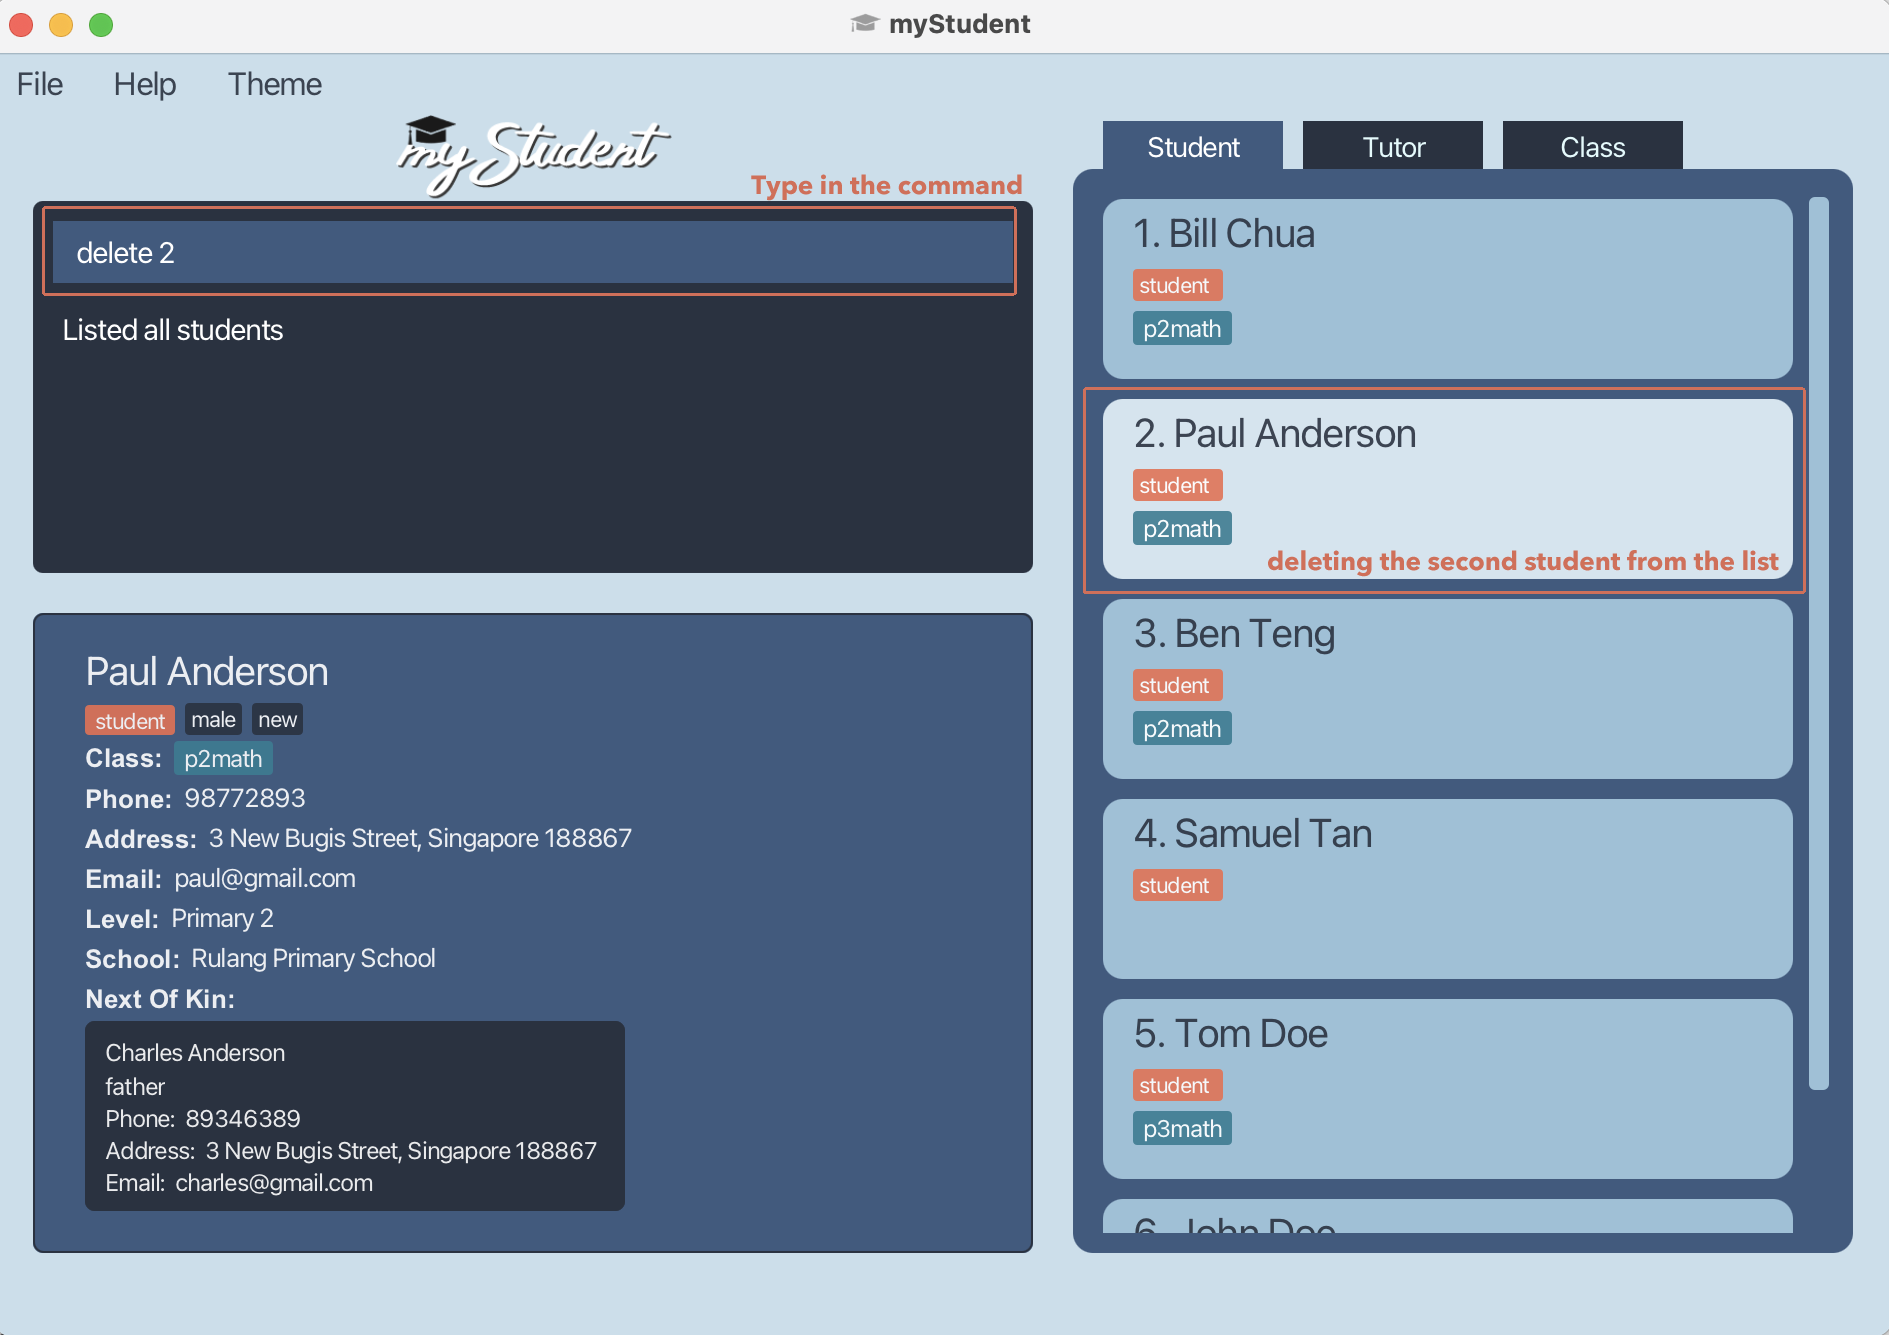
Format: delete <index>
-
The index refers to the index number shown in the displayed list. For example, when displaying the student list, the command
delete 2will delete the 2nd student in that list from the entire database. -
The index must be a positive integer such as 1, 2, 3 etc.
Examples:
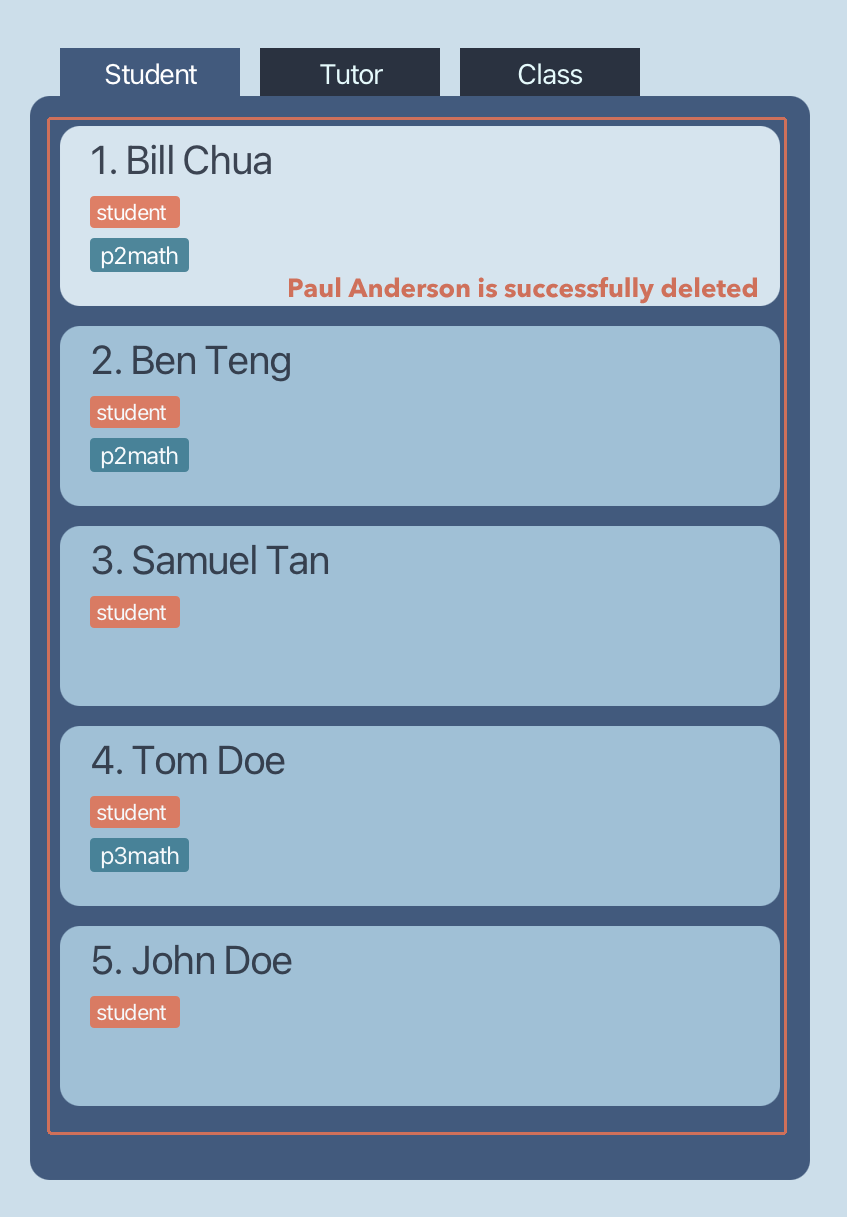
delete 2
Manipulation of data
Editing an entry: edit
Edits an entry in the myStudent database.
Formats:
To edit a student,
edit <index> [n/<name>] [p/<phone>] [e/<email>] [a/<address>] [s/<school>] [l/<level>] [#/<tag>]…
To edit a tutor,
edit <index> [n/<name>] [p/<phone>] [e/<email>] [a/<address>] [q/<qualification>] [i/<institution>] [#/<tag>]…
To edit a class,
edit <index> [n/<name>] [s/<subject>] [l/<level>] [d/<day>] [t/<time>] [#/<tag>]…
-
The index refers to the index number shown in the displayed list.
-
The index must be a positive integer 1, 2, 3, …
-
All fields are optional except for the
<index>field; however, at least one optional field must be present at all times. Fields present will overwrite the existing values. -
Fields must be valid in correspondence to the entry list being displayed currently. For example, when a student list is displayed, specifying a qualification when executing the edit command is disallowed.
-
If a specific optional field is repeated, the last occurrence in the input is taken. The
<tag>field is an exception, where multiple tags are allowed. -
The constraints of each optional field must be followed. They are:
-
<name>field should only contain alphanumeric characters and spaces, and should not be left blank. -
<phone>field should only contain numbers, and it should be between 7 and 15 digits long. -
<email>field should be of the format of a correct email address such as “johndoe@gmail.com”. -
<address>field can take any values but should not be left blank. -
<tag>fields should only contain alphanumeric characters. No spaces are allowed. -
<school>field should only contain alphanumeric characters and spaces, and should not be left blank. -
<level>field should be one of the valid academic levels. The valid academic levels are:- Primary 1 to 6
- Secondary 1 to 4
(Abbreviations are also allowed, e.g., “P1” or “Sec 3”.)
-
<qualification>field should only contain alphanumeric characters, commas and spaces, and should not be left blank. -
<institution>field should only contain alphanumeric characters and spaces, and should not be left blank. -
<subject>field should only contain alphabetical characters, and should be one of the valid subjects. The valid subjects are:- English
- Mathematics
- Physics
- Chemistry
- Biology
- Elementary Mathematics
- Additional Mathematics
(Abbreviations are also allowed, e.g., “Eng” or “Amath”.)
-
<day>field should be a valid day of the week.
(Abbreviations are also allowed, e.g., “Mon” or “Thurs”.) -
<time>field should be separated by a dash, a space or “to”, and adhere to the following constraints:- Timings must be in either 12-hour or 24-hour formats. When using the 12-hour format, AM/PM must be specified while minutes can be omitted. For both, the colon and initial zero may be omitted.
- Start and end timings specified must respect chronology. The end time cannot occur before the start time.
Note that all timings are considered to be on the same day (including midnight, i.e., 12am or 00:00, if specified as the end time, symbolises the end of the same day).
Some valid examples are:
- 12pm - 3pm
- 1:00pm 2:00pm
- 2200 to 2400
- 23:00 - 00:00
-
<tag>fields should only contain alphanumeric characters. No spaces are allowed.
-
Examples:
-
edit 2 l/Primary 5 d/Monday -
edit 1 n/Tom Doe
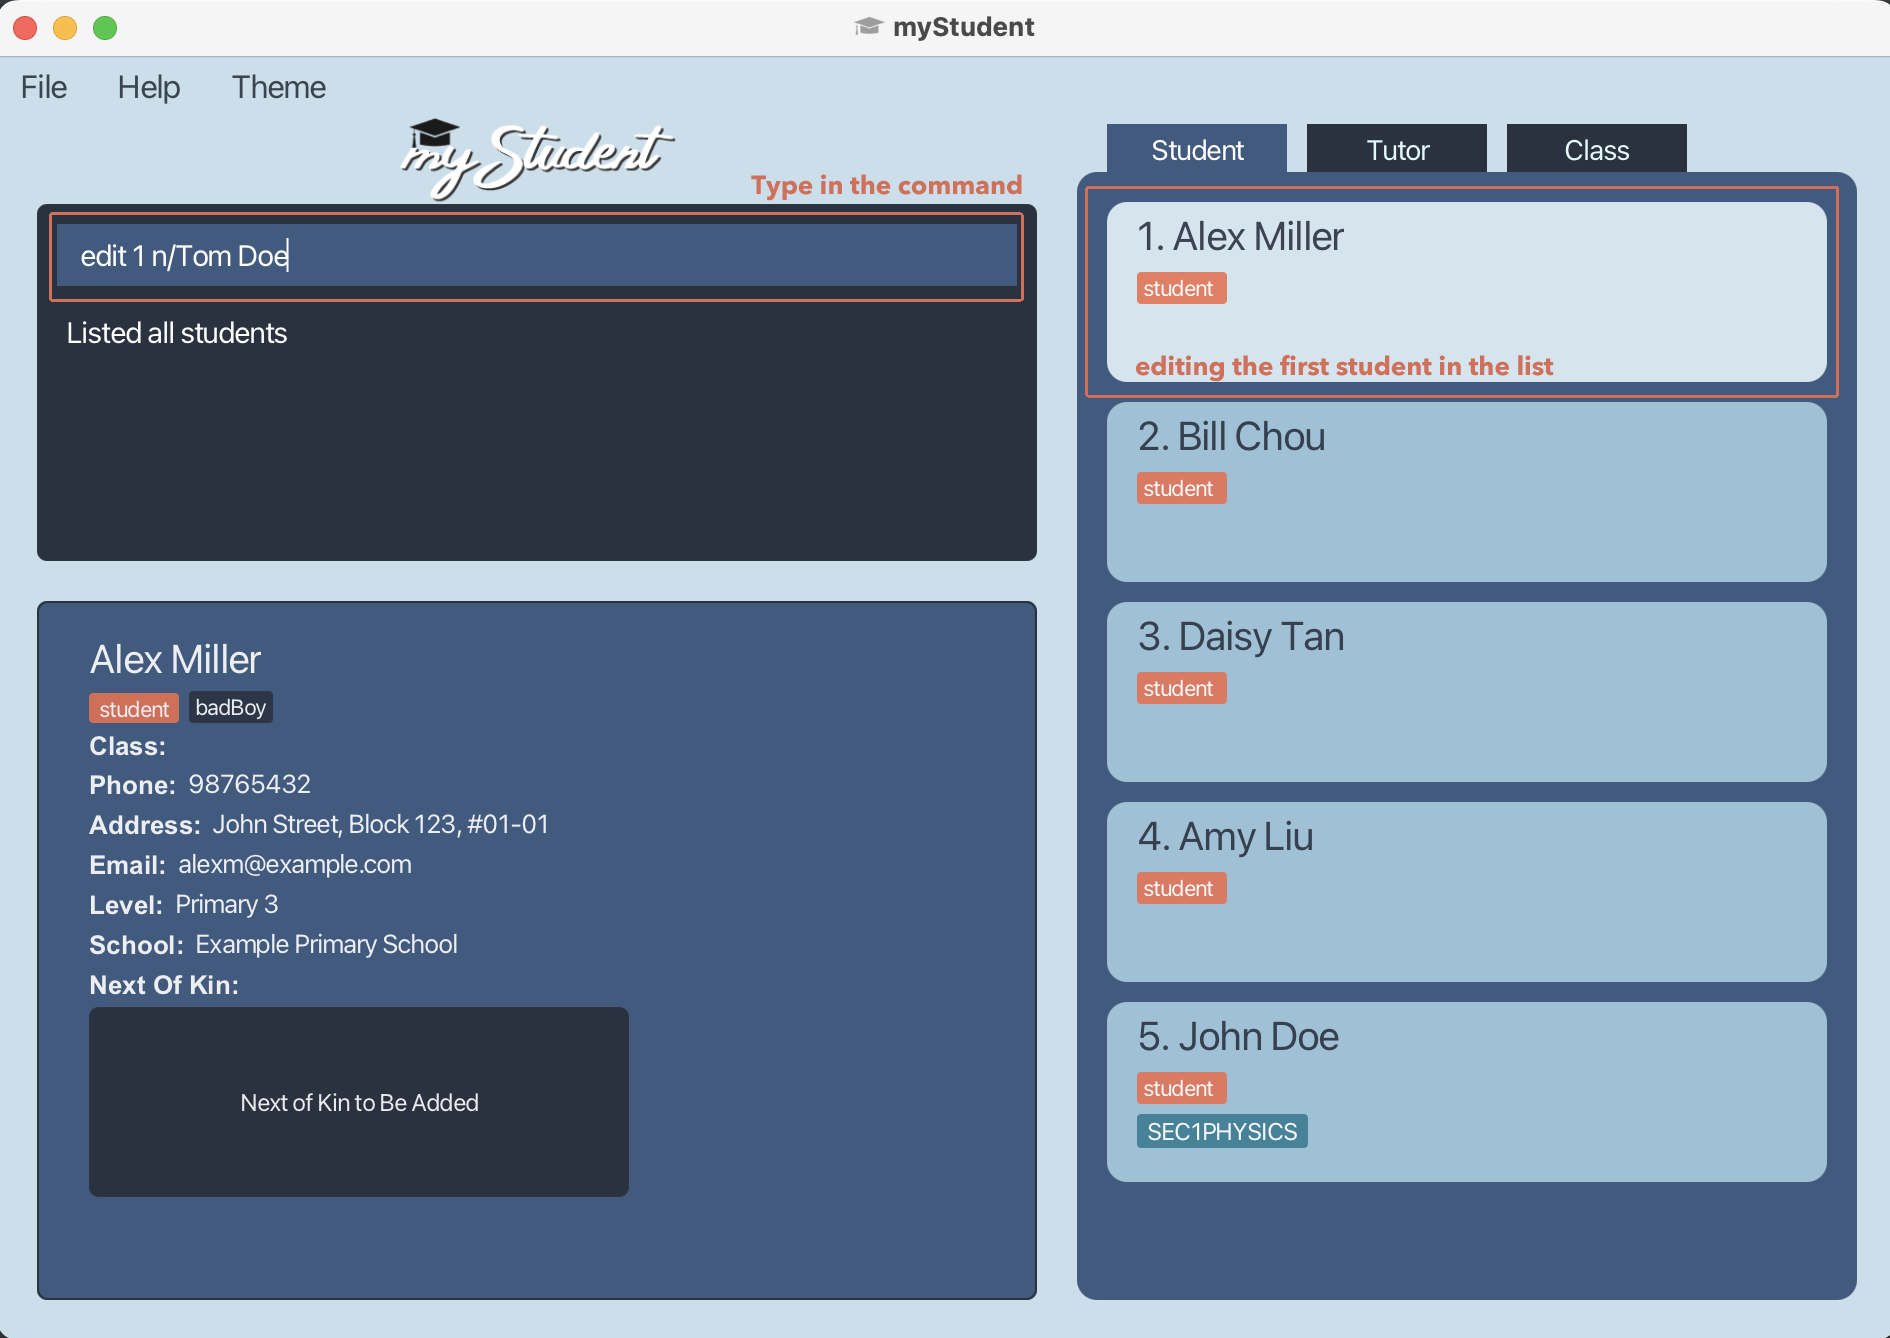
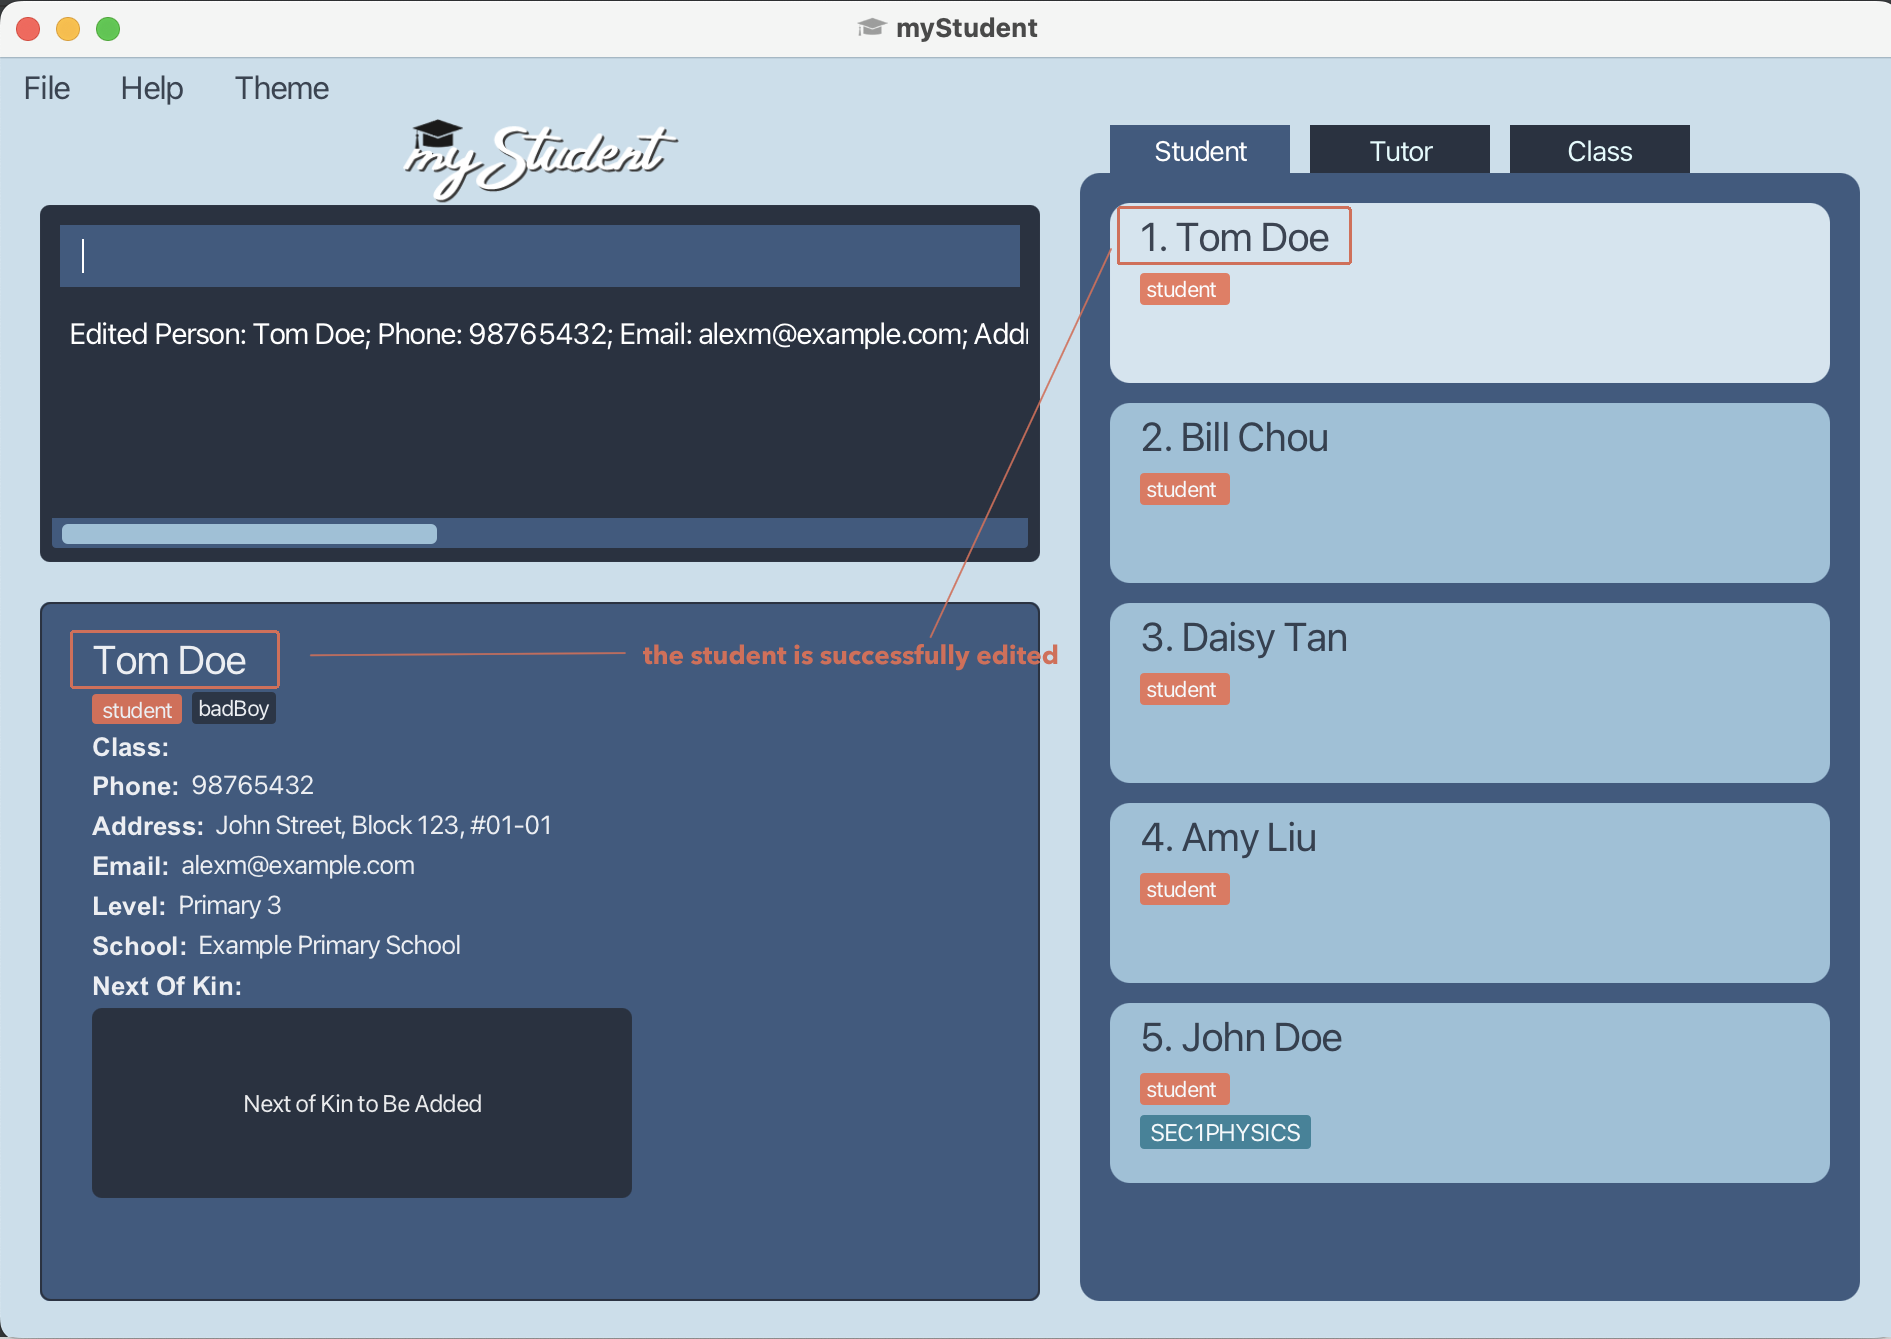
This edits the details of Alex Miller by changing his name to Tom Doe. Note that the Description Panel and the List Display Panel have been updated.
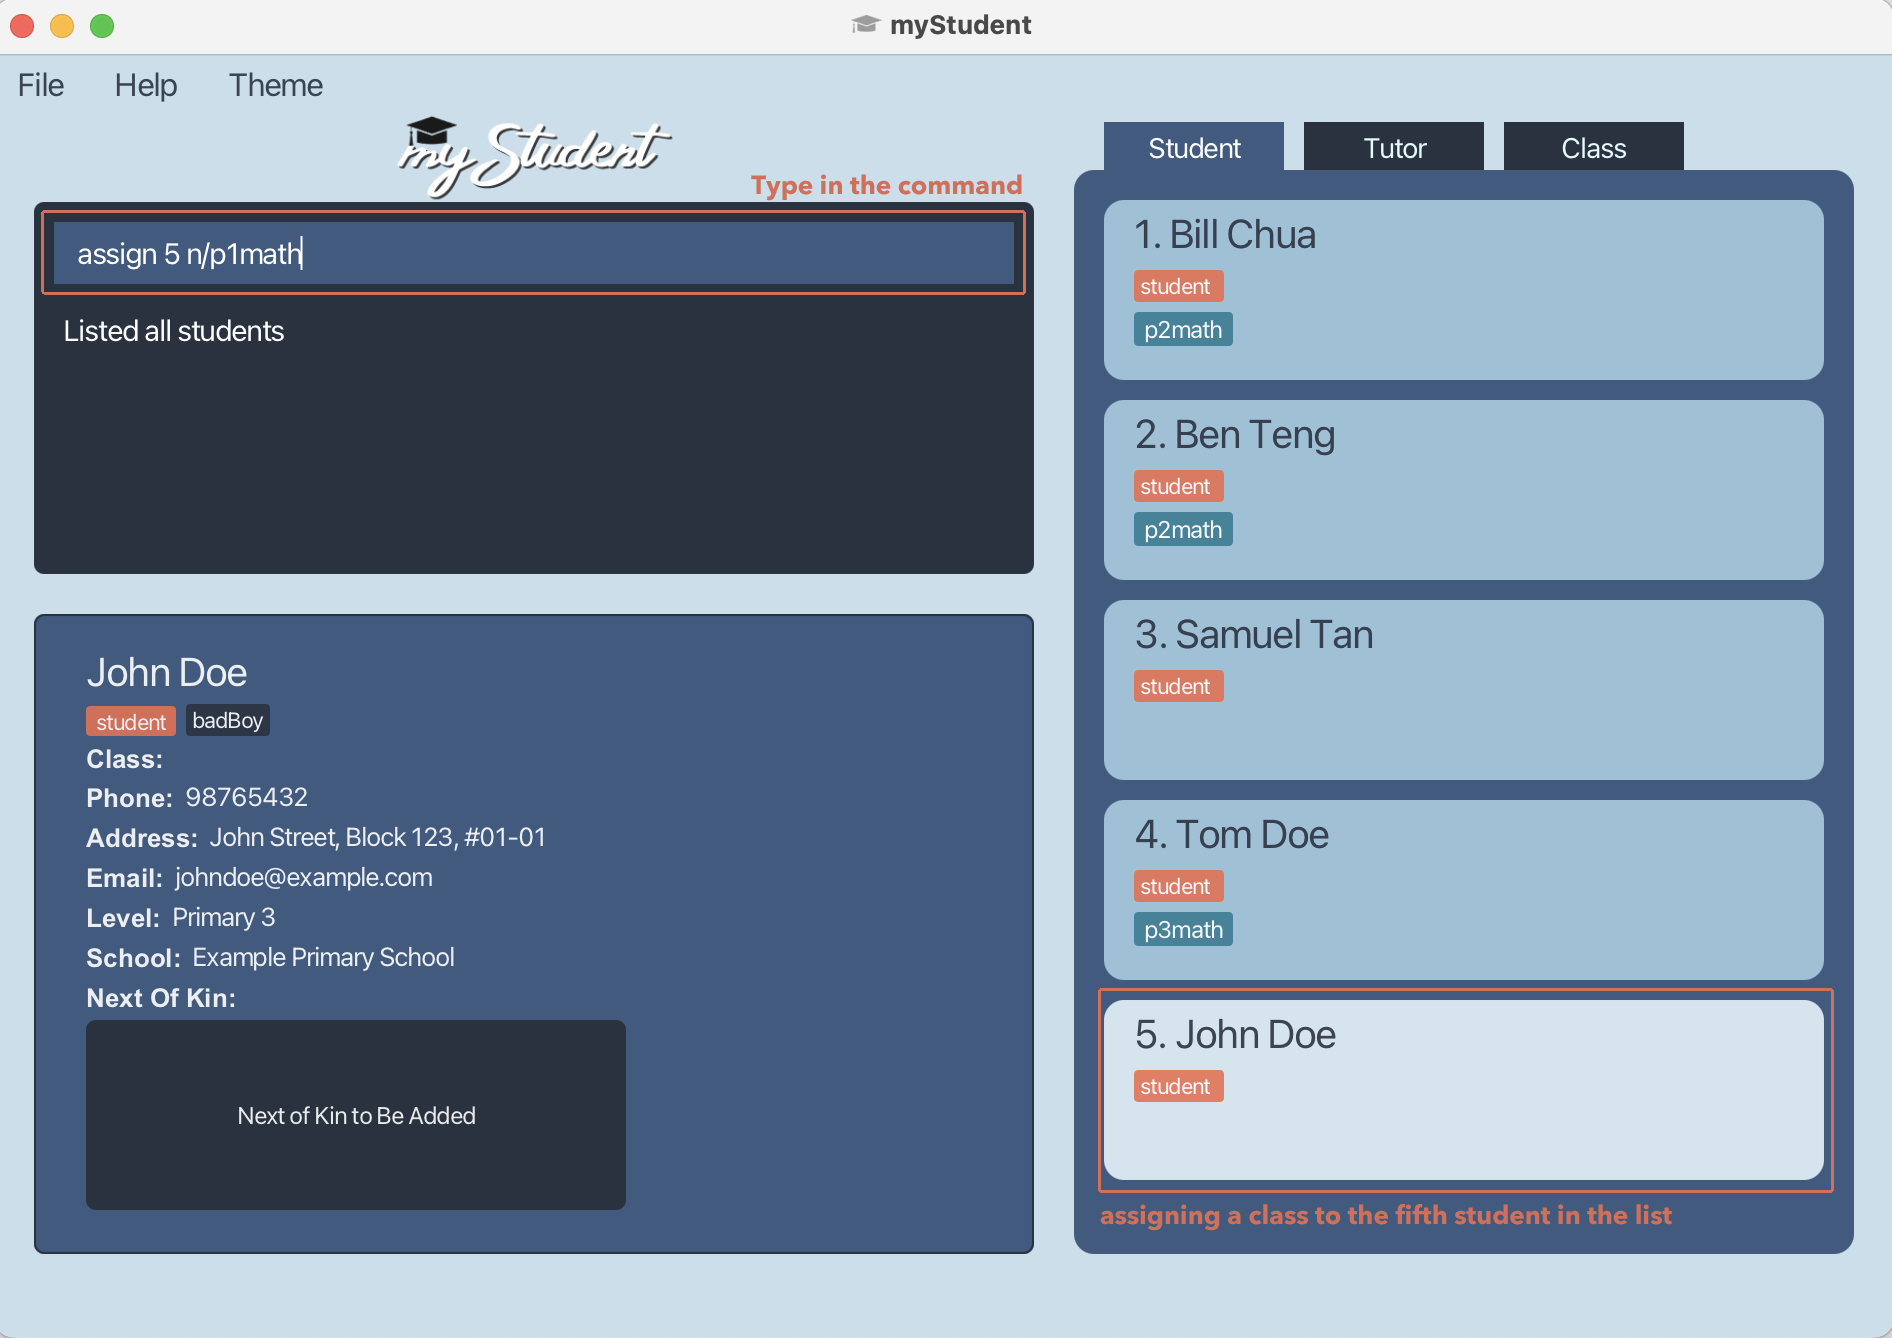
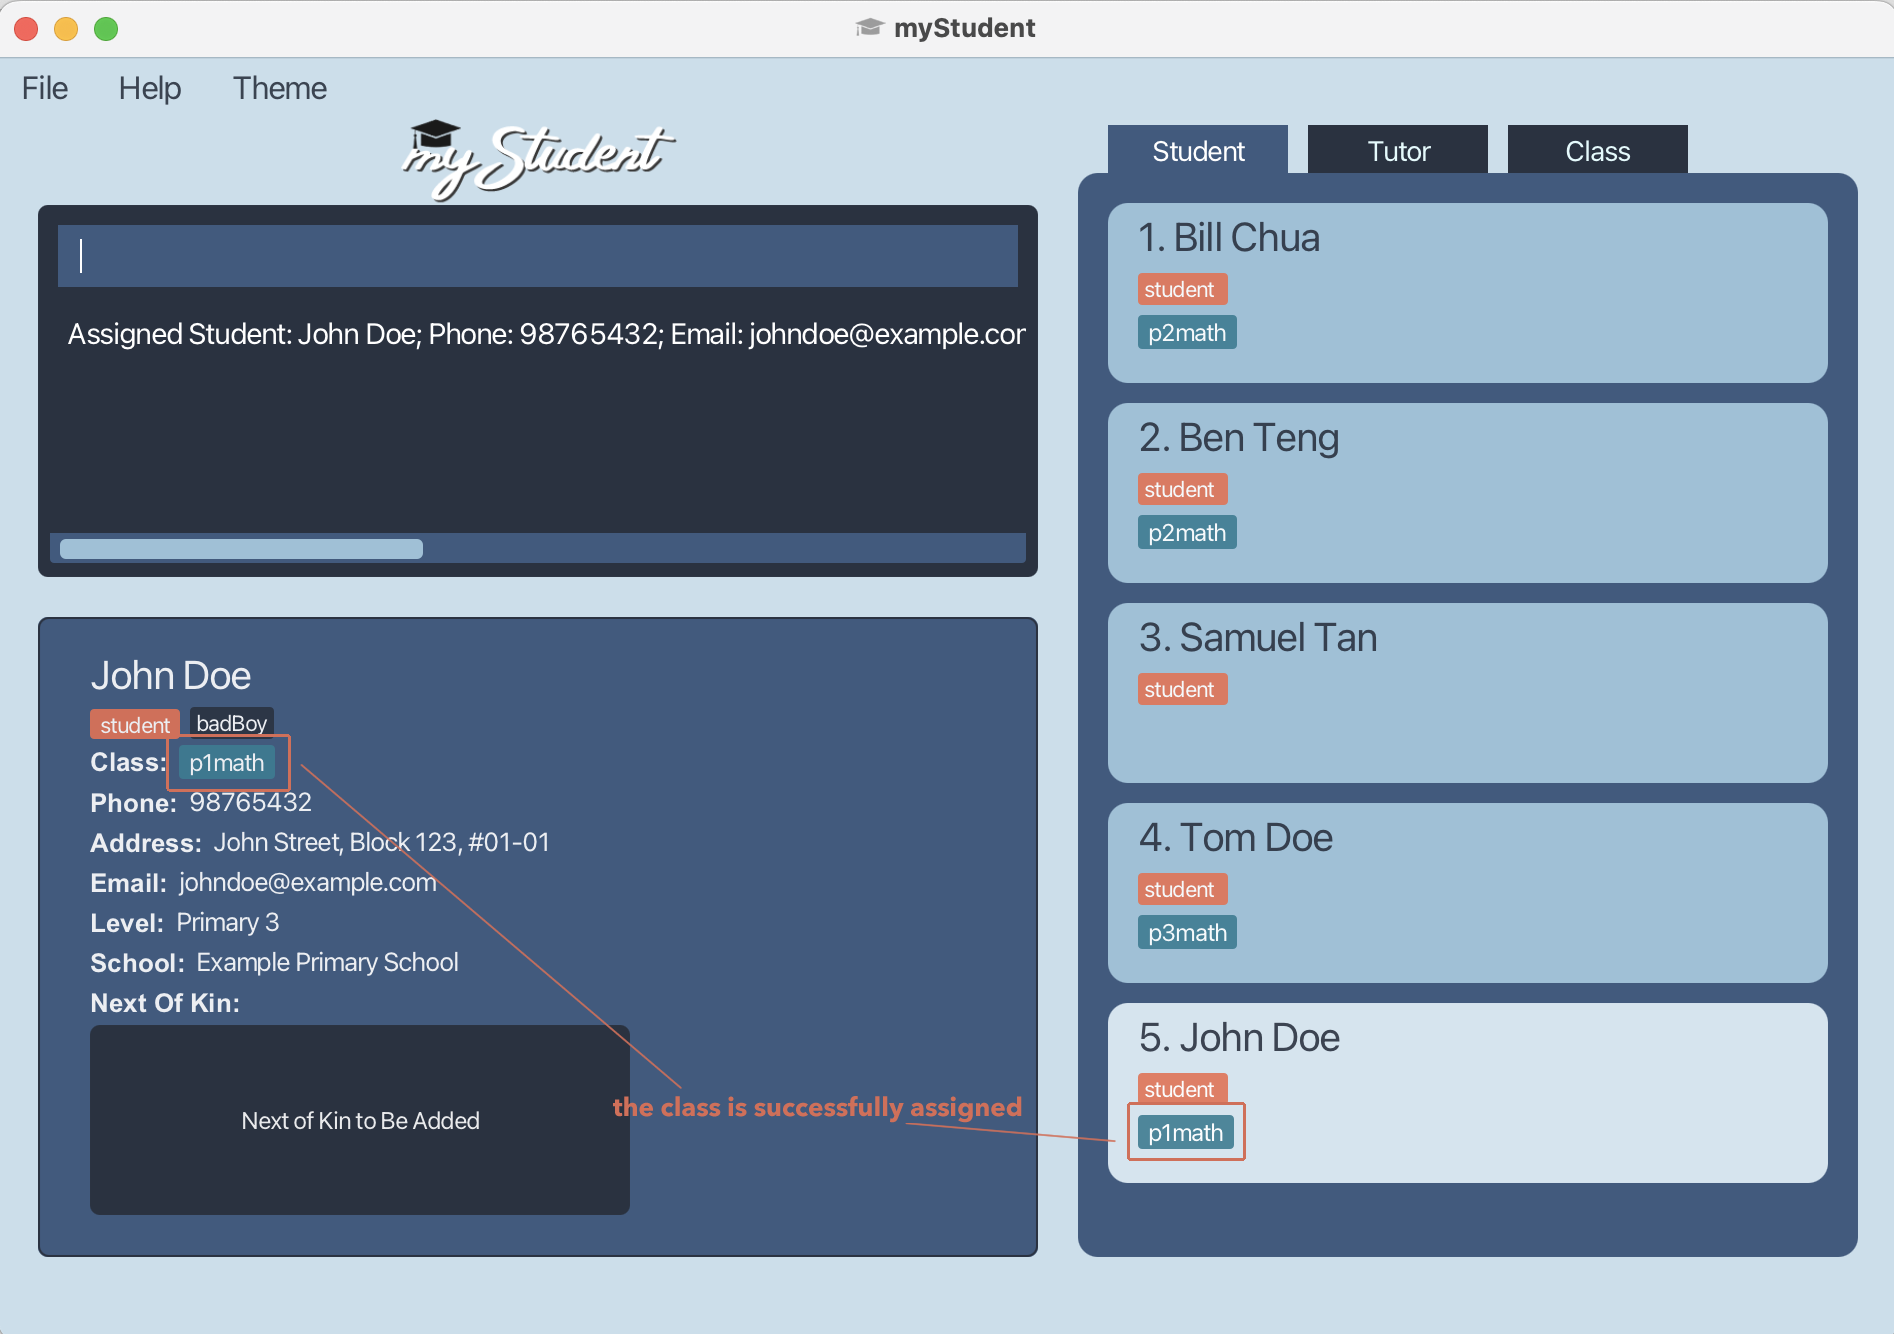
Assign class to a person: assign
Assign an existing tuition class to a specific student/tutor.
Format: assign <index> n/<name>
-
assigncommand only works when the displayed list is the student list or tutor list. -
The index refers to the index number shown in the displayed list.
-
The index must be a positive integer 1, 2, 3, …
-
<name>field refers to name of the class being assigned and should only contain alphanumeric characters and spaces, and should not be left blank. The specified tuition class (case-sensitive) must already exist in the class list. -
The tuition class to be assigned to the specific student/tutor must not be assigned beforehand.
Examples:
assign 5 n/p1math
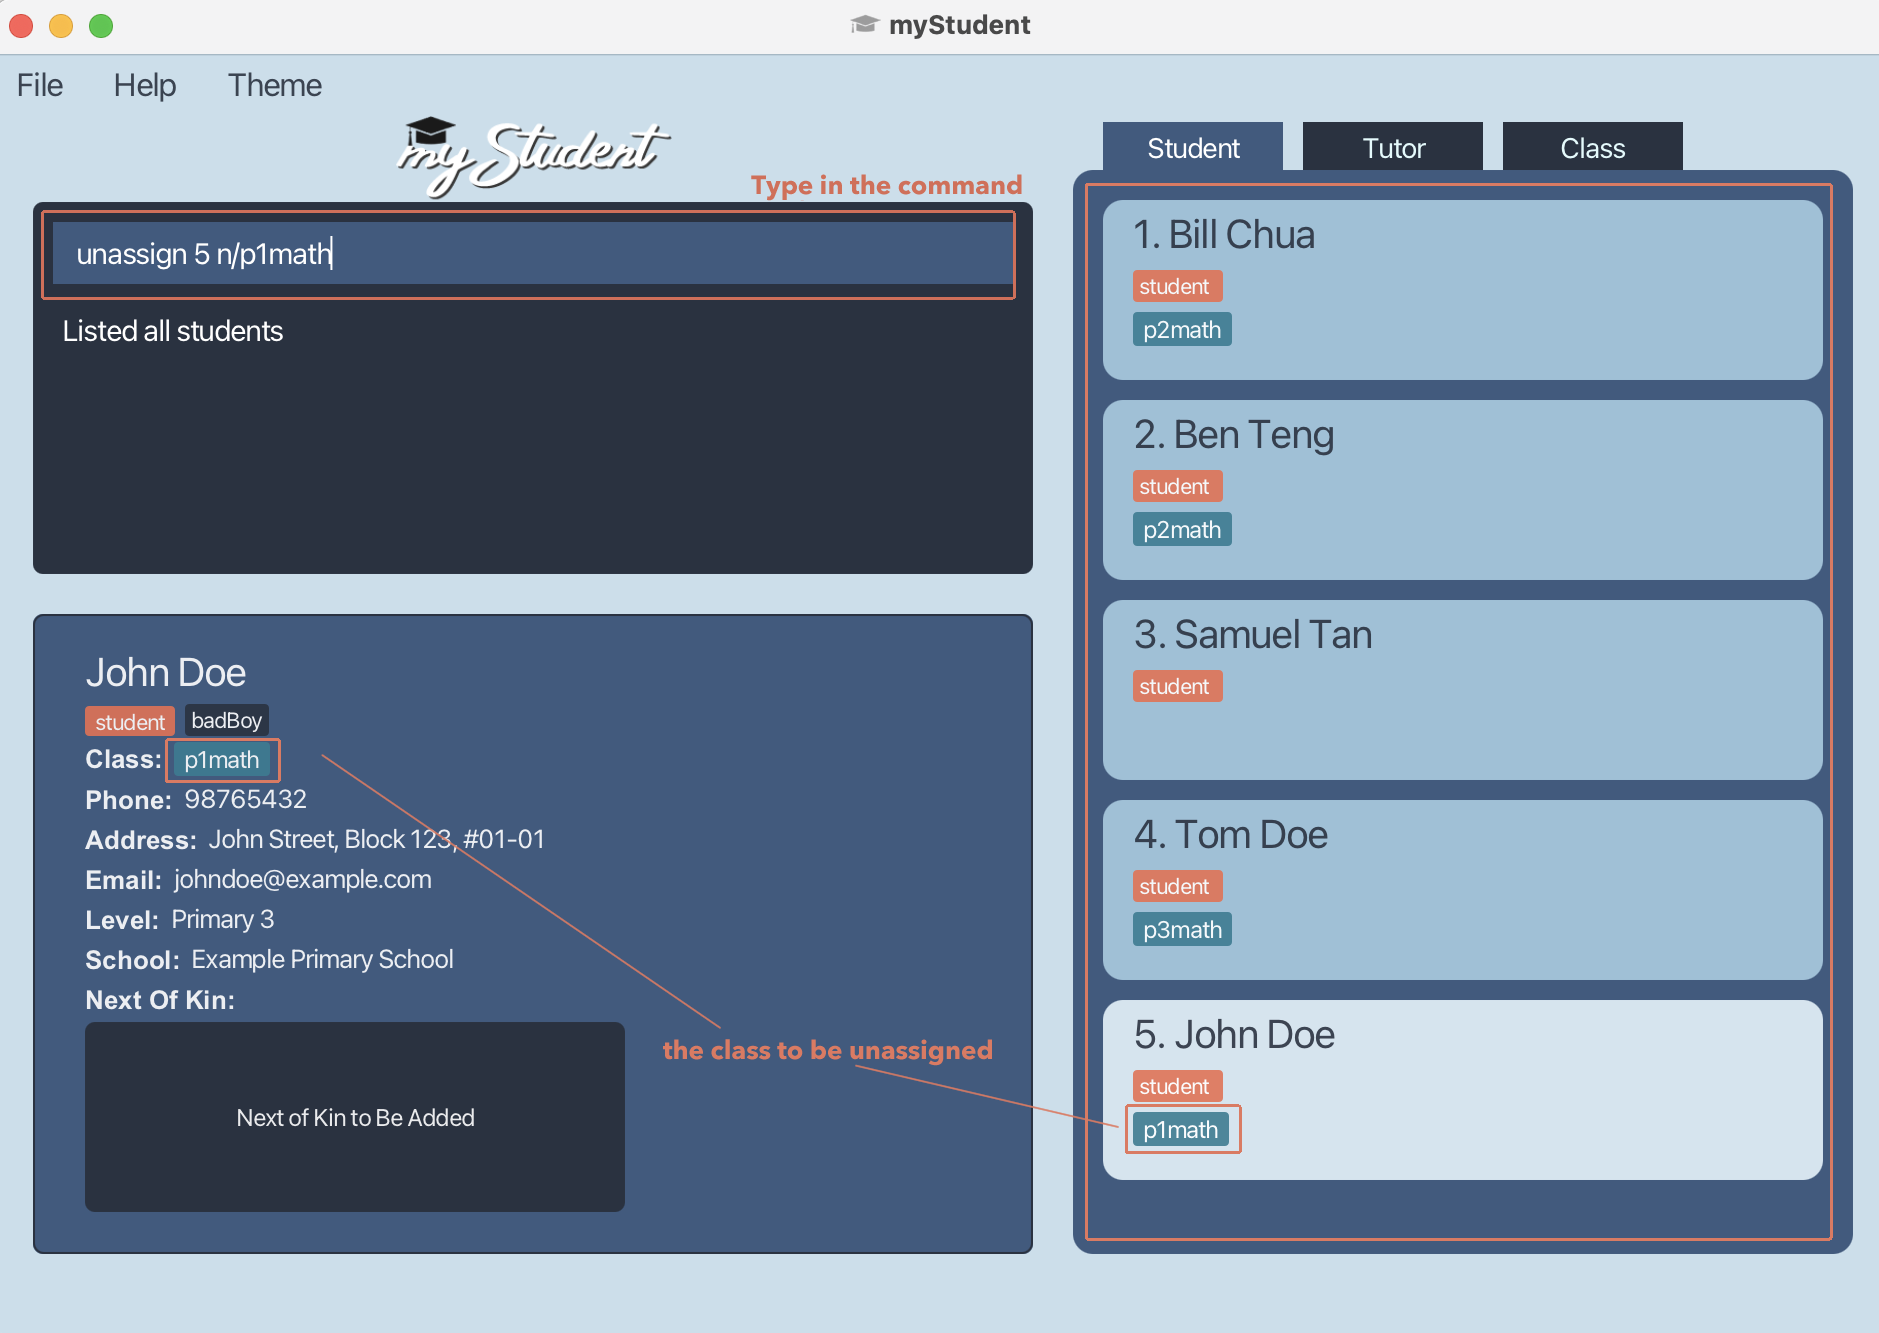
Unassign class from a person: unassign
Unassign an existing tuition class from a specific student/tutor.
Format: unassign <index> n/<name>
-
unassigncommand only works when the displayed list is a student list or tutor list. -
The index refers to the index number shown in the displayed list.
-
The index must be a positive integer 1, 2, 3, …
-
<name>field refers to name of the class being assigned and should only contain alphanumeric characters and spaces, and should not be left blank. The specified tuition class (case-sensitive) must already exist in the class list. -
The tuition class to be unassigned from the specific student/tutor must be assigned to the student/tutor beforehand.
Examples:
unassign 5 n/p1math

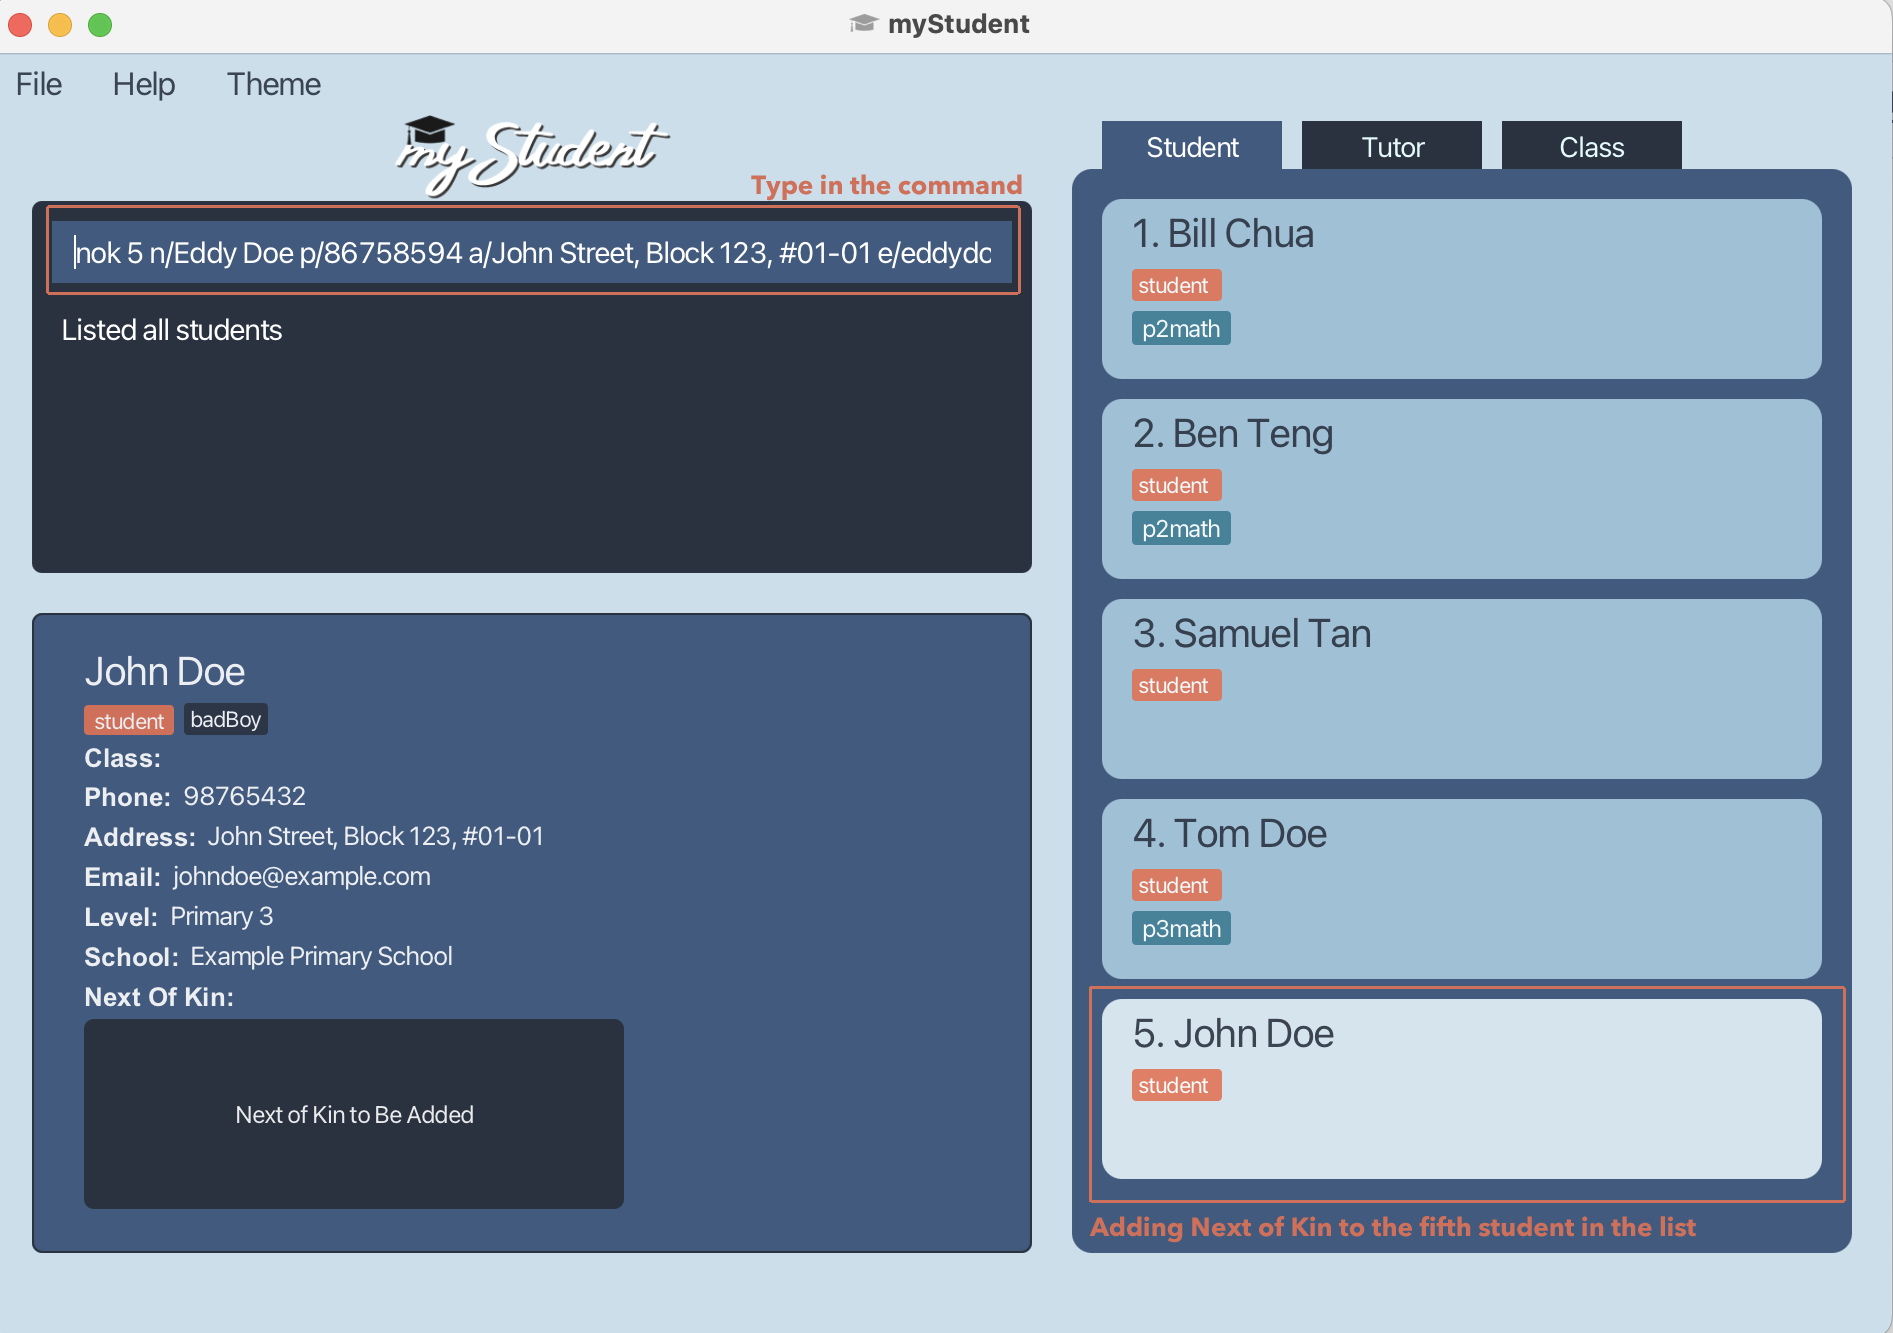
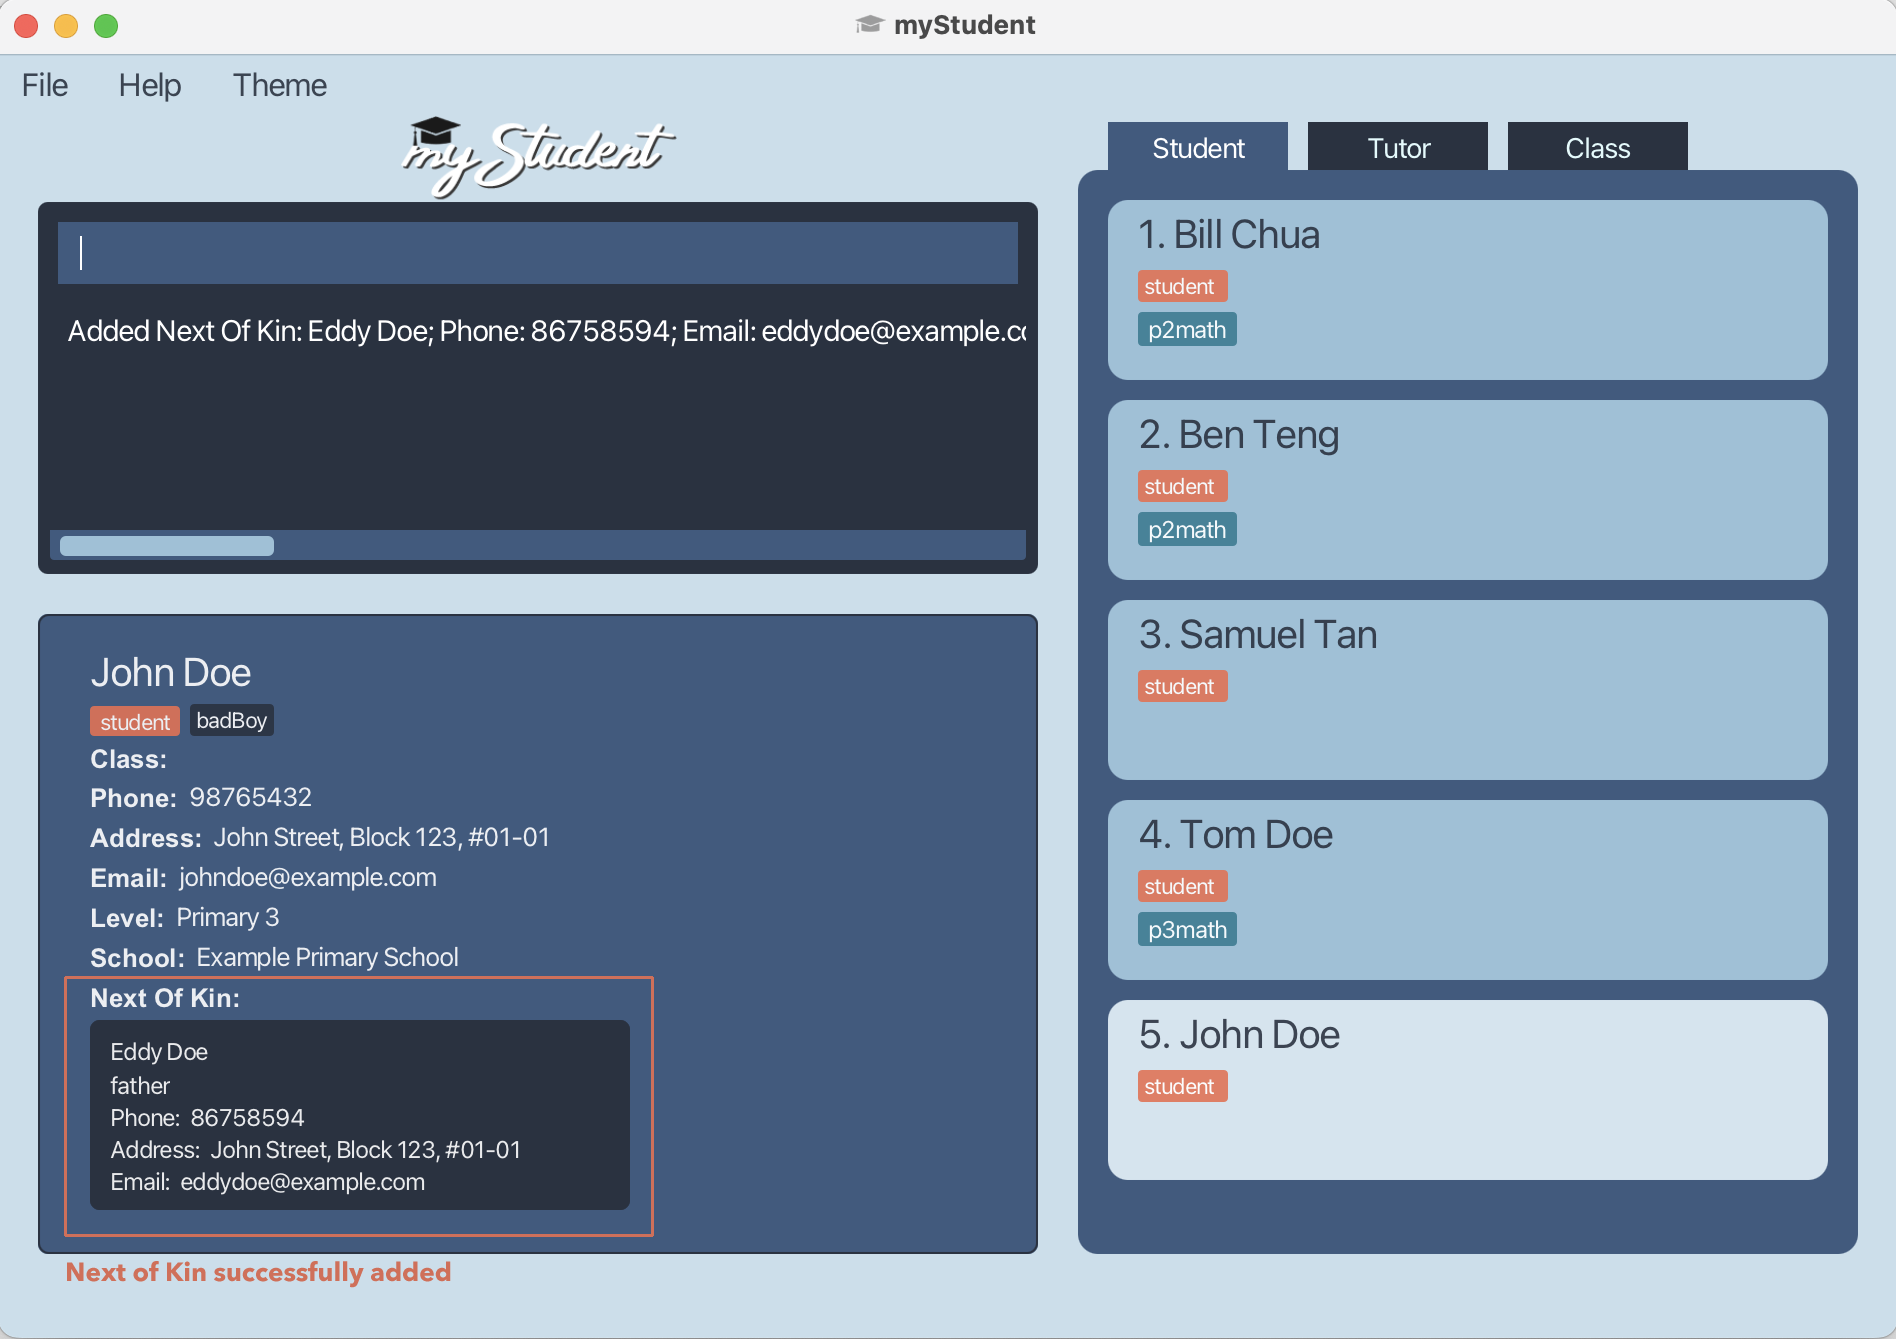
Add next of kin to a student: nok
Adds the next of kin to an existing student. If there is an existing next of kin, it will be overwritten.
Formats:
To add or overwrite existing next of kin,
nok <index> n/<name> p/<phone> e/<email> a/<address> r/<relationship> [#/tag]…
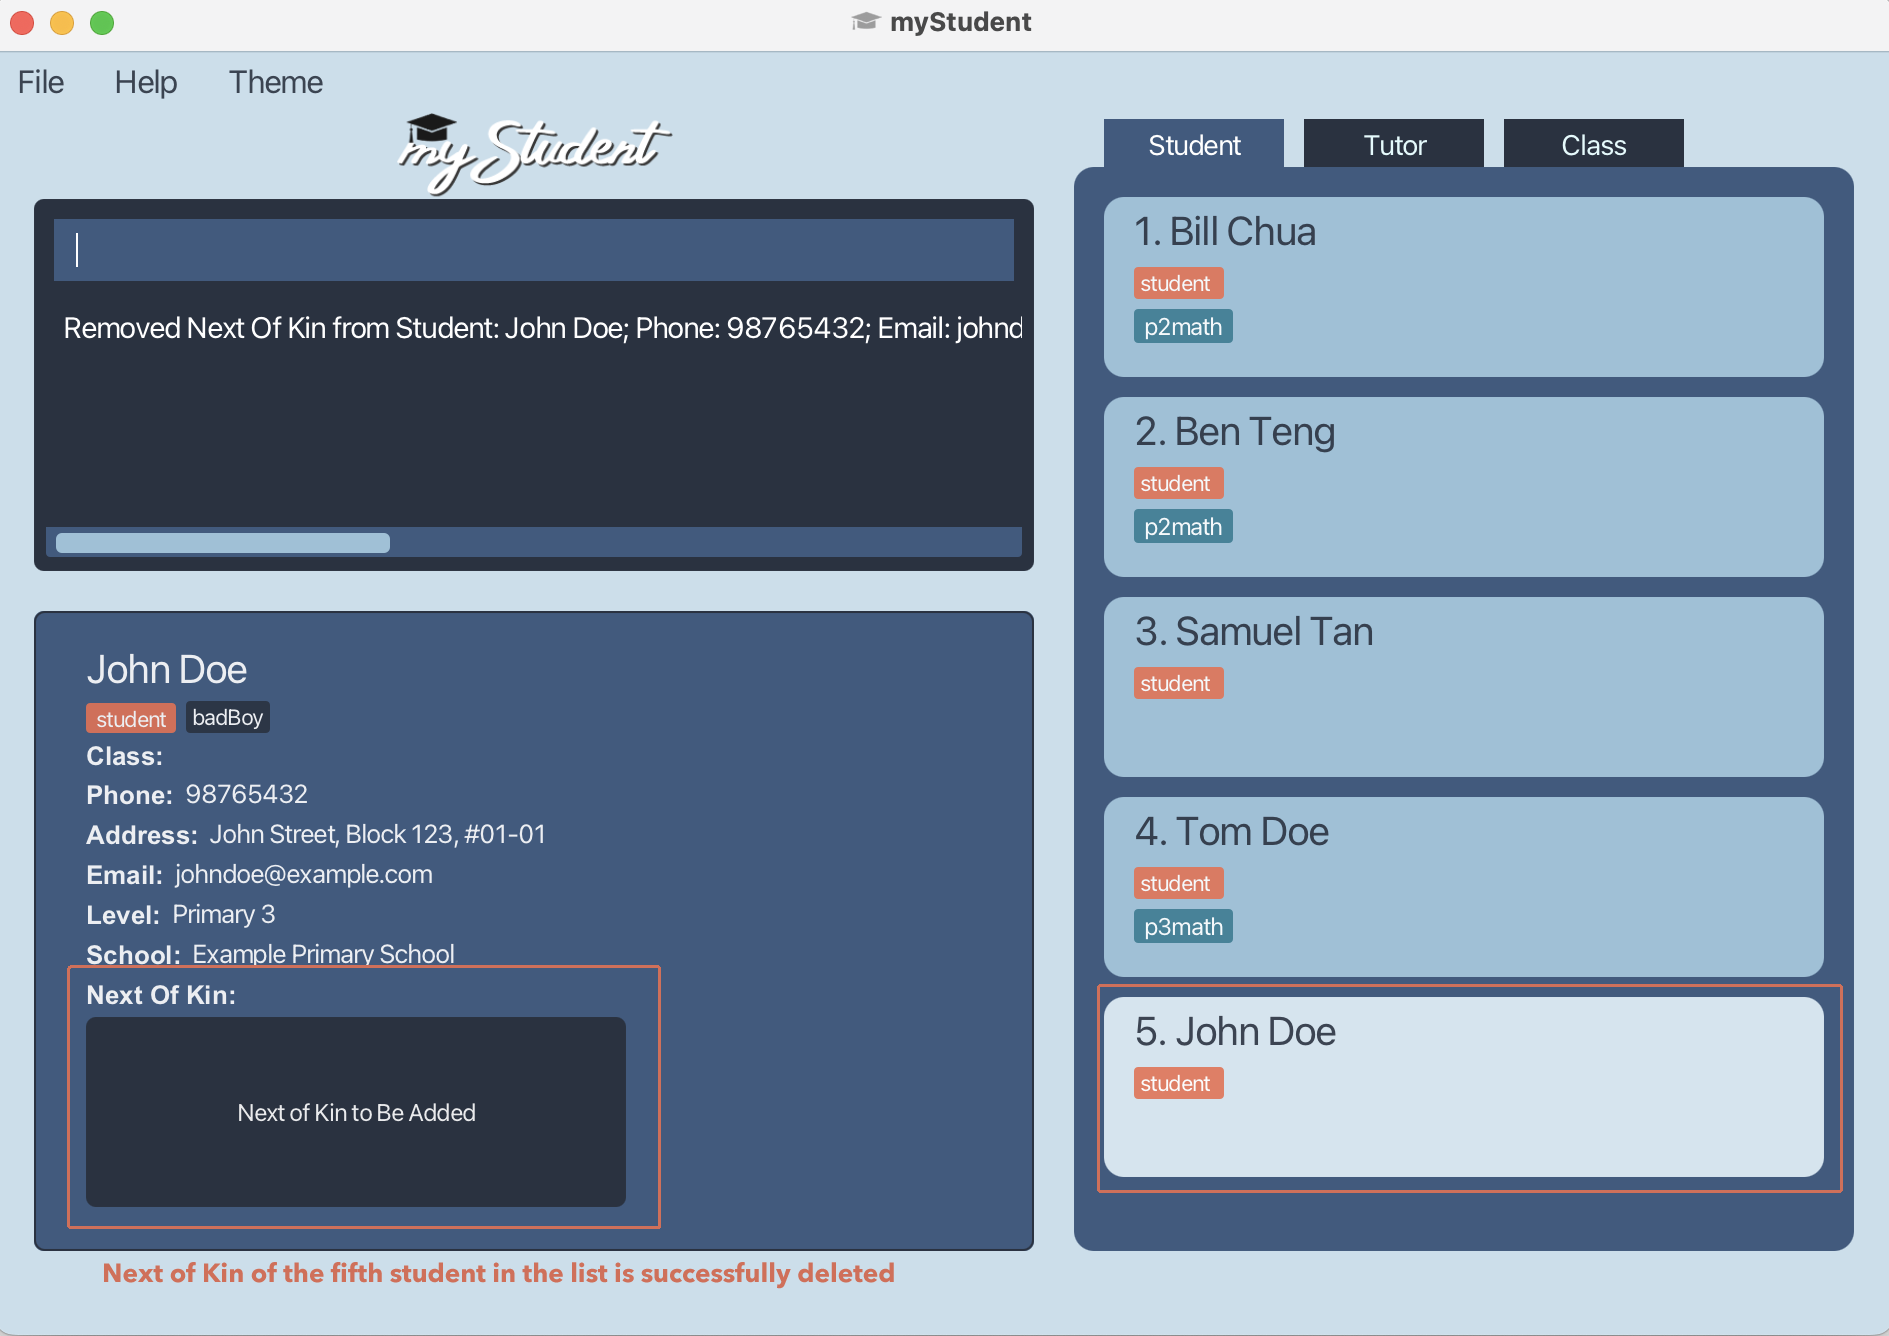
To remove existing next of kin,
nok <index>
-
The displayed list when executing this command must be the student list.
-
The index refers to the index number shown in the displayed list.
-
The index must be a positive integer 1, 2, 3, …
-
When adding a next of kin, all fields must be present, except for the optional
<tag>field. -
If a specific field is repeated, the last occurrence of the field is taken. The
<tag>field is an exception, where multiple tags are allowed. -
If no fields are present after the required
indexfield, the next of kin from the student of that index will be removed. -
The constraints of each field must be followed. They are:
-
<name>field should only contain alphanumeric characters and spaces, and should not be left blank. -
<phone>field should only contain numbers, and it should be between 7 and 15 digits long. -
<email>field should be of the format of a correct email address such as “johndoe@gmail.com”. -
<address>field can take any values but should not be left blank. -
<relationship>should only contain letters, and should be spelt out in full. The valid relationships are:- Father
- Mother
- Brother
- Sister
- Guardian
-
<tag>fields should only contain alphanumeric characters. No spaces are allowed.
-
Examples:
-
nok 5 n/Eddy Doe p/86758594 e/eddydoe@example.com a/John street, block 123, #01-01 r/FatherThis adds the next of kin to John Doe.
-
nok 5This deletes the next of kin of John Doe.

Presentation and Organisation of data
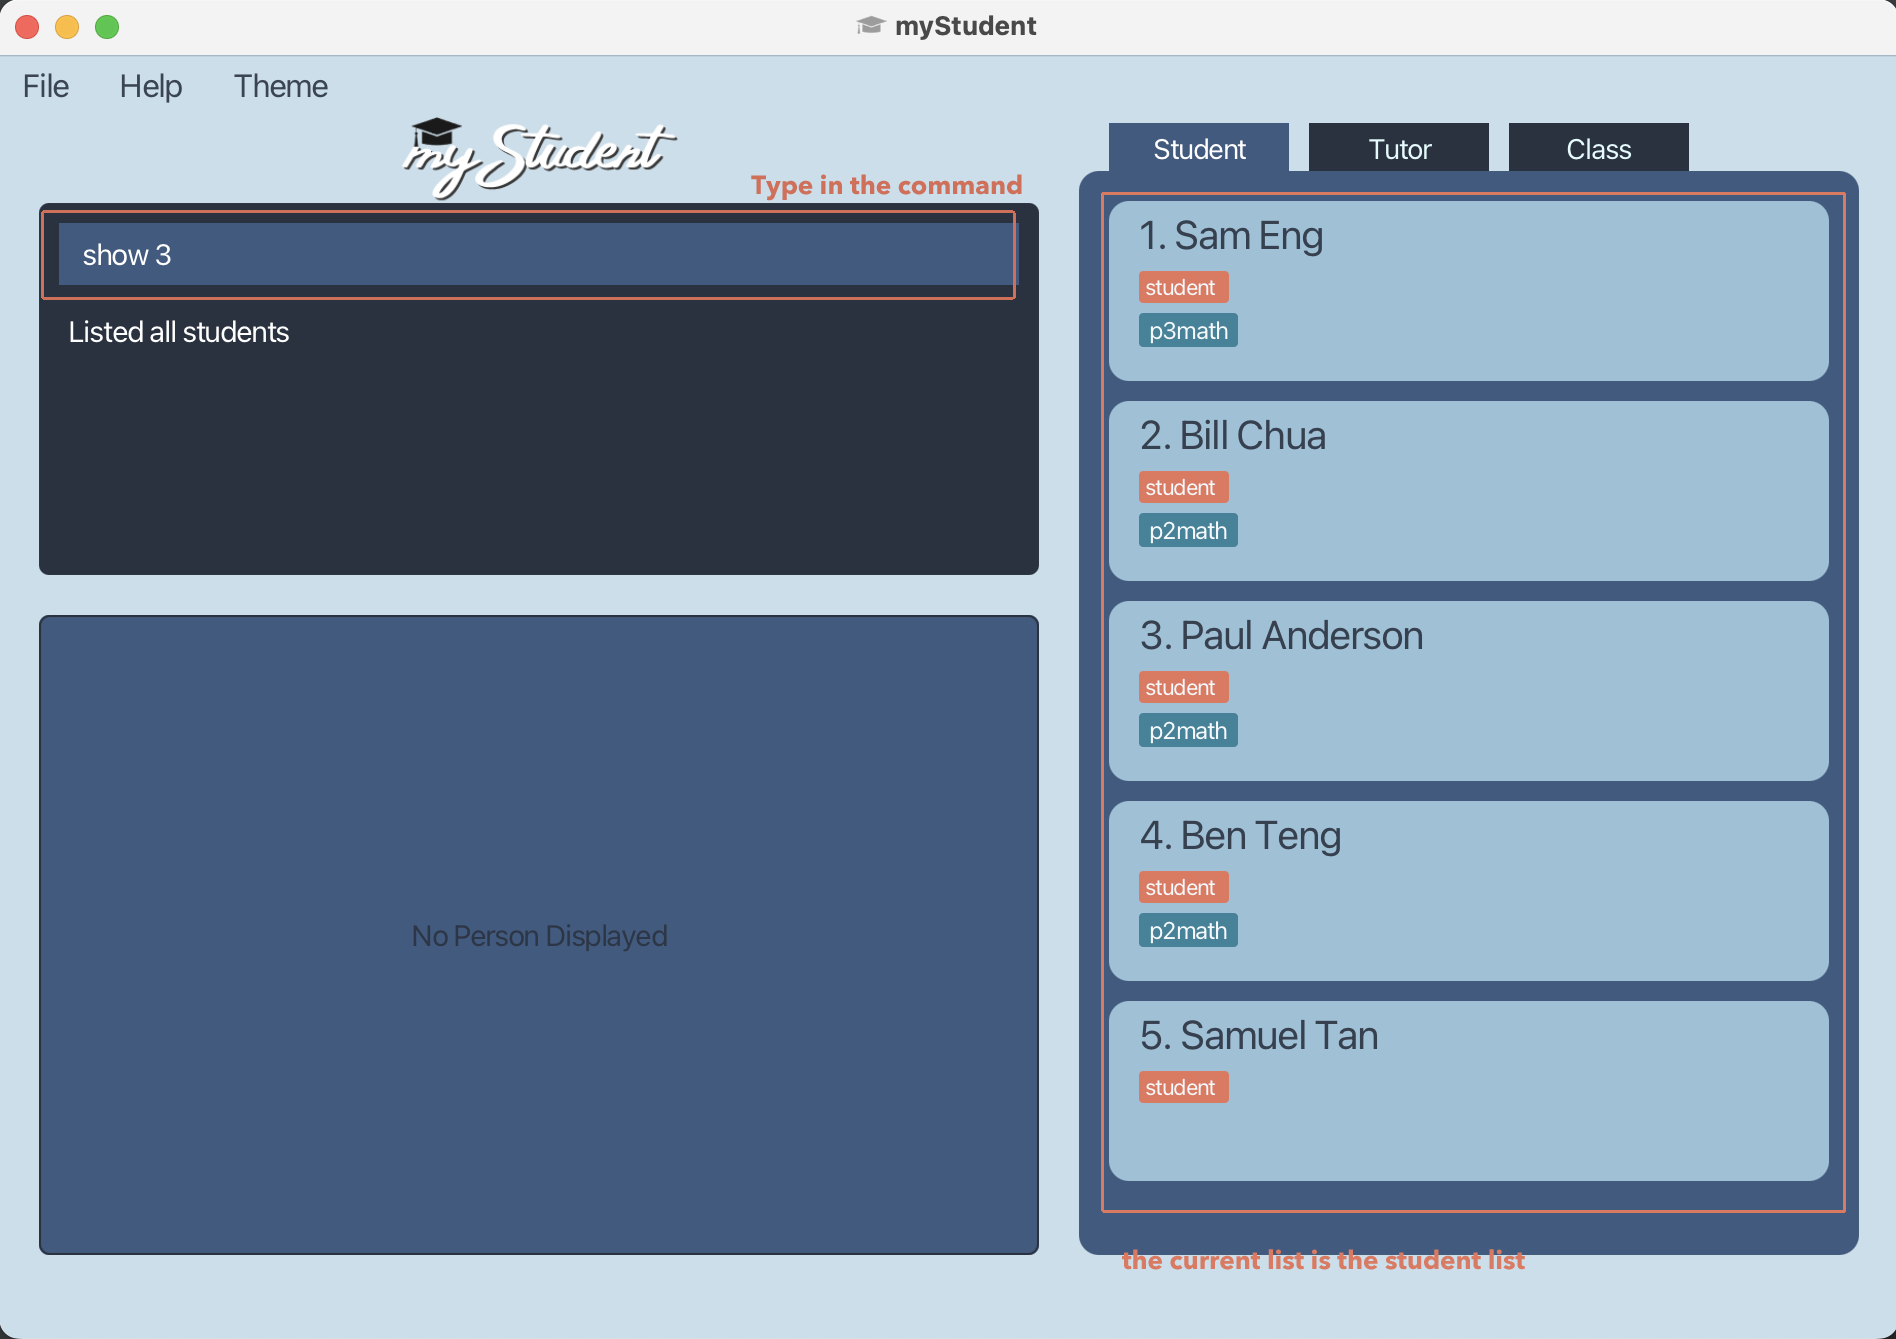
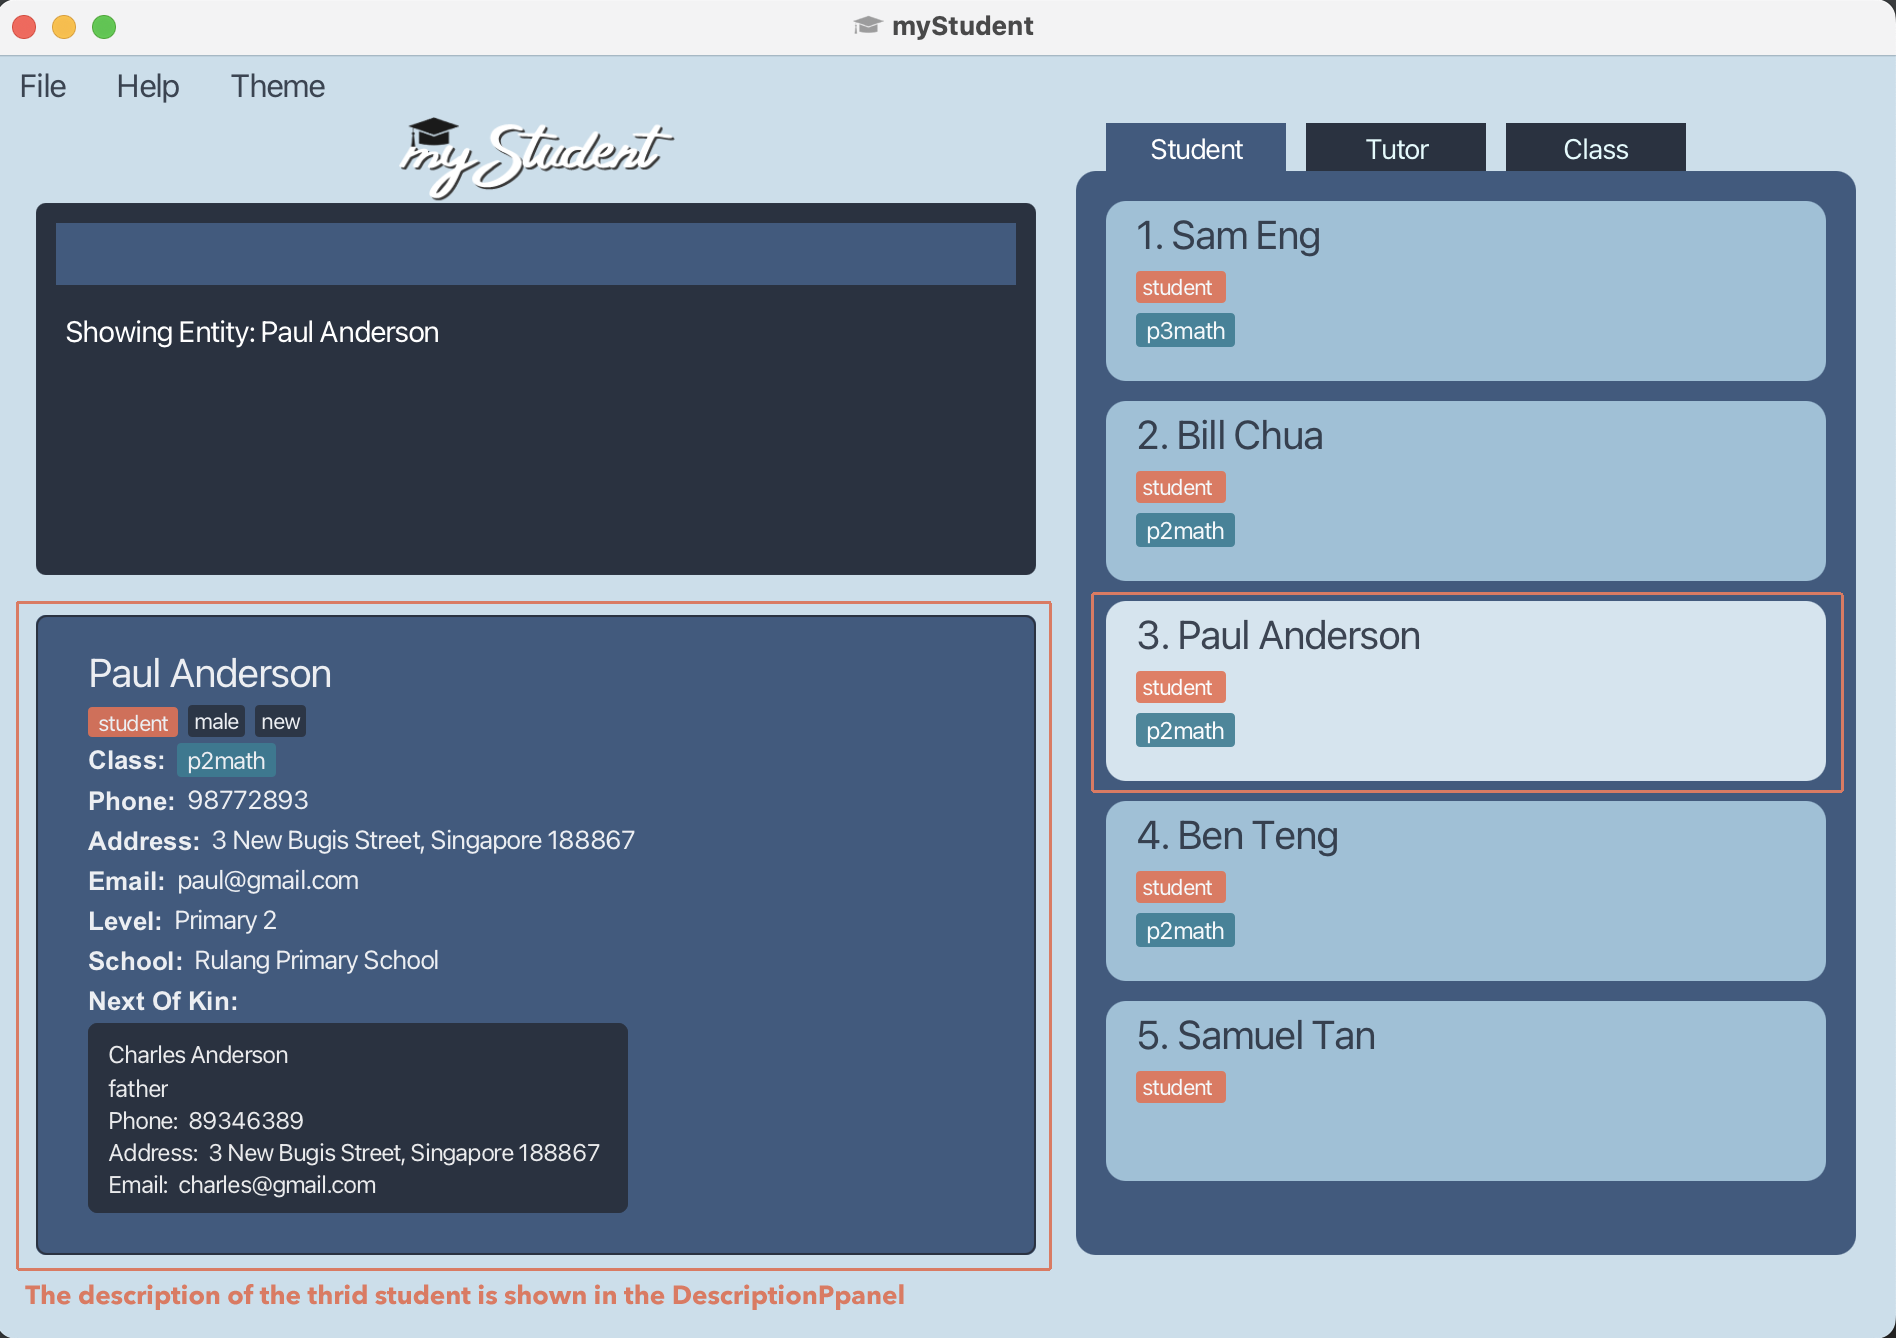
Showing the details of a person: show
In the student list and tutor list, the details of a person are not displayed due to privacy reasons. You can access a person’s details by executing the show command.
Format: show <index>
-
In the student list,
show 1shows the description of the first student in the list. -
In the tutor list,
show 1shows the description of the first tutor in the list. -
In the class list,
show 1is invalid as theshowcommand can only be executed for the student list and tutor list.
Examples:
-
show 3in the student list.
-
show 1in the class list.
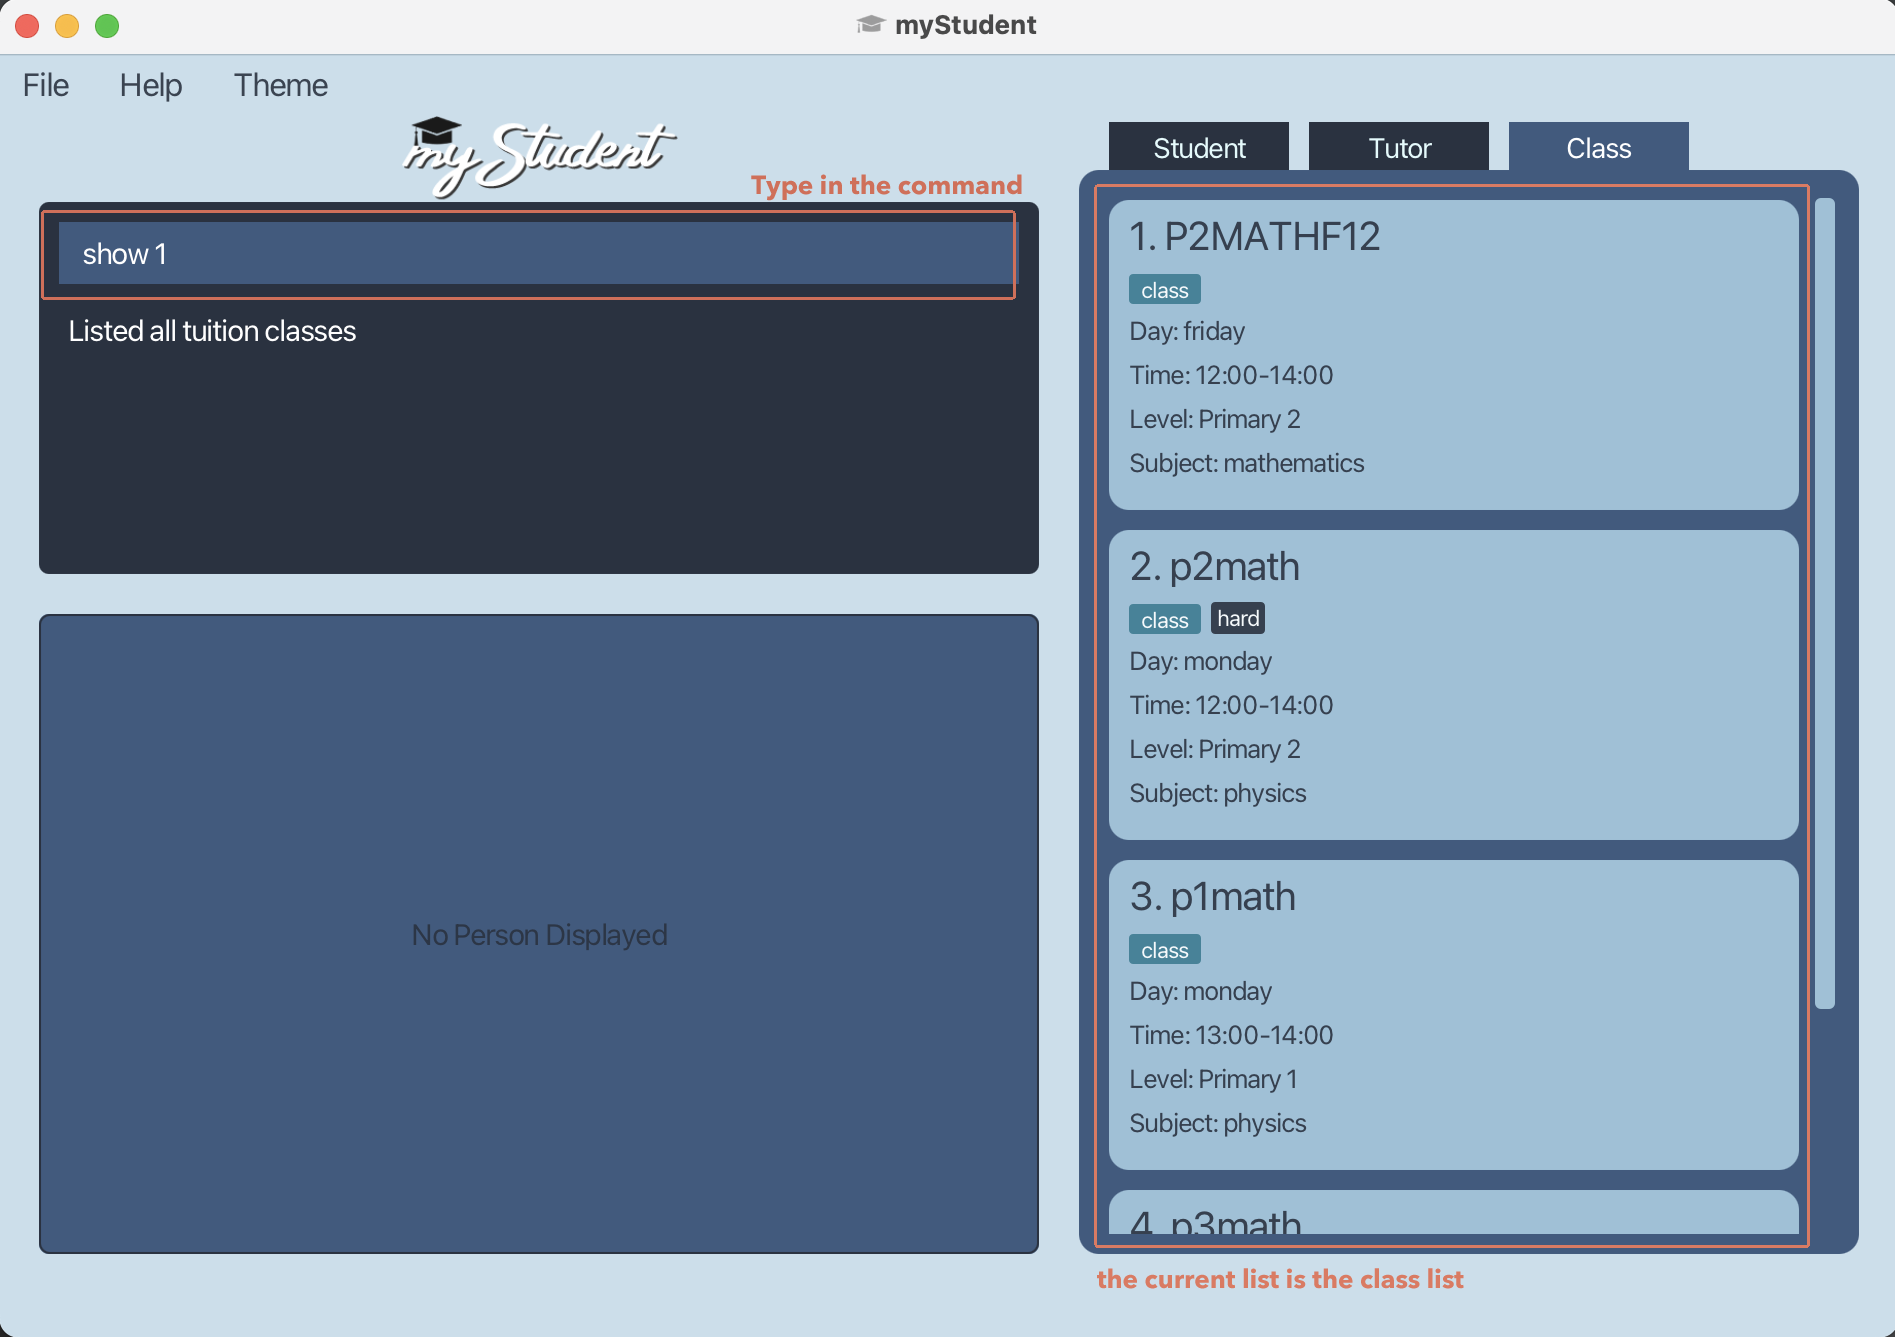

Note that show command is invalid for the class list.
Listing all entries : list
Shows the list of a specified entry type in the myStudent database.
Format: list <entry type>
- The valid entry types are:
- student
- tutor
- class
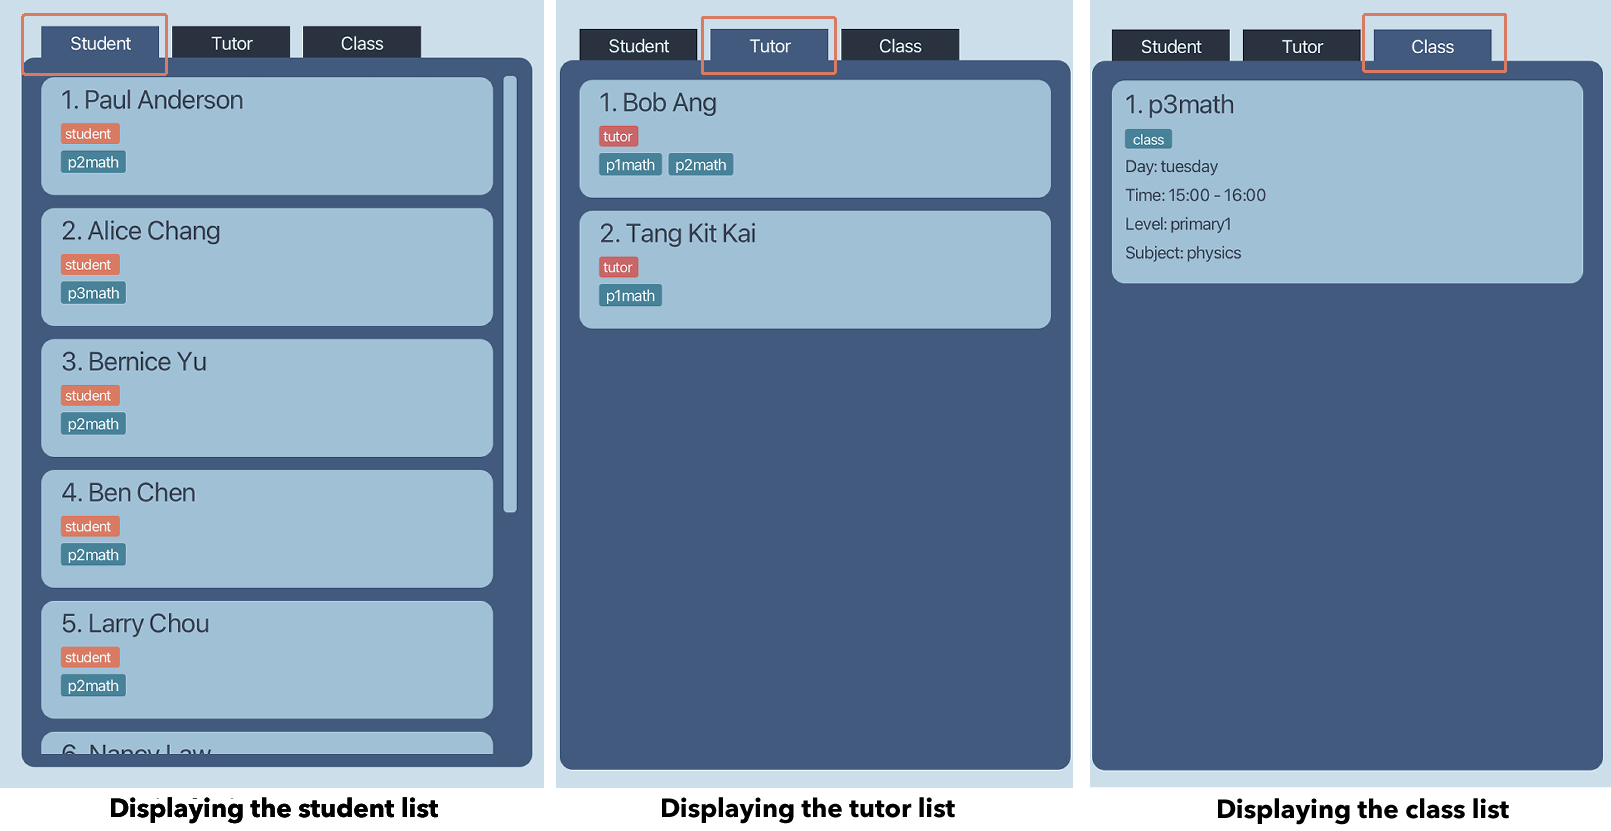
- The list of each entry type can also be displayed by clicking any of the tabs above the displayed list.
Examples:
list tutor
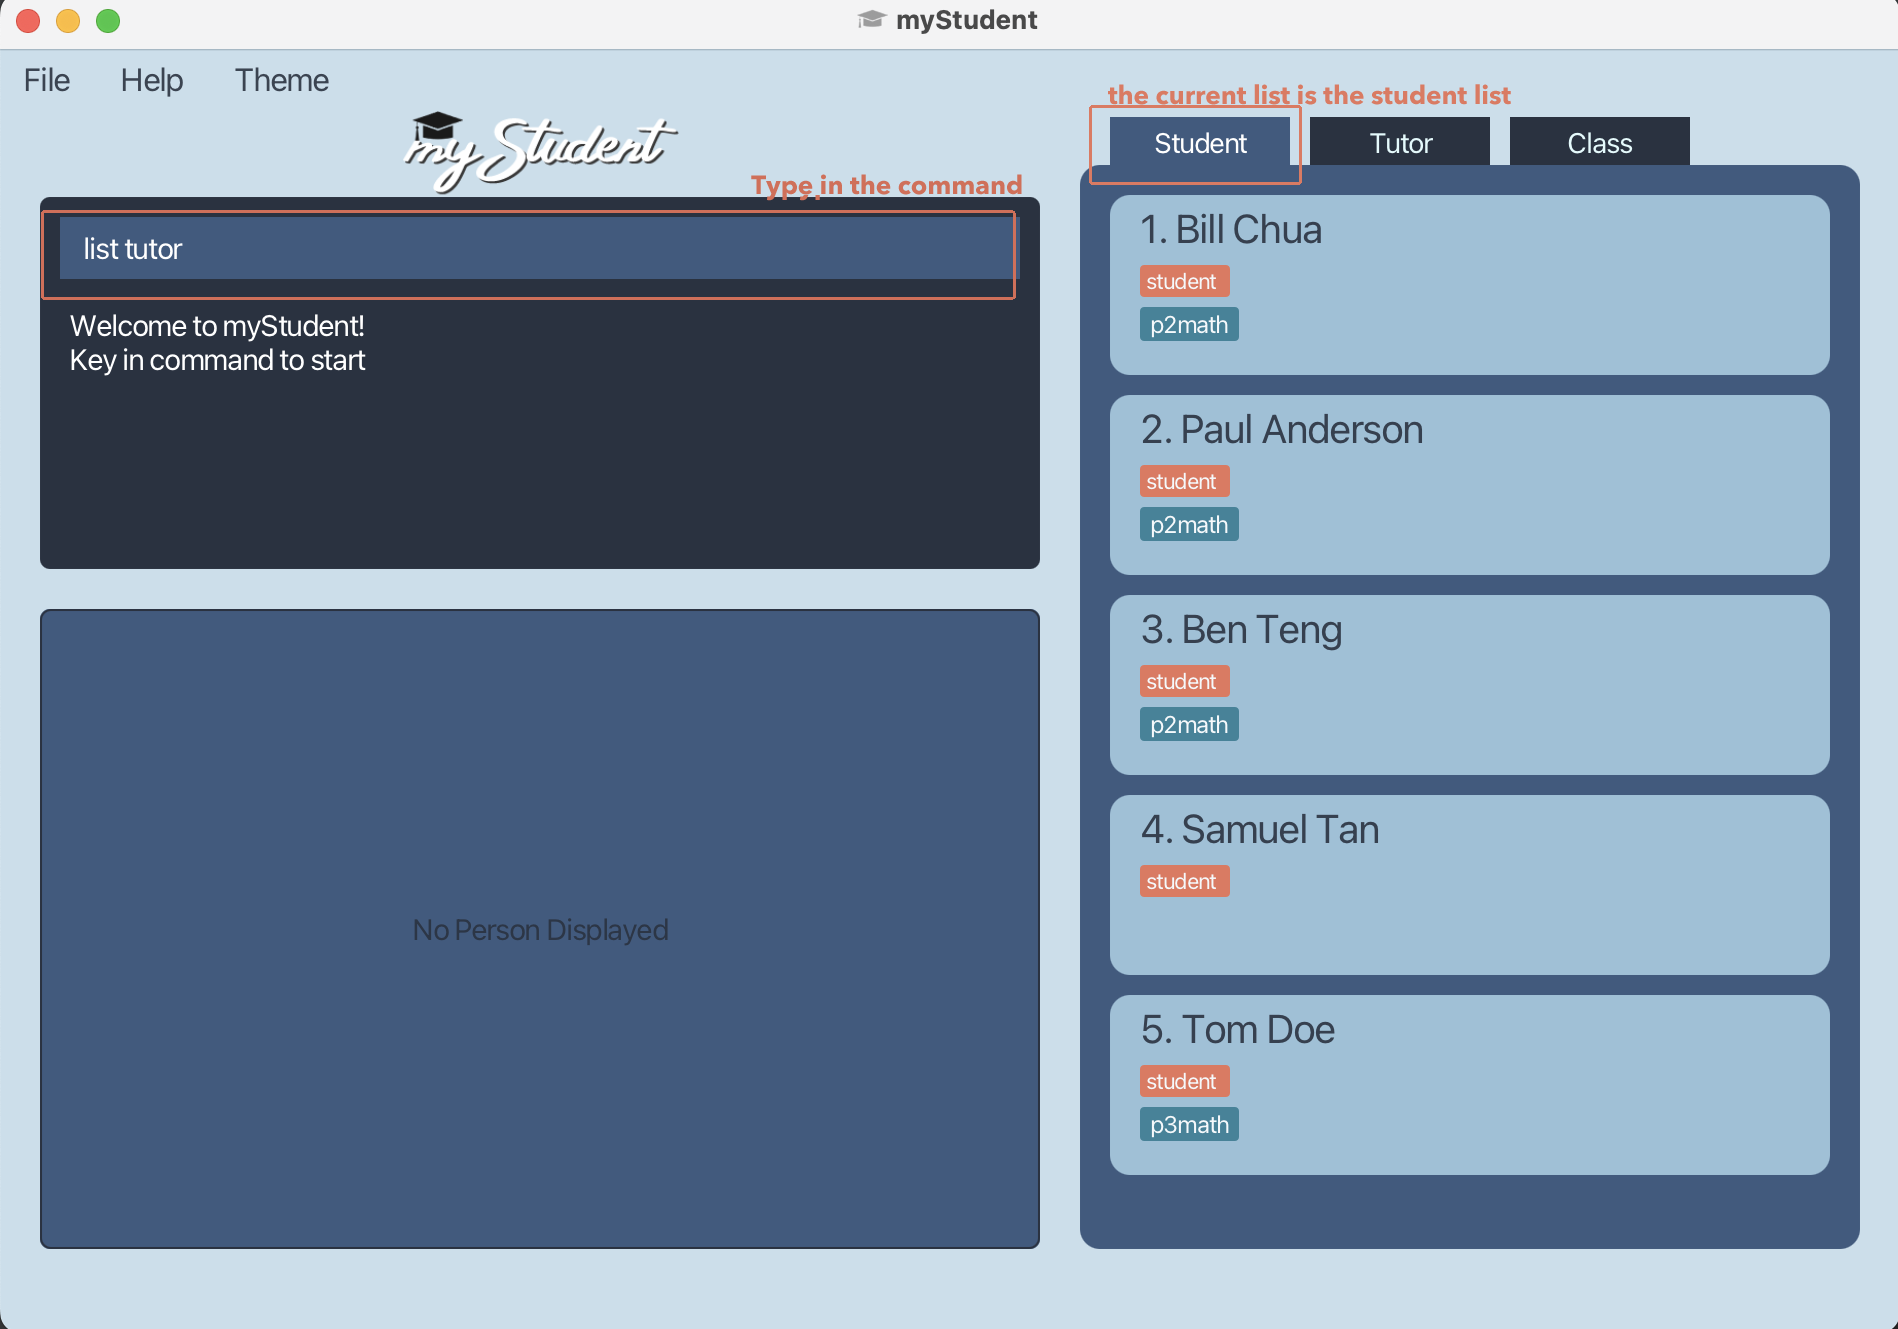
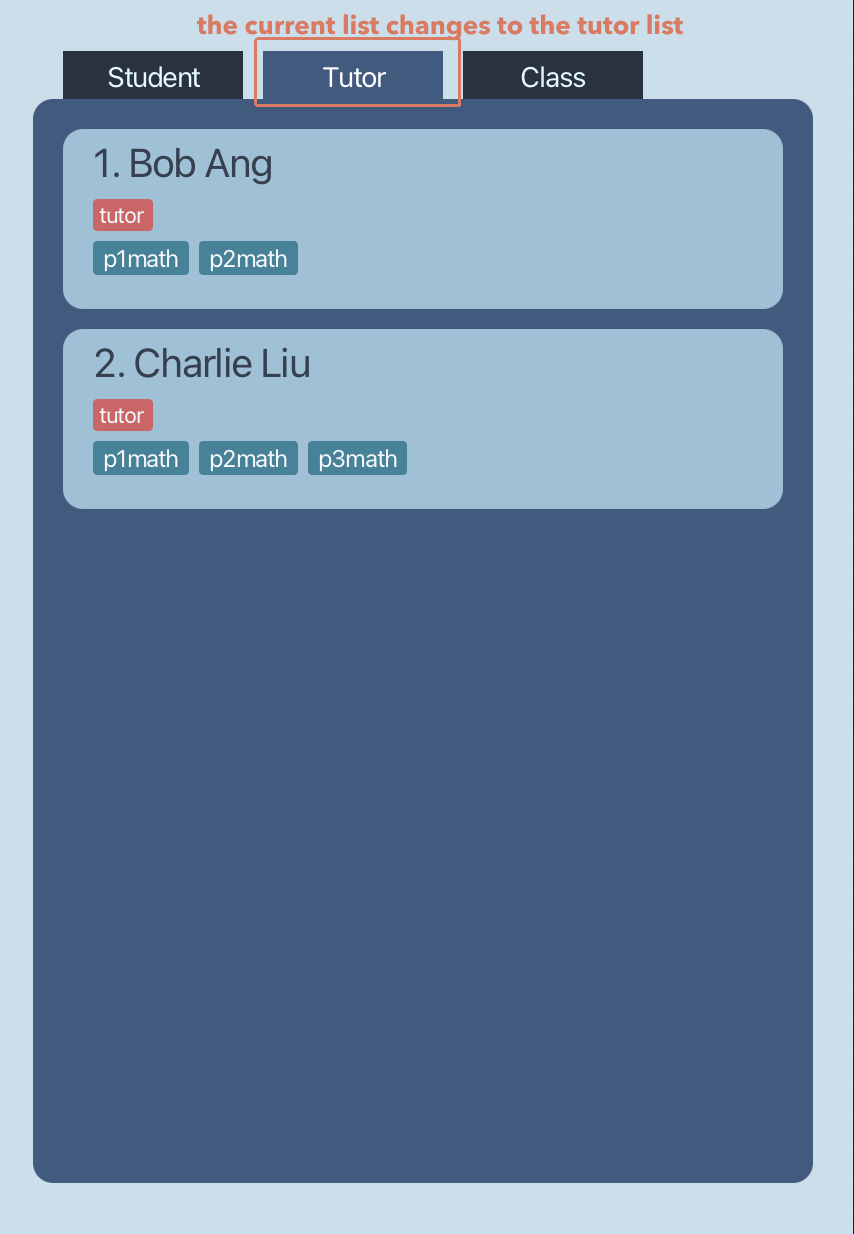
Note that this changes the displayed list to the tutor list.
Clears list: clear
Clears either the student, tutor or class list.
Format: clear
- Please ensure that you are clearing the correct list as this action is irreversible. The current list can be identified by the tabs above the displayed list.
![]()
![]()
Note that the clear command clears the current displayed list only which, in this case, is the tutor list. The student list and the class list will remain unchanged.
Sort list: sort
Sorts the displayed list chronologically, alphabetically, or in reverse order.
Format: sort <order>
-
<order>field should be a valid sort order. The valid orders are as follows:- default: Sorts the displayed list in order of entries updated from oldest to newest. Editing an entry is considered as updating it.
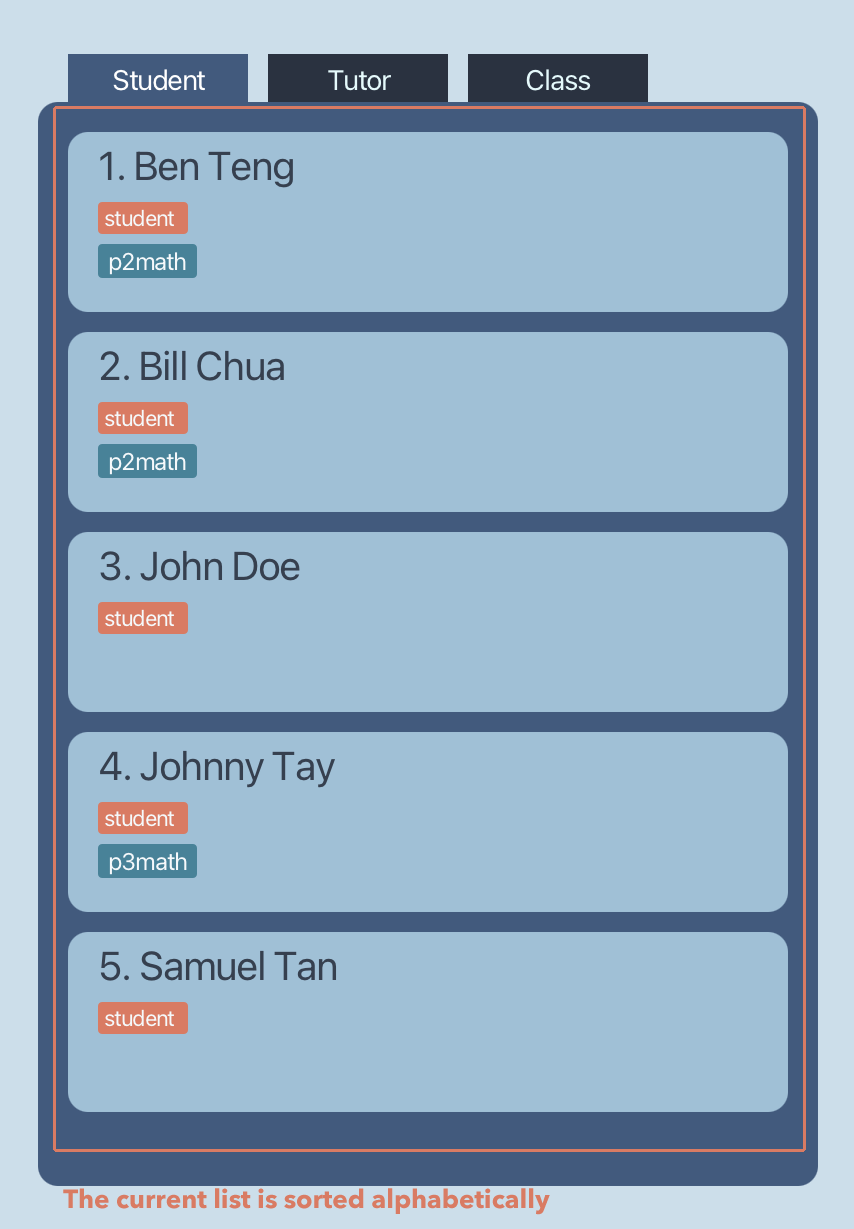
- alpha: Sorts the displayed list alphabetically with reference to the name.
- reverse: Sorts the displayed list in reverse order.
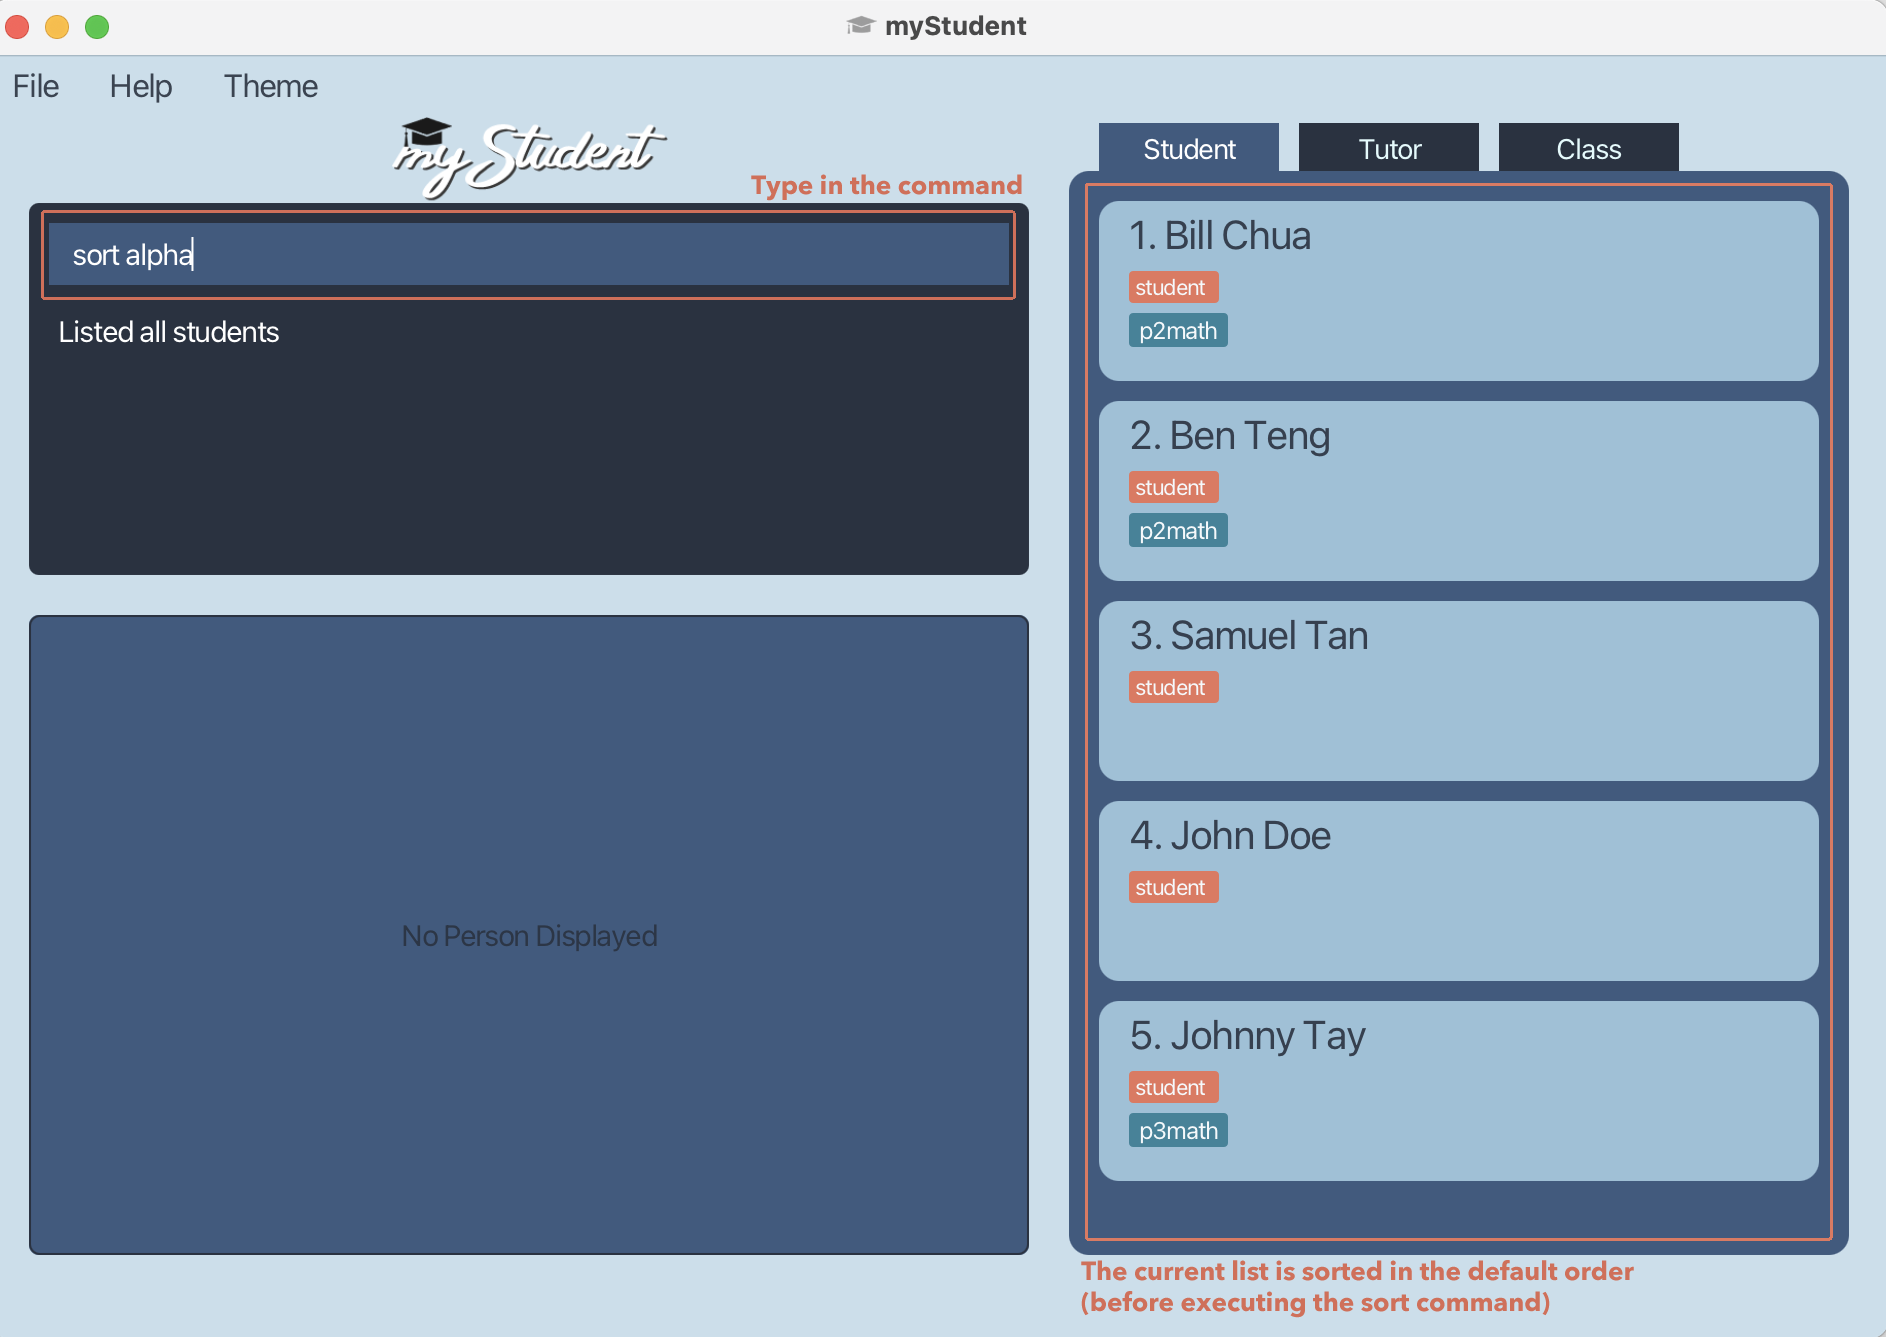
Examples:
sort alpha
Searching by multiple fields: find
Finds entries from the displayed list based on multiple fields where the entries shown have fields that contain the respective keywords.
Format: find PREFIX/KEYWORD [MORE PREFIX/KEYWORD]...
To find a student,
Format: find [n/<name>] [p/<phone>] [e/<email>] [a/<address>] [s/<school>] [l/<level>] [#/<tag>]
To find a tutor,
Format: find [n/<name>] [p/<phone>] [e/<email>] [a/<address>] [q/<qualification>] [i/<institution>] [#/<tag>]
To find a class,
Format: find [n/<name>] [s/<subject>] [l/<level>] [d/day] [t/time] [#/<tag>]
-
All fields are optional, but at least one pair of
PREFIX/KEYWORDmust be specified. -
The input
PREFIXis case-sensitive and must be in lowercase (e.g.,n/hans e/notgmail.com). -
The input
KEYWORDis case-insensitive (e.g.,n/hanswill match a student named “Hans”). -
Partial
KEYWORDSwill be matched (e.g.,n/Hawill match a student named “Hans Jones”). -
The order of the
PREFIX/KEYWORDpair does not matter (e.g.,n/Alice p/12345678vsp/12345678 n/Alice). -
KEYWORDSmust not contain the/character. -
If there are repeated
PREFIXES, only the latest one will be taken. -
The
<time>field should be searched in theHH:MM-HH:MMformat (e.g.,find t/18:00orfind t/09:00-11:00). -
When searching the
<level>field, a space must be included between the level and number if the number is to be specified (e.g.,find l/secondary 1instead offind l/secondary1).
Examples:
-
find n/johnin the student list.
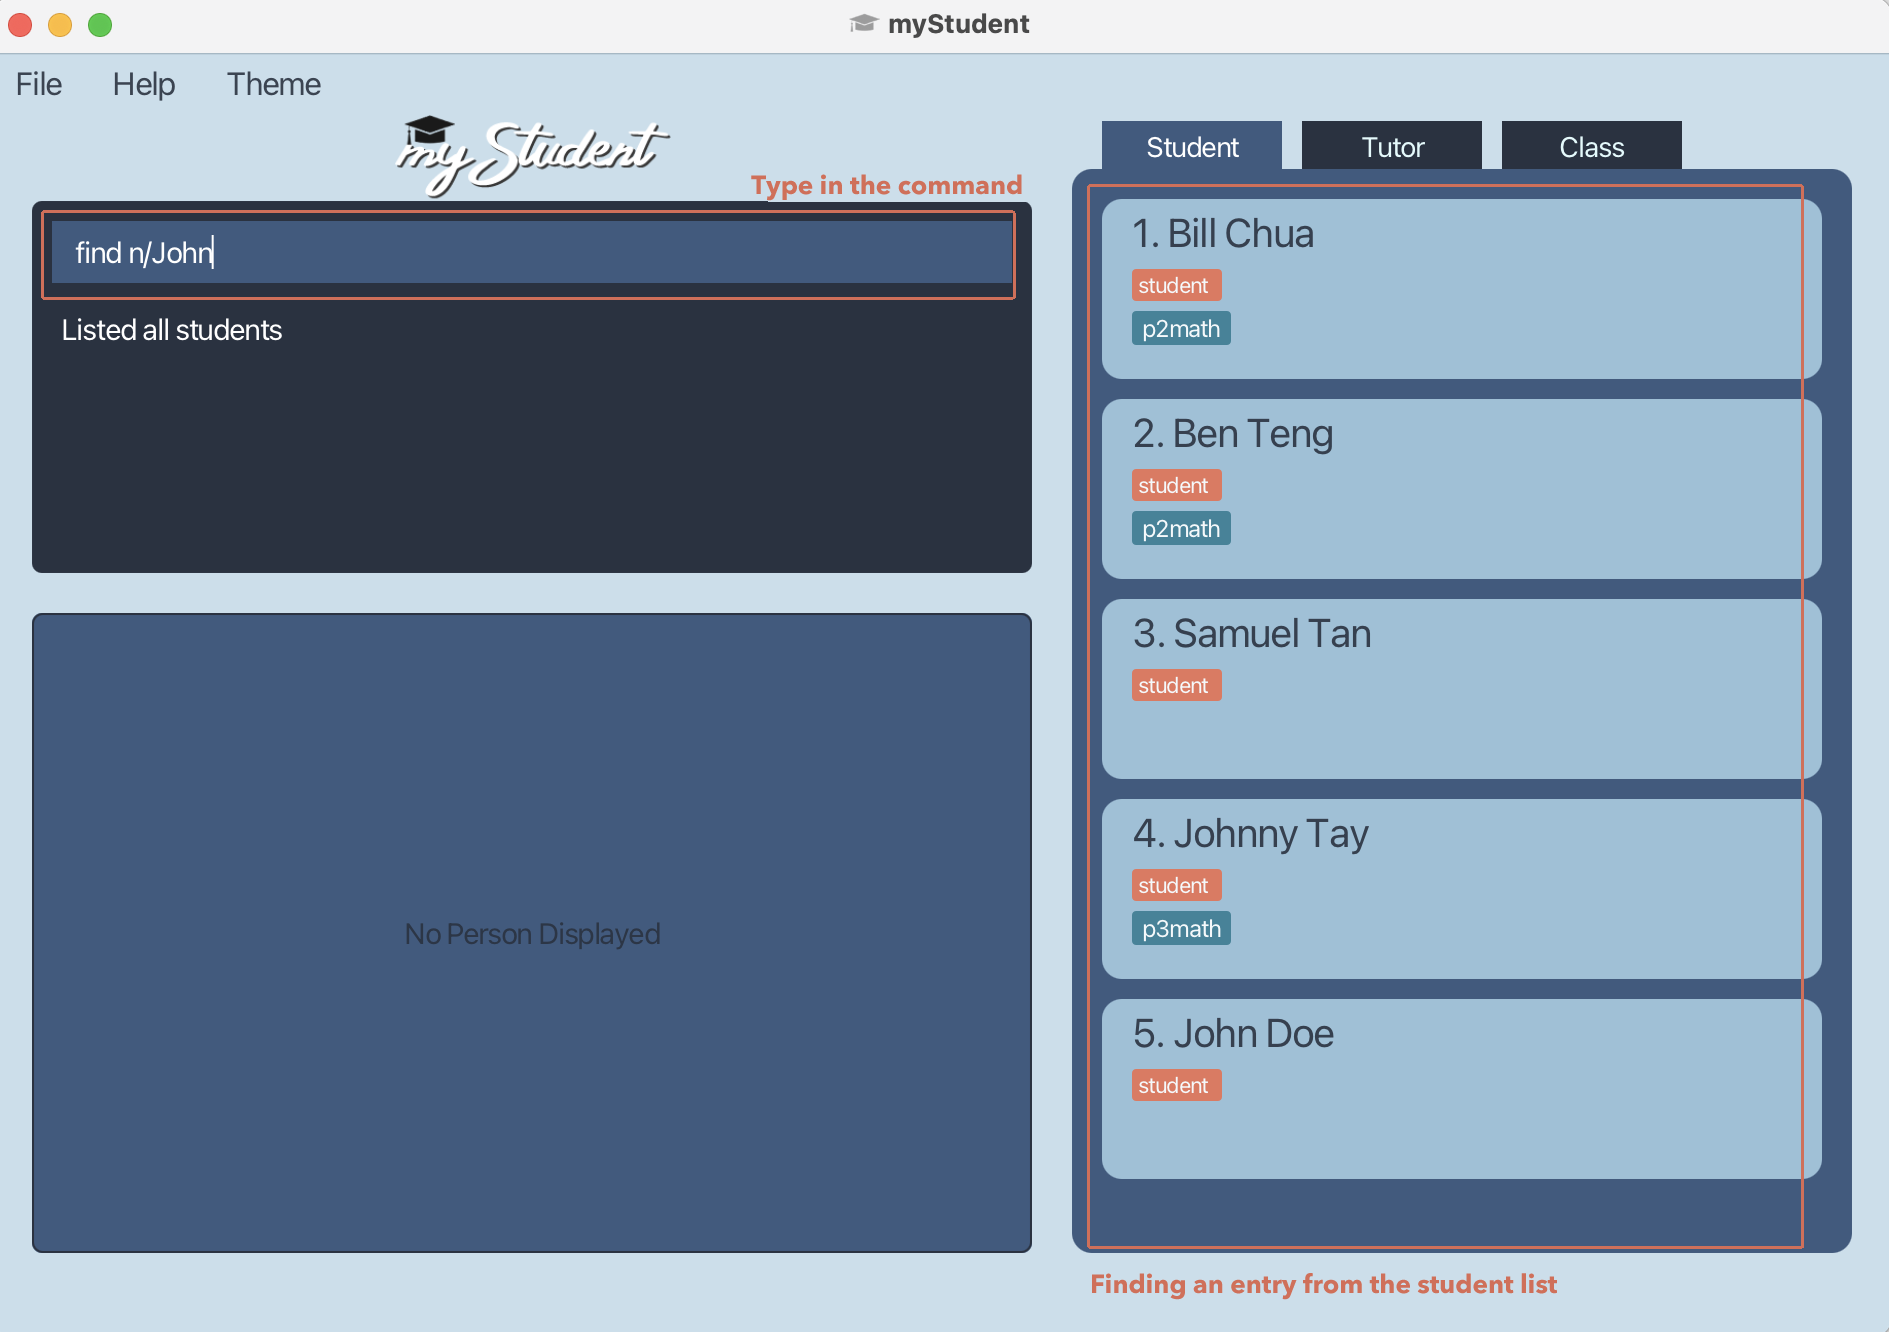
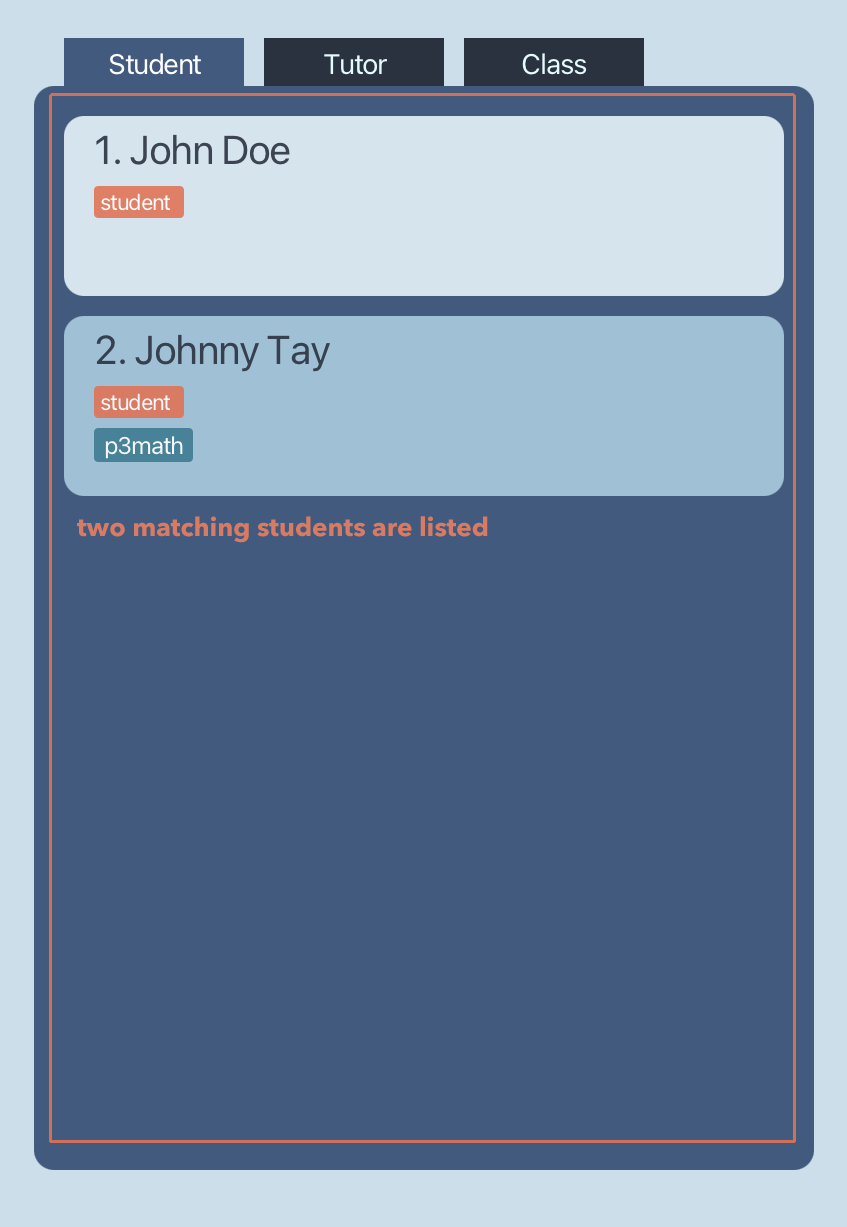
Note that the displayed list is the student list, so find n/john returns the students, John Doe and Johnny Tay in the student list.
-
find i/NUS q/Bachelor of Computingin the tutor list.
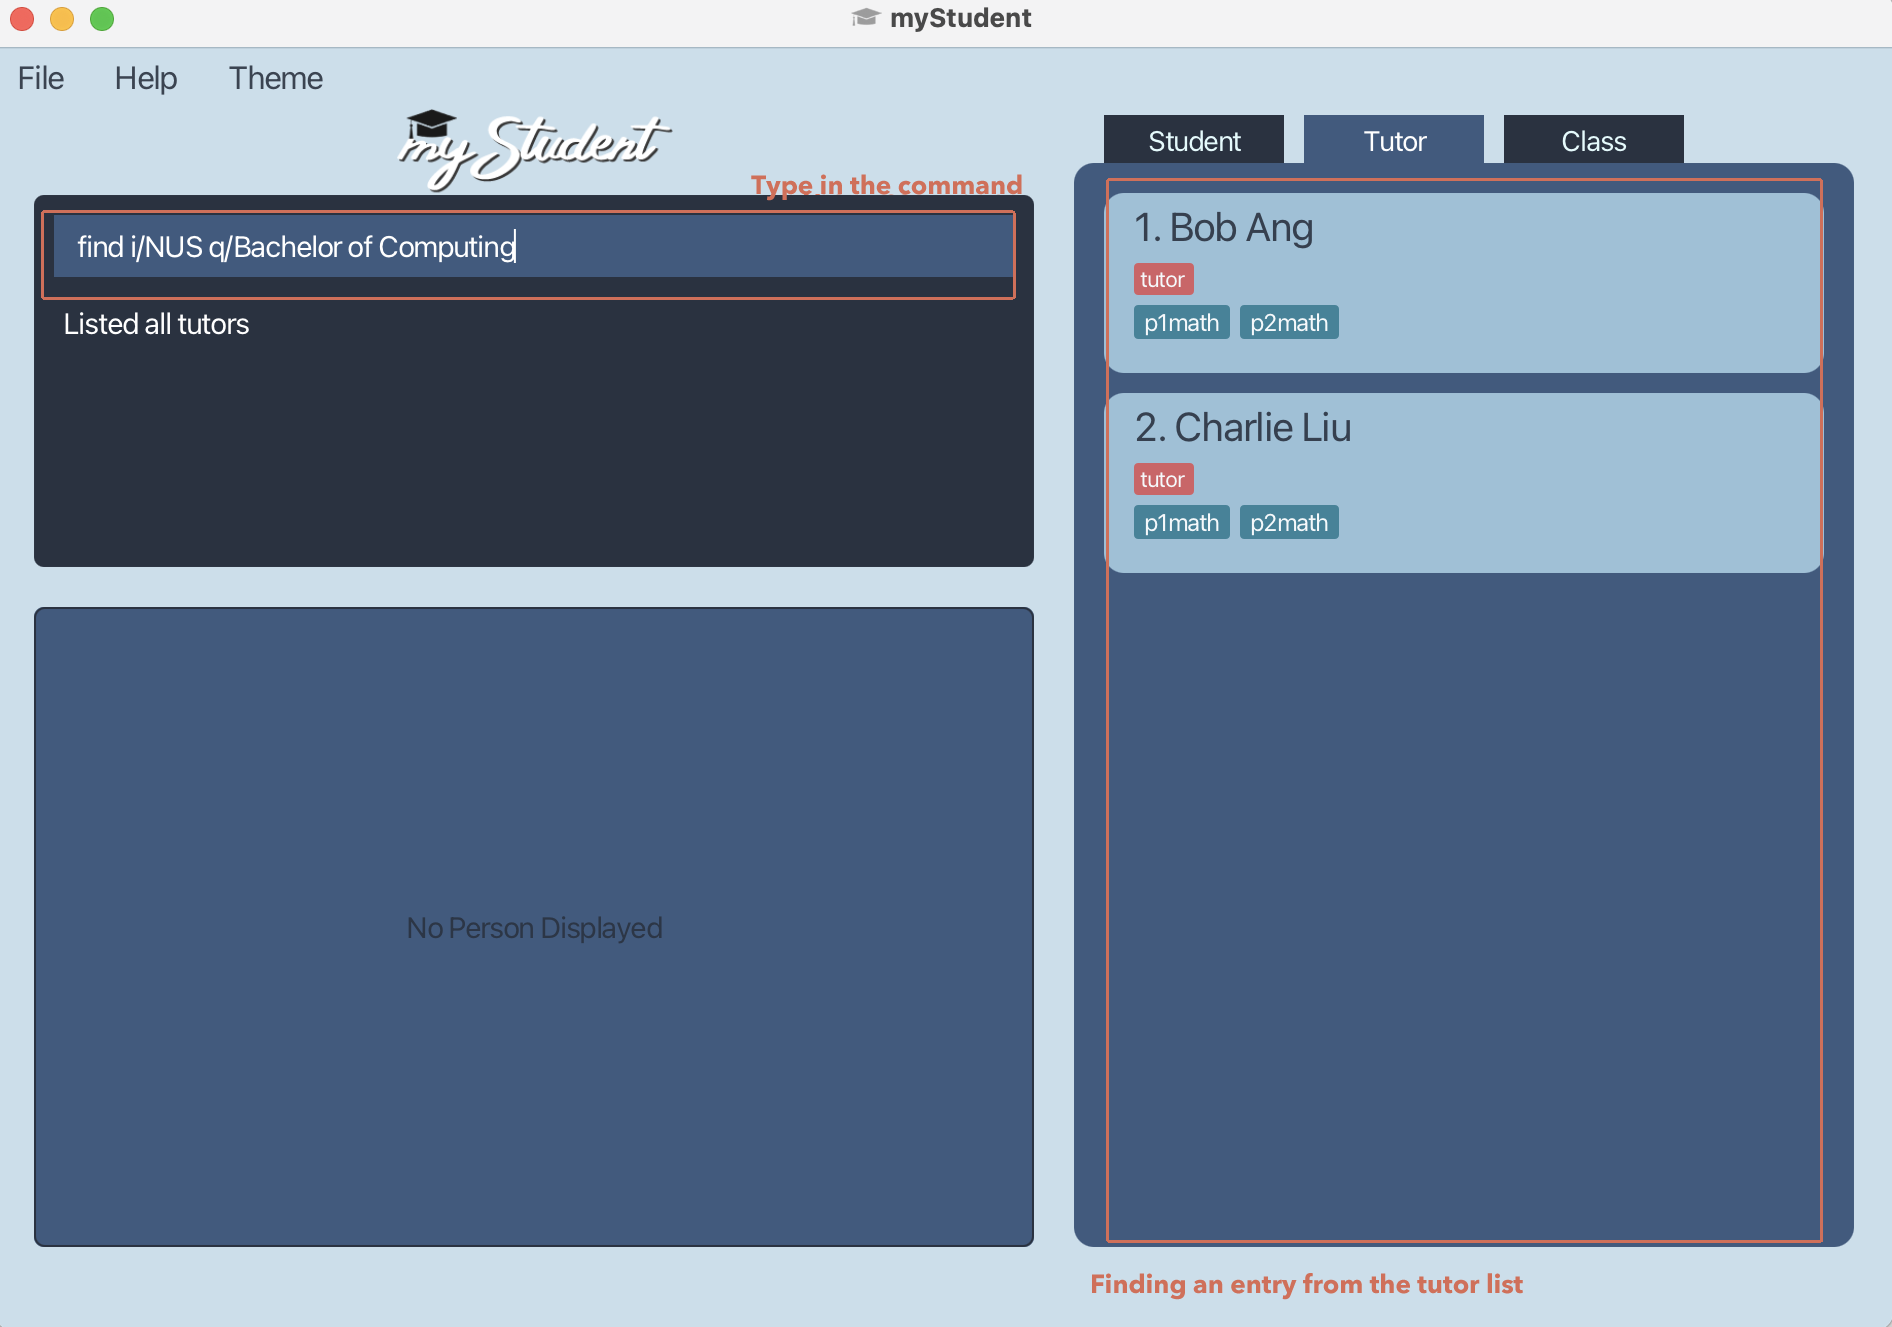
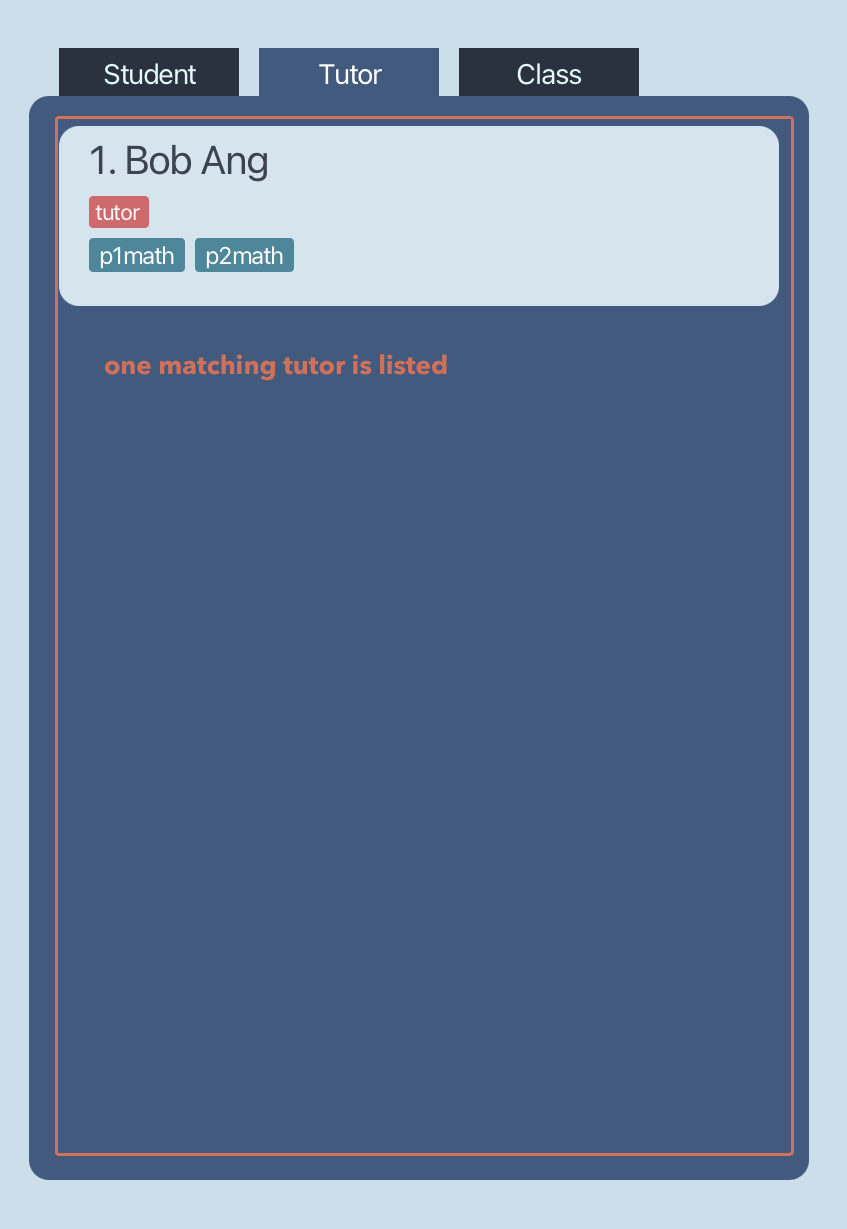
Note that the displayed list is the tutor list, so find i/NUS q/Bachelor of Computing returns the tutors who had graduated from NUS with a Bachelor in Computing qualification.
-
find d/monday #/hardin the class list.
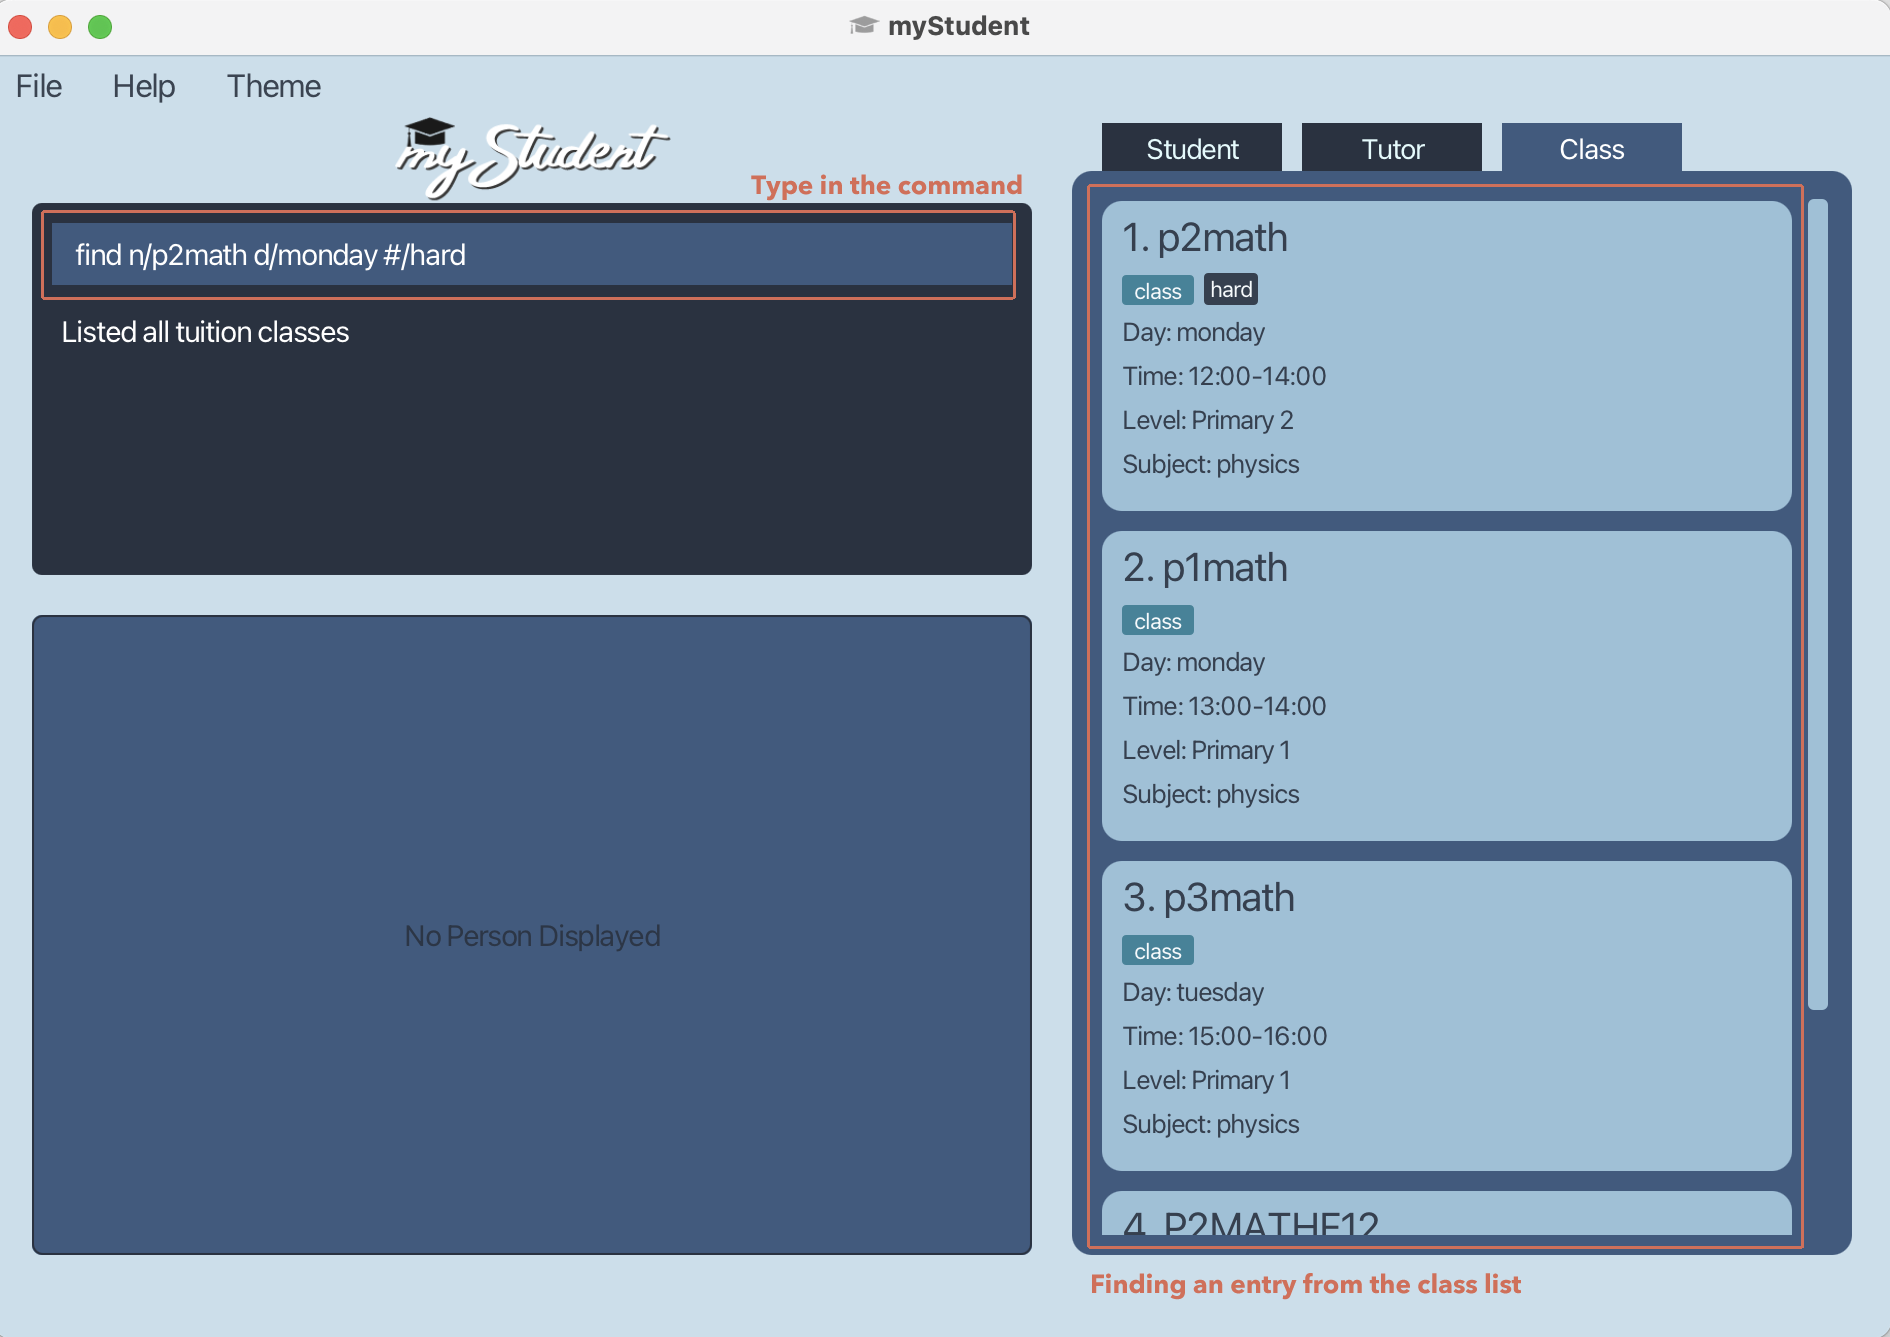
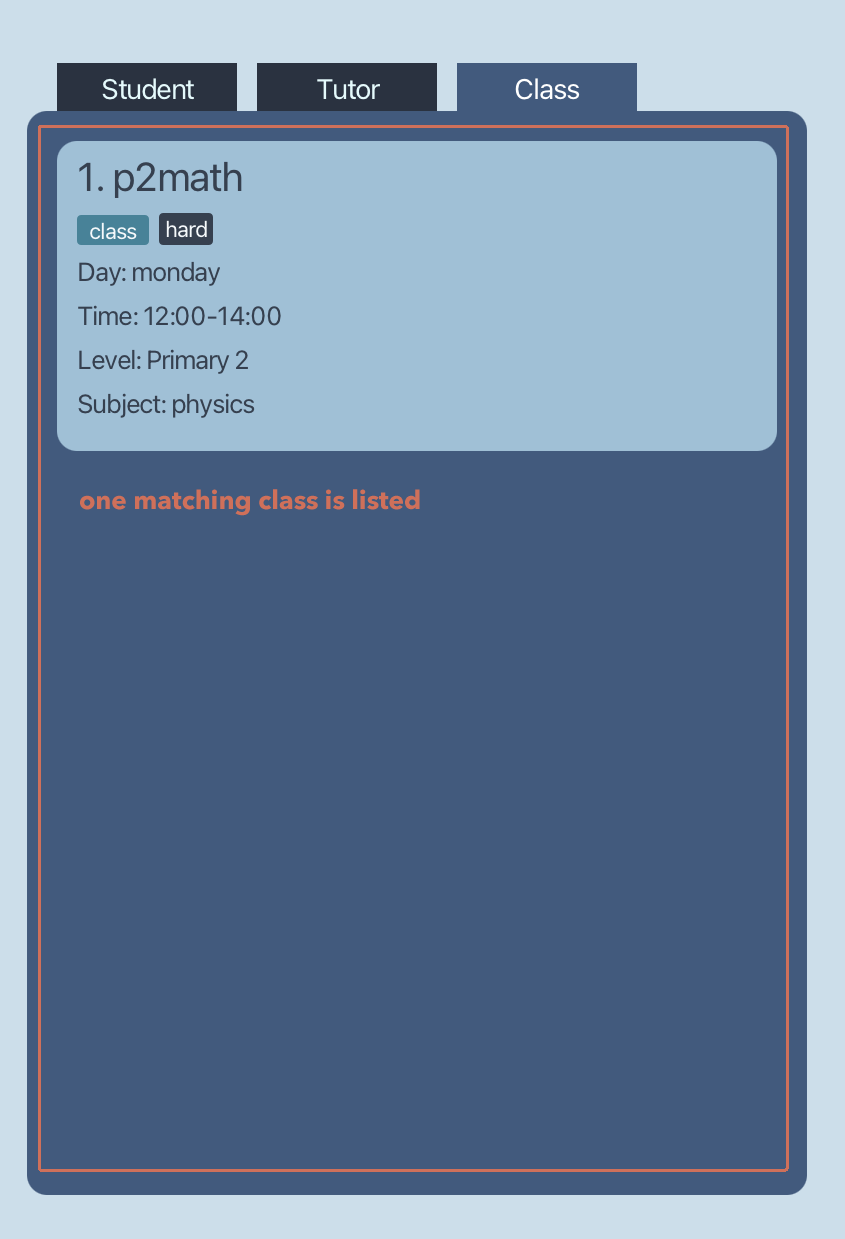
Note that the displayed list is the class list, so find d/monday #/tag returns all classes conducted on Monday and have the tag “hard”.
Advanced
Exporting address books to csv
Export the Student, Tutor, and TuitionClass address books into their own .csv files to be used in other programs.
They are named students.csv, tutors.csv, and tuitionClasses.csv respectively.
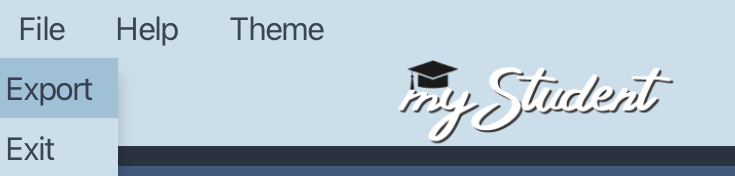
Format: Click on the “File” tab located at the top-left corner of myStudent and click on “Export” in the dropdown menu, as shown in the image above.
-
The csv files will be saved in the same location as the .json files as specified in
preferences.json. You can change the location here, under Configuring the app. -
The default location is in a folder named
datain the home folder where you downloaded themyStudent.jarfile. -
Exporting will replace any .csv files that were exported previously, if they exist.
![]() Warning
Warning
The export function will NOT work if any of the .csv files in the save folder is opened during the exporting.
Please close any .csv files that are currently open before clicking on the “Export” button.
FAQs
Q: Does myStudent need an Internet connection?
A: No, myStudent is an offline software that does not need Internet connection to use.
Q: Can I move myStudent from one computer to another without loss of data?
A: Yes, by copying the home folder containing myStudent.jar to another computer, you could resume your work on another computer without loss of data.
Q: I can export my data to .csv files, but can I import .csv files into myStudent?
A: No, currently the import feature is still a work in progress. Stay tuned for it!
Q: I can’t seem to open myStudent when I tried to double-click it like a normal application. What do I do?
A: You can refer to our troubleshooting guide here.
Q: What if I’m still having trouble using myStudent?
A: You can tell us about the problem you’re having and give more details here. We’ll be glad to help!
Q: Can I request for new features or themes?
A: Of course you can! We’re open to new suggestions. You can leave your suggestions here.
(Do note that implementation of any suggestion will be at our own discretion)
Troubleshooting
- “myStudent.jar” cannot be opened because it is from an unidentified developer.
- Please skip this problem if you are not a Mac user.
- This is a possible warning issued when Mac users are trying to open the software by double-clicking the icon.
- Instead of double-clicking the software icon, you may want to right-click the icon and choose
Open, then clickOpenin the pop-up window. Note that you only need to do this for the first time. For future usage, simply double-click the icon to launch the software.
-
Unable to launch the software.
- Make sure that you have installed
Java 11or above by doing the following checking:
- Make sure that you have installed
-
For Mac Users: Open your terminal and type
java -versionand press enter. Information returned should show the current version of Java installed on your computer. -
For Windows Users: Open the command prompt and type
java -versionand press enter. Information returned should show the current version of Java installed on your computer. -
If you do not have
Java 11or above installed, please it install from here.